Feeds:
Posts
Comments

Archive for the ‘Knitting Tutorials’ Category

In my internet surfing the other night, I watched some videos on how to make an separate I-cord,  and also one on how to apply it to a cast off edge.  Using the method suggested for making the cord by itself seemed rather tedious. So…. I asked myself, why can’t  you “apply” an I-cord to a cast on row only?  Answer, you can.  It makes a rather nice roped cord and you can cast on the number of stitches you need for the length, then simply work across.  Here is a photo of the one I made to replace the drawstring in my Twine Knitted Slippers.

I-cord example

In my case I used a #3 needle, as I did for my slipper.  Cast on the amount of stitches I needed for 24 inches.  I then proceeded as follows:

Cast on 2 sts, [:Knit  2, knit  2 together  through back loop:].  Slip three stitches back onto left needle, and repeat the process in the brackets [   ].  I DID NOT pull the yarn hard across the back as some instructions suggest, I simply  used the same tension as in my normal knitting.  It worked just fine and ended up very close to the exact measurement I wanted.  The example in the photo was done with Sports weight yarn.

As you can see in the photo below, the slipper on the right has the new cord.  It does not curl up like the crocheted chain, making a much neater looking finish.

I-cord example 2

Give it a try!

Happy Knitting!

KT

Read Full Post »

The other day, as I was working on some baby socks for our new grand daughter due on Valentine’s Day, I caught myself pulling the cord of my circle needle around the corner as I started the transition to the back needle tip, of my Magic loop.  I do this to prevent ladders, where the cords of my 47 inch circle needle form loops on each side.  The trick is to pull your cord through long enough so that you can bring it to the left under the left needle tip, then swing it down and around and up over the top to start the first purl stitch of the last section of the round.  That is why I always opt for the 47 inch cord.

cricle needle tip 1-preventing ladders

Here you see cord being pulled to the left and under the needle.  This move takes the stress off the gap between the left needle tip and the cord.

circle needle tip 2 -preventing ladders

The right tip of the needle is then brought around and over the top, then inserted under the yarn in preparation to be purled.

circle needle tip 3  -preventing ladders

Once the stitch is purled, I make sure to release it, allowing the right hand needle to lie parallel to the stitches riding on the cord to the right.  If need be, I take up any slack.

magic loop tip 1

In the above photo, you can observe how I accomplish this on the knit side.  Here again, I swing my cord around to the left and secure it with my thumb before knitting the next stitch.

magic loop tip  2

Once the new stitch is complete I allow the right needle to lie parallel to the cord, then take up any slack that remains before proceeding to the next stitch.

In both cases I  continue holding the cord around the corner for a few more stitches before releasing it to finish my round.

Just passing it on!!

KT

Read Full Post »

The other day I was working on an idea for a new Mocassin slipper.  After turning over the one I was wearing, I decided to try and duplicate the shape of the sole.  How?  With short rows.

Dividing the sole shape lengthwise, I charted the short rows to achieve the upper half which ends at the toe edge.  Next, I flipped my chart and designed the other half, ending the final row at the back of the heel.  If you will notice there is a blue line of loops down the center;  that is the provisional cast on row.  Once the first half is finished, the provisional chain is released and the stitches are picked up to complete the second half.  Below is the result of my playing around.

If it looks a bit textured, it is.  The entire project is Twine Knitted.   The wonderful double layer will keep my feet warm and toasty.  🙂

The finishing round of this part of the slipper was a purl row, as it made a clean transition before starting the short row shaping for the sides.

After working about 5 even rounds, I marked off the front tow section and began to shape the back part of the slipper sides with short rows.  Once the short rows were complete, I closed the gaps, continued around to the toe section and ,decreased stitches at the front to create a much nicer fit.  The next section will be the top of the toe and a flap that lays up on to the instep.  I am thinking about doing a Fair Isle design for that.      Humm????????

It was during the process of creating the flap for my toe section that I decided to share the process I used .

This double layered(or lined) flap is knitted with straight sides, and single and double stitch portions to form the shape.

I have completed a tutorial with written instructions as well as a chart.  The idea is to get you imaginations going.  Short rows are not limited to sock heels, shoulder seams, and sleeve cap shaping.  This tutorial is a swatch practice that I hope will help you feel more comfortable with closing all sorts of short row gaps.

Below is a result of repeating the chart three times on the same original cast on.

I feel a hand puppet coming on!!!!!!

Short Row Closure Practice Tutorial

PS:  I will be uploading the slipper pattern when its finished.

This morning I added a PDF that might help you understand the way I design these short rows-at least I hope it does.

Short Row Designing

Happy Knitting

KT

Read Full Post »

Since I learned how to make the short row heel, with all its variations, I have been fascinated with the concept.  It is not at all unusual for someone to find me casting on a number of stitches on to a DPN, to try out a new idea on how to use them.  Recently I have been charting my short row shapes, which  gives me a clearer picture of the end product, and the opportunity to change the stitch groupings as needed to get the desired affect I want.

For example –

Even though the chart clip is small, viewing it from the bottom up, you can see the angle of each side.  This chart leaves a  pair of stitches on the needle with each turn.  Rows 7 and 8, close the gaps and complete the shape.

In this chart, groupings of three stitches are left on each end before the turn, thus changing the angle of ascent.

In the chart above, I have combined groups of 2,3 and 4 stitches to create a more rounded shape.  Here, rows 9-10 close the gaps and complete the shapes.  The possibilities are endless.

How do I close my gaps?  I pick up the stitch that looks like a “collar” around the slipped stitch of the previous row, place it on the left needle, and knit or purl it together with the slipped stitch.

What does that look like?

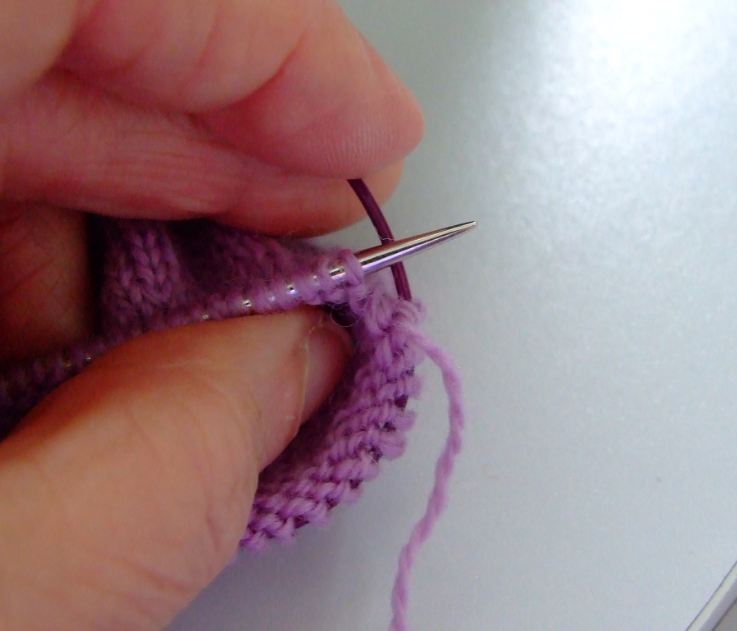
Above, is an illustration of how it looks after you turn, slip one stitch and knit the next.  I have highlighted the “collar” in pink.   You will notice that is actually is the stitch below the slipped stitch that forms this “collar.”  You will also notice that it leans slightly toward the left, as it is being pulled over with the slipped stitch.

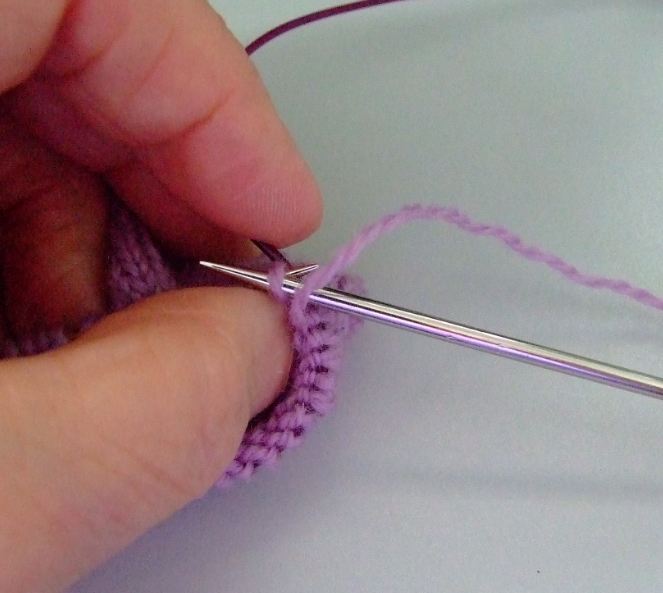
This illustration shows you the slipped stitch turn on the purl side.  Here again, the stitch(collar) leans to the left a bit.

What do I do with the “collars?”

I haven’t made a video of this yet, but Cat Bourdhi has, in her Sweet Tomato heel demo on YouTube.  But that aside, I have drawn some illustrations to make my point.

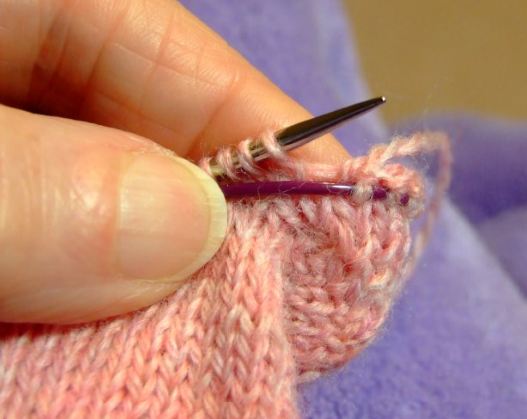
When you have a “collar” (pink) around the stitch just before the gap as in the illustration above, you lift the “collar” (pink) up and onto the left needle, then knit it together with the slipped stitch.

This process closes the gap.  From here you can knit the next stitch or stitches of the next grouping until you come to the next “stitch collar.”  This works the same on the purl side as well.  You will find it is a very smooth transition.  Another advantage of experimenting with the various stitch groupings is that you can shape your toe caps (see my More Toes Tutorial) as desired.   You can combine the various groupings with the single stitch turns normally used in the short row heel ( a 90 degree turn) to finish the cap before picking up your stitches off the provisional cast on to start knitting in the round.  For those of you who already use my method of short row heel, you will recognize this as the SPR.  The only difference is that you are lifting the loop and knitting or purling it with the loop to its immediate left (the slipped st).

I will soon be posting the complete tutorial as a PDF.  So check back soon.  In the meantime, try some different shapes of your own.  Also don’t forget to check out the “Sweet Tomato Heel” tutorial on  YouTube.

Now that I have completely confused you , I bid you happy knitting!

KT

Read Full Post »

I just finished a pair of socks for my husband.  He claims they are the best he ever had, and the first ones that he didn’t have to pull up after he wore them a while.  Wow, that is an accomplishment!  With that endorsement, I thought I would share my design with you.

First off, credit where credit is due.  I recently visited Cat Boudhi’s Sweet Tomato heel demo,  and… as always I can’t leave anything alone but had to see what variations I could do with the presentation.  As  result of my dink’n around, I came up with this variation on her heel design.


In her video, she works all her short rows in pairs of stitches, and in the first two wedges I did as well.  However, I began the second wedge several stitches to the left of the first, to spread out the stress.  The third wedge began to the left of the 2nd as well, but this time I use intervals of 3 stitch groups for half the wedge and finished up with 4 stitch groups (this flattens out the curve).   Varying stitch groups allowed me to shape the wedge to fit my husbands foot better.  Play around with this and you will see what I mean.  I also shaped my Twine Knitted toe cap with the same process.

As you can see I opted for a 2 by 2 rib to finish it off.  It worked very nicely.

Below is a PDF of the entire process.   If you have any questions, you know how to reach me.

Chuck’s Sock

Happy Knitting

KT

Read Full Post »

This project has been particularly interesting, as I not only had fun knitting Intarsia , Armenian knitting and Fair Isle, but I also was able to combine three different types of yarns in this design.  The border was done in fingering yarn with lace weight wool and silk strands of  free floating chains riding over the top.

The chicks were especially fun to do with a combination of Aloft mohair, added to a ply of fingering yarn.  Their  3D look was accomplished by adding an additional  two strands of the black mohair to the belly and wing area.  Adding these extra strands automatically increased the gauge without changing the stitch count.  I was able to restore the  gauge around the area by filling the void with poly fill stuffing, then running a few strands of lace weight across the back, side to side, and top to bottom.   Taking up the slack with these strands, allowed me to contract the surrounding stitches back to their proper gauge.  The next move after blocking the top was covering the back with nylon net, (great stuff, by the way) and stitching around the expanded portion of the chicks,so that it would remain securely in place.

The  combination of the Mohair and the 3 D affect  made my chicks look like the little “fuzz balls” they really are.     They are the first thing people touch when they pick up the pillow and comment, ” Oh my gosh!  They look so real!”  And so they do.

The details on the legs, feet, and beak were done with duplicate stitches and crocheted chains of one and two plies of the various yarns.   The various shades on the hen are yarns that have been blended, using  of one ply of each color that have been hand spun back together.   Check out my post on blending yarns if you are interested .

So….the most clarifying  statement I can make about this pillow is that I was never bored knitting it.  It definitely was a challenge to my adventurous knitting spirit.

I also loved working with the free floating chains on the frame of the picture.  Of course as I looked at it more closely I realized this free floating chain pattern would look great on the bottom of a tunic, or the cuff area of a sleeve, or……..  Hummm????  Maybe?   …….

I have included a  tutorial describing the entire process with this  pattern.  I even included charts for practicing the process.  This tutorial is also on my “Fun Stuff”page.  It includes a sample swatch chart of the border for you to practice with.  Enjoy!

At present the pattern is available  in my Ravelry  and Etsy stores.

Again, it was an extremely fun knit.

Happy Knitting

KT

Read Full Post »

This morning I finally took the plunge and uploaded my first video on YouTube.  What did I upload, “Knitting backwards/ or Reverse continental.   In reading  my stats daily, I have noticed that this seems to be one of my most popular pages, so there was no better place to start.

Here is the link- “Knitting Backwards/ or Reverse Continental”

Enjoy – KT

Read Full Post »

During the process of knitting up my Sebright Hen and Chicks pillow, I have come up with some things that have made the project much easier.   The first thing is my “Knitting Palette.”  It is a 30 stitch sample of the yarns, and blends of yarn that I have chosen to use in the pattern.  By first experimenting with the colors, I was able to begin knitting on the picture, confident that the colors I chose would work.   Below is a photo of the sample that I uploaded to my Serif publishing program.  Once in Serif, I was able to label the colors and save the sample for future reference.


I have boxed the various shades with colored borders and written a description on the right.  The bottom section is a mix of Mohair lace weight and fingering yarn.  This blend of the two types of yarn added a bit of reality to my little “fuzz ball” chicks.  It worked great.   I even varied the amount of strands to see what it would do.


By adding an extra strand of the Mohair lace weight I was able to create a “relief sculpture” affect to the wing and belly area.   This expanded area is retracted to its proper gauge, by creating a yarn web across the back which is stuffed with a bit pf Polyfill.

And yes,  that’s” Scratch” on the ground, created by making small bobbles of blended yarn.  I got a kick out of making those.  Sorry for the side track – now back to the Yarn Palette.

The top half is the shades of color I chose  for my Sebright hen.  I began with Suede alone, knitted 4 rows.  Next, I blended one ply of Suede with one ply of Brass Heather.  That gave me a slightly darker golden tone.  The next 4 rows were done with Brass Heather alone.   In the blue section I blended Brass Heather and Doe, but this combo didn’t lead to much of a change. (scratch that one).  The next combo gave me a darker shade- yes, Brass Heather and Bison will do it.  All this prep took time, but I didn’t need to guess how it would look .  I worked for me!  by the way, the colors mentioned above are all from Knitpicks.com.

The next aid that really helped me was my MUSIC STAND.  Yep!  There it was, sitting there next to my harp doing nothing (I play mostly from memory anyway) and the light went on in my head, “Wait, you can use that to put your chart on.”  And so I did.  Now it is not sliding off my lap so I have to chase it all over the floor.

Little things mean a lot!!!!!

Just thought I’d share.

Happy Knitting

KT


Read Full Post »

I have a friend who is wild, and I mean “wild” about her chickens.  Having decided some time ago to design her a special pillow, I finally came to the conclusion that only a “chicken” would do.  Now, she isn’t into the average chickens, she prefers the exotic, and unusual, so enter the Golden Sebright Hen and Chicks.

This new design not only gives me a chance to do the many techniques of color knitting, but also gives me an opportunity to use various kinds of yarns for special affects.  The chicks are really little fuzz balls, so Mohair will give them a more realistic look.  The spotted area you see in the design is actually going to be a blend of black Mohair and one ply of beige grey fingering yarn.  I will also be using White Mohair on the chests.

The border was another matter altogether.  I wanted a lacy grid in the design you see, but cabling the black fingering yarn over the bronze, was much to bulky looking.  What to do?  I began to think “lace.”    I pulled out my lace silk and wool cone, and went to work, using white in the background, I worked “floating” chain loops between the stitches to form the design I drew on the pattern.  Here is the result.

This gave me the affect I wanted.  So I am now waiting for the Black lace yarn to be delivered, so I can get started.  Meanwhile, I will be knitting up swatches of the various shades and combination shades that I will be using in the main design, and recording them in my color chart for later use.

If you might be interested in learning how to knit these free floating chains, take a look at the “Wandering Chains” tutorial on my “Fun Stuff” page, or you can use this Floating chains tutorial.  I will be add to the info as I work on this project and develop the pattern for sale.

Just thought I would share –

Knit-tweaker

Read Full Post »

I was so glad to get this one done so I could send it to my grandson.  He has been checking on it’s progress the last few months, so now he won’t have to wait anymore.

I had great fun knitting this one.  I even knitted some extra leaves, which I placed in the front of the duck, stuffing them a bit to give it a 3 dimensional look.

One other thing I did differently from the last pillow was to make my own pillow form.  I discovered that most of the forms  (no matter what you pay for them) are made with clumps of fiber fill, often leaving a lumpy surface.  Of course, that is unacceptable when you have spent many hours working on one of these pillow tops.  The only solution-make it yourself.

I began the process with a sheet of Poly-fill quilt batting.   I cut two 17 inch squares, then machine sewed them together on three sides, using a long stitch.   I stuffed the middle with tiny pieces of fill, poked them in place with a #1 DPN, then whipped the open edge shut.  You could even use two thickness (sheets) for each side to unsure an even smoother surface.   Anyway, it  worked great.  It will also dry much faster as there is no cloth on the inside.

I will be making all my pillow forms from now on.

Now it’s time to box it up and head to the UPS store.  My grandson will be a happy camper!

I hope to have this pillow pattern available soon.  I will be starting my J’s Designer Pillow page soon.

KT

Read Full Post »

« Newer Posts - Older Posts »