Feeds:
Posts
Comments

Posts Tagged ‘toe-up sock’

2016-02-14 11.00.48Yes, I know this isn’t knitting, but…………. it did start with my knitted purses.  I fell in love with the beads. Who knew????

Because these beaded purses were made for gifts, I wanted to create a pair of earrings to make the picture complete- that’s when I discovered needle tatting.  I am sure that some of you who visit my site have also done some of the other crafts too, so as you know one thing leads to another.

The photo above is my latest design, and it will be going to my grand-daughter for her birthday.  I call it “Midnight Sky.”

I have written up the pdf pattern for any of you who are interested.  feel free to upload it to your PC.

Midnight Sky Tatted Necklace and Earring set

As for knitting, I am at present working on tabi boot socks for my brother.  I have both socks on two needles.waynes socks on two needles
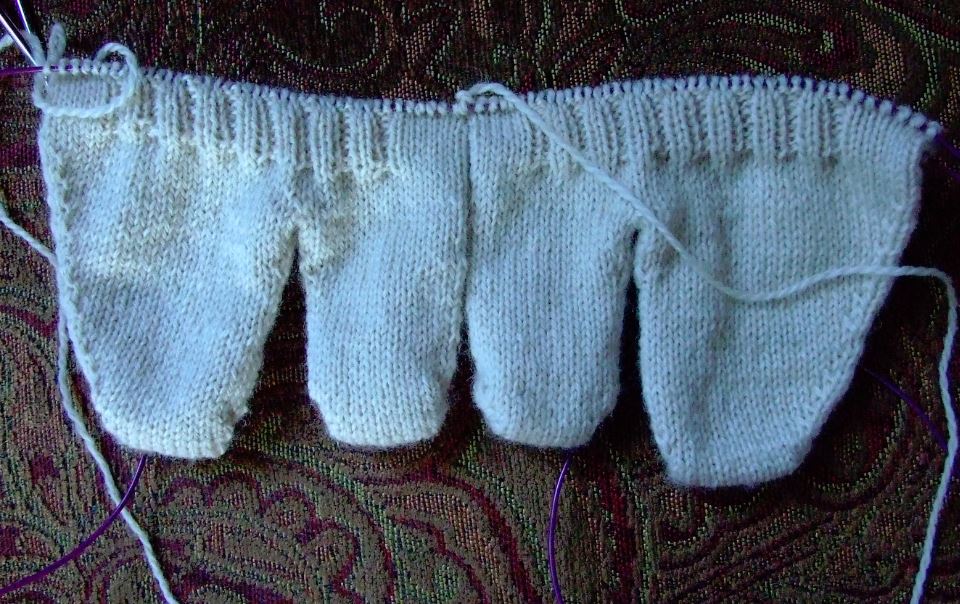
I will be ribbing up the center through the ankle for a better fit, as he has a wide foot with a narrow heel and ankle.

Once I have the heel and ankle sections complete I will be working an Intarsia pattern in the round, using the back center motif as the turn.  He requested a rattle snakeskin design, so I have it charted and ready to go.  I will update you on the pattern when they are completed.  As for now they are a work in progress.  The chart for the leg section only I have inserted below.  This chart makes the top colorful side of the skin to ride on the side of the leg, and the inside has the belly colors.  It should be interesting.

He is a hiker, so he plans on showing off for the snakes. 🙂

Sounds “nuts” to me!

rattle snake skin sock

Just had to share- KT

Read Full Post »

While completing the heel section of my husband’s new pair of boot socks, I played around with different needle arrangements that would take the strain off the short row closures.  What I settled on was the following method.

First the set-up.

I use one 47 inch circle needle to make all my socks.  I always label the top of the sock as riding on NA( needle A), and the heel or bottom of my sock, as NB(needle B).

When I am ready to make the heel, I now pull out a loop of my needle cord in the center of the top of my sock(section A).  I do the same for the heel section B.

repositioning needles

You can see the arrangement above.  As I was working a wedge heel,(or Sweet Tomato heel) I marked the beginning of my short row turns with a marker.  In the picture above I have completed one wedge and it is hardly visible.

This arrangement of needles definitely takes the strain off of the yarn bars between the short rows turns, and makes the closing round much easier to accomplish.

Just thought I would pass along this tip!

Happy knitting!

KT

PS- I have added recipes to my low carb e-book.  Check it out.

Read Full Post »

Well, the socks for Rebecca actually fit-not for long though.  This tiny little 6+pound, 4 day old munchkin modeled grandma’s socks for the first time today.rebecca's socks 3

Good thing I didn’t make them any smaller.

rebecca's socks 1

Just had to share!

Happy Knitting!

KT

Read Full Post »

I just finished knitting a pair of infant socks for our expected arrival in about 2 weeks.  Since my daughter’s theme is “Jungle Pets,”  I decided to do an elephant head on the leg portion of the sock.  Below is the right foot.  I flipped the head chart for the left foot, so that they face each other.  If you noticed the color variation in the photo, it  is due to the fact that the sock is not quite dry yet. 🙂

elephant sock

I used the same method as I described in the “Seamless Cables Tutorial”   to join the outside edge of the design, so as to not have a seam in my sock.  The inner ears of pink are one area that I chose to use the Fair Isle approach, as it eliminated the need to add additional yarn strands to the design, thus cutting down the number of yarn ends having to be woven in at the completion of the project.   On this particular sock, I chose to interlock the rows at the color change on the right edge of the design.

cropped elephant sock

I have also discovered that it is advantageous to leave a longer tail when adding an additional yarn, as these shorter strands(double or single ply) can be used to add duplicate stitches for detail(such as the eye or added grey stitch at the bottom that opens his mouth a bit).

POINT!!  I don’t like to have any more yarn strands to weave in than is absolutely necessary.

When I find the time, I will try to write up a row by row tutorial for the charted design so you can become better acquainted with the technique, but for now, I just wanted to give you a sneak peek at what I did with it.

Happy knitting – KT

Read Full Post »

I just finished a pair of socks for my husband.  He claims they are the best he ever had, and the first ones that he didn’t have to pull up after he wore them a while.  Wow, that is an accomplishment!  With that endorsement, I thought I would share my design with you.

First off, credit where credit is due.  I recently visited Cat Boudhi’s Sweet Tomato heel demo,  and… as always I can’t leave anything alone but had to see what variations I could do with the presentation.  As  result of my dink’n around, I came up with this variation on her heel design.


In her video, she works all her short rows in pairs of stitches, and in the first two wedges I did as well.  However, I began the second wedge several stitches to the left of the first, to spread out the stress.  The third wedge began to the left of the 2nd as well, but this time I use intervals of 3 stitch groups for half the wedge and finished up with 4 stitch groups (this flattens out the curve).   Varying stitch groups allowed me to shape the wedge to fit my husbands foot better.  Play around with this and you will see what I mean.  I also shaped my Twine Knitted toe cap with the same process.

As you can see I opted for a 2 by 2 rib to finish it off.  It worked very nicely.

Below is a PDF of the entire process.   If you have any questions, you know how to reach me.

Chuck’s Sock

Happy Knitting

KT

Read Full Post »

I just finished the Tabi Sock pattern (unisex) and have it available on my Free Pattern Catalog page.   This Tabi sock pattern knitted from the toe-up is constructed using Magic Loop method.  The pattern has detailed instructions, and illustrations, and will be accompanied by the necessary tutorials for your convenience.  Once you have the concept, you can design your own Tabi’s, as plain or fancy as you like.  With the necessary proper measurements done, all you have to do is apply your gauge and away you go.

One exclusive feature of my sock patterns is the toe shape.  I like my socks to “fit.”  For this specific sock, that means that I want the four toe section to fit perfectly, no wrinkles, no gaps.  In this pattern I will illustrate how I make the adjustments needed to help you fit your toe shape.  One of the concepts I introduce in this pattern and in the Foot Glove pattern, is called a CTF (connecting toe fan).   This little addition provides added comfort between the toes and conforms more closely to the actual foot shape where the toes are attached.

The picture below, is of my brothers Tabi socks.  These are done with Sports weight yarn.  With this pattern you can do either fingering yarn (my favorite) or Sports weight.

You can see in the picture above that my toe shape is intirely different than his.

Some might think my patterns are a bit lengthy, but, I like to draw, and love working with my camera.   It is very important to me that you understand the reasoning behind the instructions.  Why?  Because I am one that learns better by doing than by reading.  I need pictures.  I need to know the concept.  Once I do, then, look out!  Get out of my way!  I’m coming through!!!

The creating process is fun for me- it’s not work.  So bear with me, you’ll have to get use to the 15-20 pages of detail. 🙂

Knit-tweaker

Read Full Post »

Today I’d like to share with you a sneek peek at my latest fun project.  I call it the “Foot Glove.”

I started out with the intention of using one color for every toe to illustrate the contruction, but afterwards liked the results so much I decided to continue the stripes throughout the entire sock.   This is definitely a great project for using up the sock yarn stash.  All you have to remember is to divide each color in half (two balls, one for each sock) then knit away.

Presently, I am working on writing up the pattern and will have it in my ETSY store soon.  This was a bit of an engineering challenge, as the toes are not simply attach in a straight line, but need to be comformed to the shape of the foot, but I soon figured it out and will be giving you step by step instructions in the pattern.

Of course, once you get past the toe section, you can let your imagination run wild with all your pretty colored yarns.  The techniques I used in this Toe-Up pattern included jogless stripes,  my no-wrap short row heel, “no-dots” rib color change, and an invisible bind off.  All these techniques will be included in the pattern.

It has been great fun knitting this up.  I hope you have fun knitting up your version, too.

Knit-tweaker

Read Full Post »

In my last post I shared with you that I was working on a pair of socks for a friend.  This lovely lady has a problem buying socks because she has extremely large ankles in comparison to her foot size, along with the fact that one ankle is 2 inches larger than the other.  What to do?  Hummmmm?????

First off, I couldn’t use my customary ” left/right toe cap” in the  “More Toes” tutorial (click my “Tips and Tutorials” page)  because of the large amount of increases I would need to accomodate the ankle measurement, so to solve that problem I opted for my “Slipper Toe Cap” pattern instead, using the width of the three middle toes for my provisional cast on ( see “Tips and Tutorials page).  When my toe cap was completed I began increasing equally on each side till the entire toe area was complete.

With the toe section finished,  I began a 2 x2 rib on the upper center instep section.  The increases from that point on were made every fourth round, one stitch in from the beginning and ending of each side of my Magic Loop NA (needle A, first half of round) and NB (needle B, last half of round).  My ultimate goal for a total stitch count was 1 inch less than the circumference measurement of the ankle.

My next task was to form a relatively narrow heel, while retaining the large number of stitches I needed for the ankle.  To do this, I planned a 3 inch deep heel.  Using half of the total stitches, in my case (52),  I began my heel by working 18 sets of short rows, leaving 16 stitches, ( or 2 inches) in the center at the turn.  Here is the result.

You can see the wide ankle stitches are in their proper place, evenly distributed to fit this special foot.

* Just a note on the placement of the heel.  Even though her foot measured 10 inches from tip of big toe to back edge of heel,  I finally got the proper fit when I planned the turn of the 3 inch heel at 8 1/2 inches from the tip of the big toe, otherwise it did not fit the heel as smoothly as I wanted it to fit.

If you will take a good look at a commercial sock, you will notice that the heel turn is NOT at the back edge of the heel, but forward of it.

Now, all I have left is a few more rounds, working stockinette only on the heel portion, then I will complete the sock with  the 2×2 rib  around the entire sock for about 5 inches.

The right foot will begin as for the left foot, except that the increases on the instep with be less, and will be spaced every 6th round.

The 3 inch heel construction will still be  needed so I will have to borrow a few stitches from the instep in order to work the 18 short row sets for the heel, but that’s OK, it will fit, and that’s what is important.

Hope this helps those of you who might have these special feet.

Knit-tweaker

If you have any questions,  feel free to contact me.

Read Full Post »

While working on a pattern for a Tabi Sock Pattern, I began to think about all the different foot shapes, heel shapes and variables there are in making a custom fitted sock.   I was especially thinking of those I know that have difficulty in finding socks that fit them.   Some just have unusual foot shapes, while others have had to deal with medical issues.  The bottom line is that they should have socks that fit them, too.  So where do they go – hummmmmm??????  Who can make socks to fit them?????

Well, to me it is a challenge, one that is definitely worthy of my time and effort.  So to that end I have put together a short illustrated tutorial to give you some ideas you might consider in designing your own custom socks, or perhaps designing some for that friend who can’t seem to find the “right” fit.  This offering is one that will be updated as I deal with different issues, but for now it covers the basics.

Below is a picture of the Toe-Up Tabi Socks my brother and I designed when I was in California.  His foot is a bit unusual as he has a second toe that extends way beyond the big toe.  He also has a very narrow heel and ankle.

 You will also notice that his toes set at an extreme angle, and the base of the little toe is well below the base of the big toe.

All these challenges were resolved by starting each section with the proper measurements,  knitting a Toe-Cap, and finally, shaping each section to fit his foot.  This process is described in Customizing Your Toe-up Socks

Have fun- Knit-tweaker

Read Full Post »

Yes, my “Going to the Dog Socks” pattern is done and setting on the self of my Etsy store.  The pattern includes, fitted right/left toe; a simple 2 by 2 rib on the instep; my short row neat and sweet heel, a double knit picture panel and the smooth finish of an invisible bind off.

  Why the double knit picture panel?  Double knitting is much more stretchy than Fair Isle knitting.  There are no floats to deal with and you don’t have to worry about the tension getting too tight.  And… besides, the best part is that there are no yarns to catch your toes on.  So,  just  for your viewing pleasure I have started a Video Tips page that includes a short clip on my way of  double knitting. There are lots of instructions on the web and YouTube.  Don’t be afraid to try it.

Get your pattern, here.

Enjoy! 

Knit-tweaker

Read Full Post »

Older Posts »