Feeds:
Posts
Comments

Posts Tagged ‘short rows’

I promised that I would upload this pattern, so here it is.  The instructions are general, as I know most of you knit socks already.  This pattern includes the following techniques – Fair Isle, tubular cast on, double knit short row heel and toe, and Kitchener closure.  I have also given instructions on how to prepare for the inserting elastic in the rib casings.    If you have forgotten what they look like, below is a photo. nordic rose knee  high for website

I have altered the pattern a bit, realigning the roses and adding rose buds at the top.  The pdf’s below are available for you to upload.

Nordic Rose Leg and Instep Chart

Nordic Rose – Knee High Pattern

Nordic Rose Hell and Toe Charts

You might want to check out my post on “Oops Becomes a Blessing.”  This post gives you more info on the elastic insertion.  I am still finding the after several washing, the stockings stay up all day.  The combo of using a larger needle for the calf area, combined with the 1/4 inch elastic rounds enclosed in the ribbing works like magic.

I you have any questions, you know where to reach me.

Happy knitting- KT

Read Full Post »

After completing the Nordic socks, I ventured to come up with a double knit heel to replace the two I knitted in the original design.  Below is a photo of the results.

double knit short row heel-1I began this heel “test” with a provisional crocheted chain of waste yarn, ( as I do all my experiments),then picked up 37 sts using the MC, then set up my double knitting row.  Setting aside the 5 stitches in the center, I worked a alternate checker board design for the rest of the heel.

I treated the short rows the same as I would if I were working with a single thread, except for the fact that I brought both yarns to the back when slipping the front knit stitch, and both yarns to the front, before slipping the back purl stitch.

Below is a photo of the inside.

double knit short row heel-2

Here is a photo of the completed turns.

double knit short row heel-4

double knit short row heel-5

Both sides are completely finished and ready to complete the rest of the sock.  You can also use this method to make you toe section.

double knit short row heel-6

I closed the short rows in the same manner as I use in J’ Short Row Heel instructions, using the appropriate color to retain the design.  The only difference is that you will be working one side at a time.  After completing the knit side closure, I  bring the yarn to the front, then turn the work around. With the left needle tip, I pick up the slipped st in the row below the stitch to the right of the slipped st, place it on the needle, then turn the work again back to my original knitting position, then purl the two stitches together.  The rest is the same.

I have charted this design, you can upload to practice with in the near future, but for now, it’s something you might think about trying.  The instructional PDF includes several charts for you to choose from. I have also included some illustrations.

Double Knit Short Row Nordic Heel

I definitely will be using this in my next knee high stocking design, and my husbands socks as well.

Happy knitting !!!

KT

Read Full Post »

cozy toes nordic sock

This is my latest knitting endeavor.  This sock is knitted in Fair Isle, with a double heel and toe.

Below is the inside of the sock.  You can see that the toe and heel are smooth, as the knitted side is on the face.

inside of cozy toes nordic sock

I accomplished this by first setting up the heel section for double knitting ( knitting and purling in the same stitch with the appropriate colors).  The next step was to put the white(or inside stitches) on a #0 circle needle, letting them ride on the cord while I knitted the short row heel in purple. Once the outside heel was done, I simply slipped the “white” stitches on to my #3, and completed a duplicate heel.  Next, I matched up the short row turns, connecting them together with one ply of the yarn. I did this to keep the two heels in proper alignment.

** One trick I learned with this experiment was to set up for the double knitting with a size smaller needle.  If you don’t, then you need to take the slack out of the stitches before you start knitting the heel/toe, working from the right to left toward the working yarn end.

The next step was to join knit last row of the heels together.  From here I continued the pattern of the instep and heel.

At the toe portion, I repeated the heel procedure, joined the two toes together as before, then Kitchener stitched the final stitches to the remaining stitching of the sole.

outside of cozy toes nordic sock

The heel and toes are  soft and padded.  The extra thermal layer should give me the extra warmth and flexible room to wiggle my toes in. 🙂

The basic sock is knitted form the top down, and is tapered in to fit my leg. I had the star pattern from another sock.  You could use any of your favorite designs for this sock.

Design your own.

I will be working on a demo for the heel and toe, and will upload it when it is finished.

Knit-tweaker

Read Full Post »

While completing the heel section of my husband’s new pair of boot socks, I played around with different needle arrangements that would take the strain off the short row closures.  What I settled on was the following method.

First the set-up.

I use one 47 inch circle needle to make all my socks.  I always label the top of the sock as riding on NA( needle A), and the heel or bottom of my sock, as NB(needle B).

When I am ready to make the heel, I now pull out a loop of my needle cord in the center of the top of my sock(section A).  I do the same for the heel section B.

repositioning needles

You can see the arrangement above.  As I was working a wedge heel,(or Sweet Tomato heel) I marked the beginning of my short row turns with a marker.  In the picture above I have completed one wedge and it is hardly visible.

This arrangement of needles definitely takes the strain off of the yarn bars between the short rows turns, and makes the closing round much easier to accomplish.

Just thought I would pass along this tip!

Happy knitting!

KT

PS- I have added recipes to my low carb e-book.  Check it out.

Read Full Post »

Last night I finished another slipper.  This time I tried using the loop stitch on the upper toe section.

moccasiin with loop stitch at toe

I think I like it.

I am thinking about designing one for my husband as well.  Will upload the pattern as soon as I get it done.

Just sharing!

KT

Read Full Post »

Last night I finished my newly designed Moccasin slipper, and I was anxious to share it with you, so I have uploaded the pictures below.  I hope you like the design.

As I mentioned in the last couple of posts, this project was constructed using the Twine knitting technique  and shaped with short rows.

Here is a closer look at the upper toe section of the pattern.  I have  knitted a casing around the back and sides, which aligns with the casing I designed in the instep flap.   A 24 inch crocheted chain of both colors cinches the Moccasin in for a perfect fit.

The slipper on the right was my original pattern.  It is enough to say that I am pleased with the results of my labors.  I will be ordering the yarn for the second one, as this creation was done out of  my stash (my play around yarn).  I am planning on knitting snowflake knee socks to match.  I might even put them together.  Where I live it gets cold in the winter, and a extra Thermo layer would be nice.

As you can see the side chain, which can be done with a crochet hook or can be stitch as a embroidery chain stitch, pulls it all together.

This has been a fun project.

Happy knitting,

KT

Read Full Post »

The other day I was working on an idea for a new Mocassin slipper.  After turning over the one I was wearing, I decided to try and duplicate the shape of the sole.  How?  With short rows.

Dividing the sole shape lengthwise, I charted the short rows to achieve the upper half which ends at the toe edge.  Next, I flipped my chart and designed the other half, ending the final row at the back of the heel.  If you will notice there is a blue line of loops down the center;  that is the provisional cast on row.  Once the first half is finished, the provisional chain is released and the stitches are picked up to complete the second half.  Below is the result of my playing around.

If it looks a bit textured, it is.  The entire project is Twine Knitted.   The wonderful double layer will keep my feet warm and toasty.  🙂

The finishing round of this part of the slipper was a purl row, as it made a clean transition before starting the short row shaping for the sides.

After working about 5 even rounds, I marked off the front tow section and began to shape the back part of the slipper sides with short rows.  Once the short rows were complete, I closed the gaps, continued around to the toe section and ,decreased stitches at the front to create a much nicer fit.  The next section will be the top of the toe and a flap that lays up on to the instep.  I am thinking about doing a Fair Isle design for that.      Humm????????

It was during the process of creating the flap for my toe section that I decided to share the process I used .

This double layered(or lined) flap is knitted with straight sides, and single and double stitch portions to form the shape.

I have completed a tutorial with written instructions as well as a chart.  The idea is to get you imaginations going.  Short rows are not limited to sock heels, shoulder seams, and sleeve cap shaping.  This tutorial is a swatch practice that I hope will help you feel more comfortable with closing all sorts of short row gaps.

Below is a result of repeating the chart three times on the same original cast on.

I feel a hand puppet coming on!!!!!!

Short Row Closure Practice Tutorial

PS:  I will be uploading the slipper pattern when its finished.

This morning I added a PDF that might help you understand the way I design these short rows-at least I hope it does.

Short Row Designing

Happy Knitting

KT

Read Full Post »

Since I learned how to make the short row heel, with all its variations, I have been fascinated with the concept.  It is not at all unusual for someone to find me casting on a number of stitches on to a DPN, to try out a new idea on how to use them.  Recently I have been charting my short row shapes, which  gives me a clearer picture of the end product, and the opportunity to change the stitch groupings as needed to get the desired affect I want.

For example –

Even though the chart clip is small, viewing it from the bottom up, you can see the angle of each side.  This chart leaves a  pair of stitches on the needle with each turn.  Rows 7 and 8, close the gaps and complete the shape.

In this chart, groupings of three stitches are left on each end before the turn, thus changing the angle of ascent.

In the chart above, I have combined groups of 2,3 and 4 stitches to create a more rounded shape.  Here, rows 9-10 close the gaps and complete the shapes.  The possibilities are endless.

How do I close my gaps?  I pick up the stitch that looks like a “collar” around the slipped stitch of the previous row, place it on the left needle, and knit or purl it together with the slipped stitch.

What does that look like?

Above, is an illustration of how it looks after you turn, slip one stitch and knit the next.  I have highlighted the “collar” in pink.   You will notice that is actually is the stitch below the slipped stitch that forms this “collar.”  You will also notice that it leans slightly toward the left, as it is being pulled over with the slipped stitch.

This illustration shows you the slipped stitch turn on the purl side.  Here again, the stitch(collar) leans to the left a bit.

What do I do with the “collars?”

I haven’t made a video of this yet, but Cat Bourdhi has, in her Sweet Tomato heel demo on YouTube.  But that aside, I have drawn some illustrations to make my point.

When you have a “collar” (pink) around the stitch just before the gap as in the illustration above, you lift the “collar” (pink) up and onto the left needle, then knit it together with the slipped stitch.

This process closes the gap.  From here you can knit the next stitch or stitches of the next grouping until you come to the next “stitch collar.”  This works the same on the purl side as well.  You will find it is a very smooth transition.  Another advantage of experimenting with the various stitch groupings is that you can shape your toe caps (see my More Toes Tutorial) as desired.   You can combine the various groupings with the single stitch turns normally used in the short row heel ( a 90 degree turn) to finish the cap before picking up your stitches off the provisional cast on to start knitting in the round.  For those of you who already use my method of short row heel, you will recognize this as the SPR.  The only difference is that you are lifting the loop and knitting or purling it with the loop to its immediate left (the slipped st).

I will soon be posting the complete tutorial as a PDF.  So check back soon.  In the meantime, try some different shapes of your own.  Also don’t forget to check out the “Sweet Tomato Heel” tutorial on  YouTube.

Now that I have completely confused you , I bid you happy knitting!

KT

Read Full Post »

I just finished a pair of socks for my husband.  He claims they are the best he ever had, and the first ones that he didn’t have to pull up after he wore them a while.  Wow, that is an accomplishment!  With that endorsement, I thought I would share my design with you.

First off, credit where credit is due.  I recently visited Cat Boudhi’s Sweet Tomato heel demo,  and… as always I can’t leave anything alone but had to see what variations I could do with the presentation.  As  result of my dink’n around, I came up with this variation on her heel design.


In her video, she works all her short rows in pairs of stitches, and in the first two wedges I did as well.  However, I began the second wedge several stitches to the left of the first, to spread out the stress.  The third wedge began to the left of the 2nd as well, but this time I use intervals of 3 stitch groups for half the wedge and finished up with 4 stitch groups (this flattens out the curve).   Varying stitch groups allowed me to shape the wedge to fit my husbands foot better.  Play around with this and you will see what I mean.  I also shaped my Twine Knitted toe cap with the same process.

As you can see I opted for a 2 by 2 rib to finish it off.  It worked very nicely.

Below is a PDF of the entire process.   If you have any questions, you know how to reach me.

Chuck’s Sock

Happy Knitting

KT

Read Full Post »

Most of the time, when one thinks of short row closures,  it means making the turn to complete the diagonal seam in a sock heel, or toe.  However, there are times when short rows are used to add shape or a rounded extension to a garment, or hat, like in the pattern for the Mock Tyrolean offered  on my “Pattern Catalogue” page.   The instructions for these types of short rows often involves a wrap, made around the adjacent stitch during the turn.  I have tried this method, but was never pleased with the result, so I thought I might share the process that I use to accomplish the task.

To do this we will start with a swatch-my favorite practice tool.  Use whatever needle and waste yarn you have available.

First, cast on 30 sts ( I used the purlwise longtail cast on).

Row 1.  Knit across.

Row 2.  Purl across.

Row 3.  Knit across.

Row 4. Purl across until there are 3 sts left on LN.  Turn.

Row 5.  YO, knit across until there are 3 sts left on LN.  Turn.

Row 6.  With yarn in back,  purl.

Keep the single YO, and first purl snug.

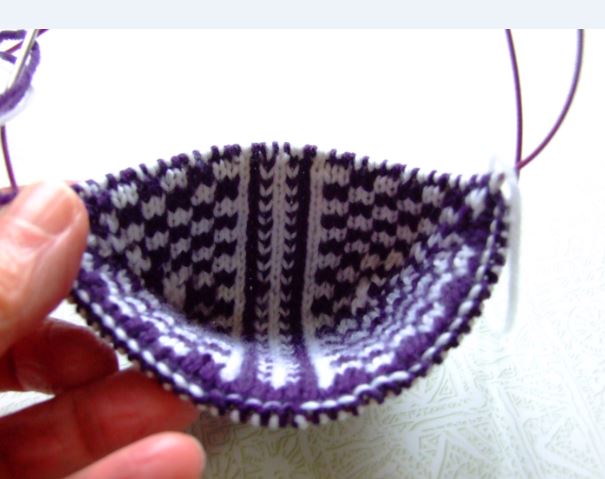
 Now, continue to purl across until you 3 sts before the first YO on the LN ( 7 loops).  (See picture below).  Turn.

Row 7.   YO, Knit across, until there are 7 loops on LN, including the YO.  Turn.

Work back and forth in this manner as many times as you like, ending on the purl side.  Turn.

I worked until there were 9 sts left in the middle.

Now I am going to show you how I close those gaps.

Knit across to the first YO.  Slip the YO knitwise, place it back on the LN (left needle) and knit it together with the knit stitch on the left side of the gap.  Continue across knitting the next 2 stitches.  As before, slip the YO knitwise, return it to the LN, and knit it together with the stitch on the left side of the gap.  Work to the end of the row closing all the knitside gaps.  Turn.

Purl side row.  Purl across to first YO.  Slip the YO onto the RN through the back loop (twist it), purl the YO.  Slip the purl to the left, knitwise, place it back on the LN.  Now slip the new purl stitch made in the YO back to the LN.  Pass the stitch to the left over the stitch on the right.  Return the new stitch to the RN.

*This move sets the knit stitch on the right side over the YO.

Work purl side, closing the gaps as instructed above.  Turn.  Now knit across.  Place your stitches onto a piece of waste yarn and view your results.  I think you will like it.  One of the key things to remember is to keep the YO and first stitch very snug.

Here is the result-

Last row completed.

Try it!

Knit-tweaker

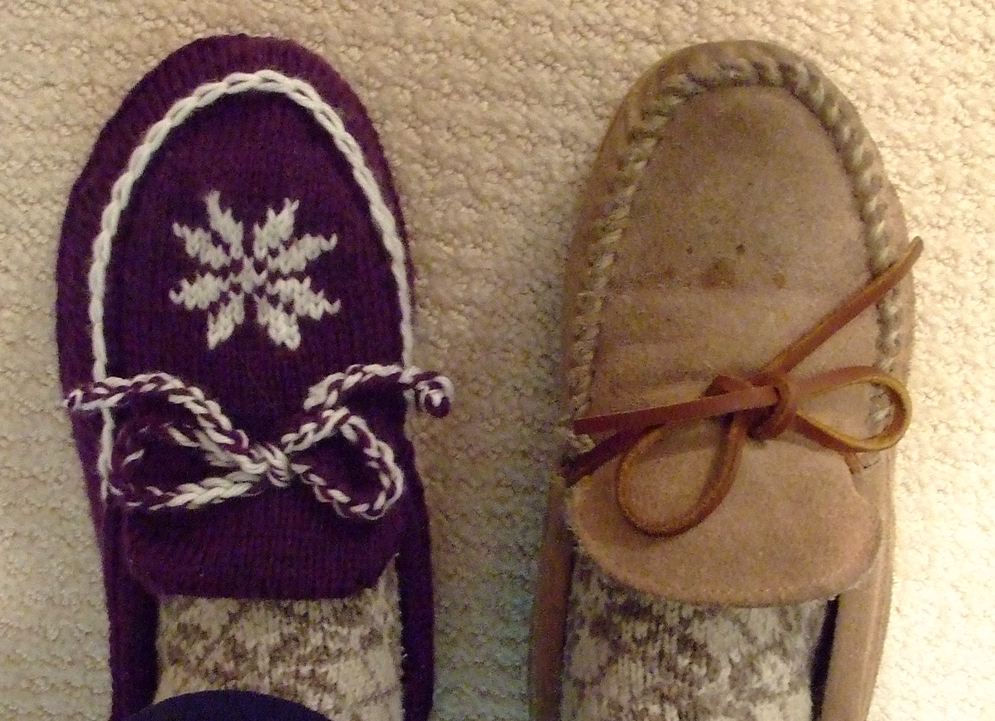
By the way,  my “Foot Glove Pattern is now available at my Etsy Store.  Just click on the “Pattern Catalogue” page for the details.

Read Full Post »