I have added this page to share my experience with Intarsia and Fair Isle knitting. If you have any suggestions or questions regarding this subject, please feel free to contact me.
Painting with Yarn- My Way
Getting set up –
1. I roll all the colors of yarn I have chosen to use into 1 to 1 1/2 inch balls.
2. I peel off a strand of about 2 arm’s length of each color (as needed).
*The exception to this rule is the color WHITE, especially if it is being used to form a border around a motif . Even though your spit splice may be almost perfect, white will sometimes show the slightest thickness where darker colors will not. Therefore, I recommend that you make your white strands about twice as long, and begin a new strand at the borders edge if need be. Don’t forget, the long strand can easily be pulled out of the “mess” of ends. It take but a few minutes to do this. You can also give your work a “good shake” once in a while, which will free some of the strands.
3. For pillow patterns, I use a crocheted chain of waste yarn for my provisional cast on. (I like live stitches to work with when joining the units together).
4. I have a high-lighter pen ready to mark off each completed row of the chart
5. I keep a yarn needle handy, so I can thread up a strand and work it over where it is needed, if I have forgotten to lift and carry it across in the previous row. Oops!!
6. I keep a DP #1 needle handy for leveling out and loose stitches in the row.
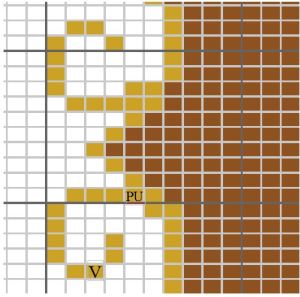
7. I check my chart, and mark the stitches where I need to use the double long tail strand when joining a new color, or places that I need to remember to carry the yarn across for use down the line.
In the above illustrations “PU” indicates where I need to remind myself to pick (or lift) up the white yarn in the previous row in preparation to be used down the line in the same row, or in preparation for starting the color in the return row.
The “V” indicates that my new yarn will be picked up in the center, allowing me to have two long tails; one tail to be use for stitches up and to the right, and the other to be used to complete the top stitches of the scroll.
Yes, it takes a few minutes to do this but it save lots of headaches and time later.
8. Before weaving in my yarn ends, I separate the plies, then twist them and weave them in the fiber of the yarns in opposite directions. This eliminates a lot of the bulk.
9. I complete the basic knit first, then add the specialty stitches when finished.
10. I wash and block each side of the pillows before joining. See Tropicana Rose Pillow PDF.
Techniques to Master
1. Spit Splice Join
This is how I do it-
When I have about 8 to 10 inches left of my working yarn, I stop and prepare both ends of the yarns I want to join. As shown in the illustration above, I unwind about 2 inches of the new yarn I want to join with its mate and tear off one ply. I repeat this with the end of the working yarn on my needles. Next, I wet both ends of the yarn in my mouth (yes, in my mouth with my Saliva), then overlap the two ends in the palm of my left hand, so that the tips lay just past where I tore the yarn off, then give them a twist in the direction the yarn strand is twisted.
Securing one end of the overlap with my thumb, I wet the palm of my right hand and place it on top of the yarns, then I begin rubbing them together vigorously. This action or friction, causes the barbs of the wool to grab each other and felt or full together. I work from the thumb out to the edge of my left palm, blending the two plies together till they become one strand of yarn. Next, I flip the join around and work it again from the thumb out. Be patient, you will be rewarded!!!
If at any time you don’t feel the friction, wet your palm with your Saliva, and begin again. Once I am satisfied that it looks smooth, I roll it in the direction of the original twist.
I used two colors here so that you could see the process clearly. You can continue rolling the yarn as tight as you like. for this illustration I did it just enough so you could see the twist.
Now I am ready to knit! No ends to weave in! No bumps or lumps to show!
I’m Happy!!!
Duplicate Stitch Tutorial This tutorial is just an illustration of how I add the extra colorful stitches to my Painting with Yarn pillow tops.
Another way to add detail to the pictures is to use a crochet hook. Detail Crocheted Chains Tutorial Check it out!


Leave a comment