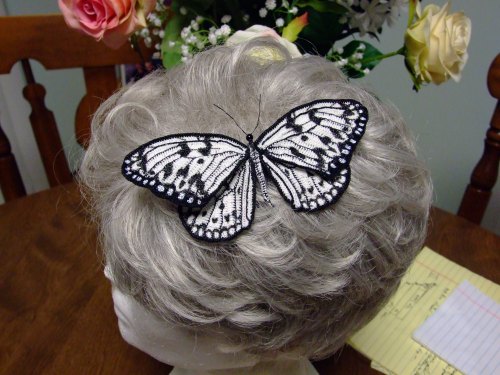
This is my latest butterfly creation. It is called a Rice Paper Butterfly and is indigenous to the Phillipines. I have to say it was definitely a real challenge, but a fun one.

The process began with a photo that was enlarged to replicate the actual size of the butterfly. This was my template. I used size 40 thread and appropriate hook.
Next, I planned my attack. Starting and the top edge of the upper wing, I numbered the veins and then using the white, I worked my way down the wing, outlining each vein in a reverse slip st using black.
The top veins was worked over wire, which allows me to shape the wing nicely. The bottom wings are begun at the inner edge, crocheting the first vein over wire.

The photo above shows you both sets of wings completed. You can also see the template in the background.
Those “little” black spots are painted on. After the crocheting is done, I spray the wings, front and back with acrylic sealer (several coats), let them dry and then use a fine brush, a magnifying head piece, and black “Hard as Nails” fingernail polish do the detail work.
I first tried crocheting this butterfly using the two colors of thread, but found that it got a bit heavy with all the ends woven in. This system seem to work better.
The body is made over wire, through which the wings are attached. The two wire ends are used for the Antennae. A black bead is used for the head.
I mounted the butterfly on a black comb, all with thread and black polish.
As this is free form crocheting I am not going to write up a pattern, but if you are interested I would be happy to help you with doing you own butterfly project.
My local “bug man” was very pleased with the results.
KT
