Just finished the project below. My Monarch now has a home. 
As I was working on putting my roses leaves together I thought I would share the process with you. I have written a basic idea tutorial with photos.
The one thing that stood out to me when I looked at my rose bush was that the rose leaves and stems are two colors. The tops of the leaves are shiny and dark, the bottom are lighter in color and match the stems.
As I am a nut for making things as close to nature as I can, I decided to make my leaves two colors also. The simple solution was to paint the backs with acrylic pain. This actually serves two purposes. First it changes the shade of the thread to a lighter green, and secondly, it stiffens the leaves, while sealing the threads.
I found that using a small damp sponge worked great. Being careful to wipe off the excess, I gently sponged in the paint a little at a time, allowing it to dry in between coats. I also used a fine short pointed artist brush to define the central vein on the top side.

For this particular arrangement I chose to use sets of 3 leaves together. The larger one for the center, and the two slightly smaller ones for the sides.
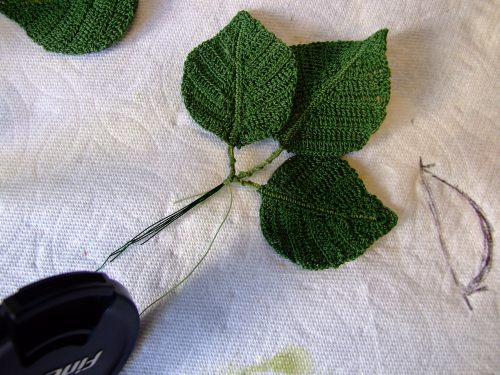
I used a backward cast on loop, (Josephine knot) to wrap the wires and secure the leaves in place on the stem. I use Hard as Nails to secure any place I need to reinforce.
The rose you see in the middle of the arrangement is made directly off the center bud structure, and the edges of the petals are just stiffened with clear Hard as Nails as well. I love the stuff. No wires needed.
One technique that emerged from this experiment was what I call closed triple crochet. This can be worked with other sts (dc, hdc,etc) as well.
I found that if I pick up one of the loops to create the stitch in the post, or chain to the right , it closes the gap sometimes occurring at the beginning of a row or change in increases, or decreases. I use it often when shaping the close of a row that needs to be tapered at the end, or when I begin a row where I want a smooth edge.
Example, if I need a dc to begin the row, I chain up, then, instead of a yo to make the stitch, I pick up the loop in the middle of my chain, then insert the hook into the hole at the base of the stitch.
If the direction call for starting the row in the second stitch from hook, I pick up the dc loop from the middle of the chain, or in some cases the hole at the base of the chain, then insert my hook into the next st (2nd), then complete the dc.
It works well for me and keeps my edge sts smooth and snug, no gaps.
Here is the pdf of my process. It is for you to play with.
KT


