I just finished the Tabi Sock pattern (unisex) and have it available on my Free Pattern Catalog page. This Tabi sock pattern knitted from the toe-up is constructed using Magic Loop method. The pattern has detailed instructions, and illustrations, and will be accompanied by the necessary tutorials for your convenience. Once you have the concept, you can design your own Tabi’s, as plain or fancy as you like. With the necessary proper measurements done, all you have to do is apply your gauge and away you go.
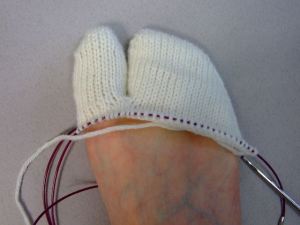
One exclusive feature of my sock patterns is the toe shape. I like my socks to “fit.” For this specific sock, that means that I want the four toe section to fit perfectly, no wrinkles, no gaps. In this pattern I will illustrate how I make the adjustments needed to help you fit your toe shape. One of the concepts I introduce in this pattern and in the Foot Glove pattern, is called a CTF (connecting toe fan). This little addition provides added comfort between the toes and conforms more closely to the actual foot shape where the toes are attached.
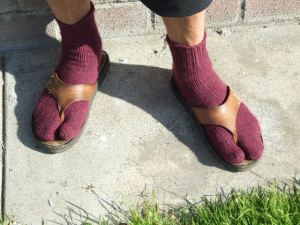
The picture below, is of my brothers Tabi socks. These are done with Sports weight yarn. With this pattern you can do either fingering yarn (my favorite) or Sports weight.
You can see in the picture above that my toe shape is intirely different than his.
Some might think my patterns are a bit lengthy, but, I like to draw, and love working with my camera. It is very important to me that you understand the reasoning behind the instructions. Why? Because I am one that learns better by doing than by reading. I need pictures. I need to know the concept. Once I do, then, look out! Get out of my way! I’m coming through!!!
The creating process is fun for me- it’s not work. So bear with me, you’ll have to get use to the 15-20 pages of detail. 🙂
Knit-tweaker


Hi!
Found your link on the sock knitters page. I’ve been looking for tabi toe up patterns for ages. The ones I found didn’t seem to do the space between the toe well. Yours looks great! Not bulky at all. My son lived in Japan for years and loves tabi socks beyond all others. Now I can make him a pair. Thanks!
Biki
I have a question regarding the tabi sock pattern. I desperately want to learn to make these. Pardon my stupidity, but the way I read it, you pick up your number of stitches from the waste yarn and then that set up row throws me off. Since I’ve already picked up stitches from the waste yarn, what exactly am I doing on the set up row? Am I just purling across the stitches I just picked up? Also, on row 7 you knit across until 3 sts remain on LN but then on row 5 you purl until 5 sts remain. Since this doesn’t follow the flow of the rows 2 – 6, is it really 5 sts or should that be 3 sts?
Sorry for all the picky stuff, but you’ve gone to a great amount of trouble to create this pattern. I’ve done the foot measurement thing and am hopeful of knitting tabi socks that really fit. Thanks for sharing all you’ve done.
The set up row is exactly that, it secures the beginning foundations stitches of the toe cap of your big toe – purl away.
Secondly, The 2 stitch difference in rows 7 and 8 is because in row 8 you are beginning the turn of the toe cap. Just follow the “Yellow brick road” in the picture illustrations. It may seem odd but you will soon see the results. KT
Is this pattern still available!? I can’t seem to find it on this page… I would LOVE to make these!!!
I can’t seem to find your pattern for just the toes.I plan to attach them to an already knitted leg/foot
Brenda, since you have already knitted the sock, then all you have to do is measure around your big toe. Next, apply your gauge to the measurement. Divide the number of stitches to be worked into 2. Lay sock flat. For left toe, place half the st number for top of toe on needle, place other half for bottom of toe on needle. Starting at the underneath side knit all the stitches, then cast on 6 stitches for fan. Place a marker, between the 3/4 the stitch. This will mark the center inside of the toe. Dec one st, each side of marker every 2nd round. Knit big toe in the round for the length you need, then work the toe cap as directed.
All the other stitches are held on a yarn until they are ready to be worked.
Hope this helps.
KT
Same with Brenda above I already knitted the sock (cuff down) and I followed knitting the toes like you mentioned until the toe cap portion.
The toe cap is knit in the flat but the toe is already in the round. How do I transition to the toe cap?
I always work these socks for the toe up. As you have reversed this, all you have to do is divide the section, place half of the stitches on an extra circle needle. Work the toe as instructed, then join to the stitches on the extra needle via the Kitchener stitch.
I made myself a beautiful pair of Tabis from another pattern. They were very difficult even though I am an experienced toe up sock knitter! I loved them wore them down to my knit hop and some dumb woman in there looked at my feet and practicaly said something to me like “Why the heck would you waste your time knitting something like that.” Well. I liked them and figured she was just an ignorant mean person and the knit shop directo called me later and said she didn’t know who the heck that person was in her shop (she and I are still friends) but It really tampered my Tabi love for a while.
But dang it all. I have three people in my family that love Tabi socks and am looking for a new pattern..One for MEN 🙂 We are having a Florida Cold Snap, and I am re-energied to try to “waste my time!” on another tabi for my husband who has begged! Say a knitter prayer form me! Will try this one. (PS I don’t think I have Ever knitted a pair of ugly socks or wasted my time on any TOE UP sock!)
I wish you luck. And .. I will pray for you!! My brother wears them all the time. I made him RattleSnake sox. Check out the post. KT