Feeds:
Posts
Comments

Posts Tagged ‘pattern’

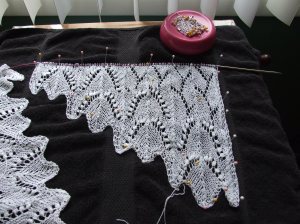
I mentioned in my last post, that I was thinking about designing a different edge, or finishing round for my English Rose tablecloth.  What you see in the about photo is that new design.

I wanted my last rose leaf to be free and overshadowed by the busy background lace. As a result,  I worked out the following method to individualize the leaves.

I began by working each leaf individually, as you would with straight needles, adding the connecting sts to only the right side edge of the leaf.  Using a spare 24 in circle needle of the same size, I then picked up the corresponding stitches for the left side of the leaf, and proceeded working across the “bridge” (connecting pattern stitches), to the next rose leaf.

Even though this is a bit of work, I find that using my extra 47 inch circles of lesser size work perfectly as carrier needles.  I pick up each completed unit on these needles, (about 3 leaves to a needle). This allows me to free up the stitches on the main 60 inch that I am using for the body of the tablecloth.

I do think that this process could be used for various shapes you might want to incorporate into designing an special edging.  As long as the work is supported on the “carrier” needles, they are easy to pick up when you are ready to finish the final rounds.

One thing I did do, was to use a different color needle tips for my needles; blue for the main/working needle, and purple for my  carrier needles; that way there is no doubt which one to pick up.

In the photo above, I am set up with my main (blue) needle tips to begin a new leaf.

When I complete the 40 leaves, I will knit all the stitches back on to my main needle, then finish the edge.

For those who might be interested, I am going to writing up a tutorial for this edging, and will upload it when I am done.


Happy Knitting- KT

Read Full Post »

Not long ago, I posted the photo and pattern of the bathroom curtain set I designed.

lace curtain finishedSince that time I have had over 700 uploads of the pattern. As a result, I have also had a request for a larger version.  To that end I have designed a 60 inch valance for those of you who have larger windows to cover.  It should go nicely with a 36-48 inch window.

Why only the valance?  If you make the valance first, the fullness and drape will let you know if you want the bottom panel larger or not.  You will get the full affect of the lace-and you might not even need to knit a bottom panel, the valance might just do the trick nicely.  I have included the original chart for the bottom panel in this tutorial.

Below is a graphic of the valance chart.  It gives you a feel for the overall design.  This chart is for a 60 by 30 valance.

graphic of lace valanceEach side panel is graduated toward the center.  The original center panel has been expanded two extra repeats.  The possibilities are endless.  You could continue adding the Lilly of the Valley arches to the side panels, blending them in to the center.

2006-06-21 06.38.14

2006-06-28 00.44.01


Each side panel in this 60 inch version measures 12 -13 inches, including the 3 stitch border. Each added arch equals approximately 3 inches in width.  If you needed a 72 inch version, you simply add two extra arches to the side panels (6 inches on both sides).  You can also add to the length of the side panels by adding on or two extra vertical arch repeats.  You also have the option of adding to the top as you knit you Stockinette finish for the casing.

There are 4 files in this pattern because of the size.  The first one includes instructions and chart symbols.  The last 3 are the charts for each section.

*Note-  I did  not write instructions for every row, only those that need extra explanations.  These rows are starred in red on the right side of the charts.  The rows are also number, and each chart has the corresponding numbers to the others.  The chart symbols are explained in the tutorial.  I have also illustrated special techniques when necessary.

Instruction manual – large lace curtain valance

Right Panel – large lace valance right side

Left Panel – large lace valance left side

Center Panel – large lace valance-center panel

Of course my brain is just full of creative possibilities for this type of project.  Pictures of flowers, animals, scenes from nature- hum…………………………………?

Happy knitting – KT

Read Full Post »

I have been working on the idea of double knitting my Honeycomb purse design, but ran into an interesting problem.  The Honeycomb stitch I created with my #4 needle and Galileo sports yarn, worked out to have 5 sts to 12 rows per inch, and the stockinette stitch with the same yarn and needles worked out to 6 sts and 8 rows per inch- needless to say,that ain’t gonna work!  So… how to solve the dilemma?  I had to eliminate 4 rows somewhere.

I had to think about that one for a bit, but the answer was quite simple-slip every 3rd row, of the stockinette stitch.  I tried it and it worked.


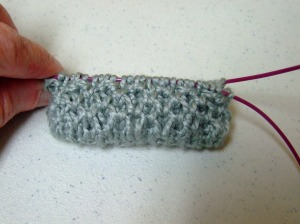
Below is a sample of a solid color honeycomb pattern.

001 (7)

This sample is knitted in the round.

002 (8)

The above photo is what the inside of the sample swatch looks like.  I have slipped every 3rd round of these Stockinette rounds.

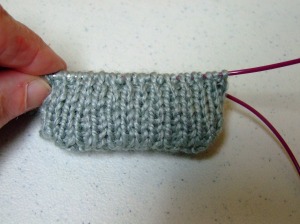
How do I know it works?  When I pulled out the needle the top of both side lined up perfectly.

003 (9)

In this photo, I was working back and forth in rows, and decided to pull out the needle to show you what happens.  both sides are the same.  With this discovery, my purse lining will always fit.  The flap will be flat, and Ican insert a woven interfacing to stabilize the shape before finishing off the edge.

I have charted this process for you to try.  There is a swatch chart for knitting it in the round, so you can make a purse or whatever, and there is a chart for a swatch for practicing using it in rows.  I have also upload a tutorial that illustrates the Honeycomb stitch.

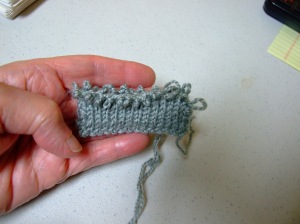
 There are also instructions for a long tail  1 x1 ribbed cast on.  The purl cast on is illustrated here.   The knit stitch is created by the normal method of creating the stitch with a long tail cast.  These two methods are alternated, creating  what I call a “ribbed cast on.”  It works great for setting up double knitting.

I hope you give it a try.  I can see all kinds of possibilities for this technique.  Hummmm??????

Honeycomb Stitch Illustration

Honeycomb Pattern Swatch Charts

Happy Knitting- KT

Read Full Post »

nordic rose knee high finish 1

When I finished these “Nordic Rose” knee highs, I found that they were a bit loose for me.  At first, I just washed them in the washer and put them into the dryer to shrink them a mite.  That helped a little but they were still a tad to big around the ankle.
To compensate, I pulled them up higher, which left me with a ribbed band that was a bit long.   The fix-fold it over, encasing  1/8 th inch elastic bands to secure them around the top of the calf.

nordic rose knee high finish 2

Because I had striped the ribbing, I was able to use a crochet hook to slip stitch the opposing purl bumps  that formed the black strips together (top of photo) to form a casing for the joined  elastic band.  The next step was to slip another elastic ring over the sock in into the area just under the first casing.  Using the crochet hook again, I slip stitched the top edge of the stocking to the base of the ribbing.

The real lesson here is that because the stockings are a bit looser, and they have the elastic rings in the top to pull them in, they stay up all day.

The next time I make this design, I will plan my casings in the ribbed( using #2″s)  area, use the #3 needle for the calf area before the decreases, then return to the #2 to finish the stocking.  That extra stitch per inch in the calf area, allows the knitting to move with you, without seeking a path of least resistance to the ankle- just like water flowing down hill.  The secret is to make them long enough to have the elastic ride above the largest calf portion, so that it pulls in just below the knee.

Below are the charts for this stocking.

Nordic Rose Knee High Pattern

Nordic Rose Knee High Chart

Nordic Rose Heel, Toe, and Border Charts

Happy Knitting-

KT

Read Full Post »

While working on my Nordic Rose stocking I did a little experimenting.  Why?  The pattern for this stocking has large areas of one color, and kind of stretches the Fair Isle method to its limits.  How to handle this problem became my challenge.

The first chart section I constructed using the Fair Isle method with short floats, say at least every 3/4 inch, and established breaks on my one circle needle for NA(needle A-front) and NB(back).

The second portion of the chart I changed my needle positions to suit the pattern, allowing me to work across the design portion without any ladders to worry about.  I also did not weave in my alternate yarn color as before.   The results were stunning.

fair isle comparison

The upper section of the above photo was done in the second method, repositioning the needles as I worked around the chart.  Of course, another benefit of this method is that you yarns don’t get tangled as they remained in the same place all the time(black on the right, red on the left).

The lower section of the example where the floats were kept shorter, shows slight dimples( see photo below)in the surface. This happens no matter how loose you leave the float.

fair isle with short floats

If you use the second method and leave your float too loose, the stitches at the opposite ends of any section of the color can loosen and affect your gauge.

fair isle with long floats

The remedy-

By securing or capturing the alternate yarn at the change of the new color, and then again one stitch before the change at the other end, the float will stay in its proper place.  To make the capture of the alternate yarn on the far end of the float smooth, first stretch out the stitches to the right, then bring your yarn(black) firmly across the expanse-

1) wrap as to knit,

2)wrap main color(red) as to knit

3)unwrap alternate color(black)

4)complete stitch with main color (red).

The next stitch will be the new color (black).  Now the float will stay in place and lay horizontally(with no discernible dip) across the back of the red stitches.  I always tip the work forward to check the tension of the float before proceeding to the next section.  I make sure that everything stretches out equally.  Taking the time to do this will save you lots of headaches later.

You will notice that the diamond above is very smooth.  The long floats on the inside that I deem might pose a problem when sliding on the stocking will be tacked down with a needle and one ply of the background yarn ( in this case, red).

The process of moving the needles as I go has  eliminated the need to deal with the “ladders” of  circle needle knitting.  One thing that makes this easy is that this pattern always has a center back pattern, and the last stitch of the round completes the right side border of this section.  This lets me know where the round starts without using a marker.

Below is a photo of a new needle position, as I retain about 10-12 stitches on my right needle, and prepare the left one to knit across the rose diamond section.

nordic rose-repositioned needles

It works for me!  Give it a try. Below is a practice chart for you to try.

Nordic Rose float Practice Chart

Of course, I could do this pattern in Intarsia, as the center back stitches make an excellent point for a turn around.  Hummmmm????

Happy knitting!

KT

Read Full Post »

As I was contemplating the possibility of beginning on one of my latest pillow designs, I thought it might be fun for me to share my thought process with you.

Below is a clip of the condensed chart, which gives me a view of “what you see is what you get,” with a 33 % view.

The design is from a simulated stain glass window that I created for my home in the mountains of Idaho.  I painted the original on plexiglass then mounted it on the window of my kitchen door.  The knitted design incorporates the frame, but I have added a South American butterfly to my Dogwood flowers, instead of the original Hummingbird.

stain glass window designYou will notice that there are 2 separate rings of colors surrounding the center motif.  The first, or outside ring, shapes the pillow.  The black edges will be knitted as part of the design.  The technique I use for this is called Armenian knitting.  I will be using 2 colors in each section and will be weaving the unused color in every other stitch.  This will give me a bit of a textured look, simulating old rough glass.  Any additional colors I might desire will be added using a single ply of the selected yarn, and applied as a duplicate stitch.

The second ring will also be knitted using the same technique, but this time the lines you see with be inserted after the work is finished.  This will give me the option of using an embroidery stitch or crocheted chain to add this detail.

The center motif will be created using the Intarsia knitting technique described in my e-book.

To begin, I roll all my colors into small balls.  Next,  crochet thread, and crochet hook, I make a chain long enough to support the number of stitches on the bottom edge of row#1 on the chart, plus 10.  Breaking the yarn, I leave a 6 inch tail, pull the yarn through and tied a loop in it.  This chain provides me a base for my provisional cast on.

Turning this chain over to the back side, I count in 5 loops from the end before I start picking up the stitches of the first row, inserting the tip of my knitting needle in to the single back loop of each chain stitch.  When all the necessary stitches have been placed on my knitting needle, row one of the chart has been completed.

The next row(purl) begins by adding a stitch.  You can do this anyway you like.  I will be using the following method: knit in front and back of same stitch at beginning and end of row for right side rows, then purl in back and front of stitches at beginning and end of purl rows.  This gives me a more compact addition.

I can’t wait to see the results of my labor.  Once I get started with one of these patterns, it is hard for me to put it down.  I love seeing the picture develop, one row at a time.

I am going to drop this pillow top chart into my Designer Pillow page.  You can also upload this 18 by 18 pillow top chart here.

stain glass pillow design chart

All the yarns are Palette by Knitpicks.  The gauge is 9/12  using a #1 needle

One skein of each color is sufficient.  You can also use fingering yarns from your stash. I have chosen to used  “heathers” for the darkened areas, in the outside ring.    I work with long strands of each color and spit splice yarn additions as needed.

I have not decided what kind of back I will create for this design, but there is plenty of time for that later.  This is definitely not an overnight knitting project.

Below is a photo of what I see on my computer screen using my Pattern Maker Pro.

pm screen view 1If you have this program, then I can send you the actual file to work with.

The second photo is a shot that shows how I number the larger areas of stitches, which helps me to read the chart.

pm screen view 2

It may be a bit hard to see, but I have inserted the stitch count of the main color.


Happy knitting – KT

Read Full Post »

I haven’t posted for a while as I have been in the process of moving to our new home, so as you can imagine, there has been very little time for knitting, but alas, my Equine Sunset designer pillow is finally finished.  As a final touch, I added a short fringe to complete the project.  Below are photos of the front and back.  You can see that I added my grand-daughters initials in the lower right corner to break up the solid black back (I get board easily when knitting solid colors).

taylors pillow - frontFront

taylors pillow - backBack

There are a couple of tips I want to share with you in regards to this design:

1)  When working on the back, check your gauge often.  Why?  Sometimes when you are switching back to a solid color after working with intense color changes there is a tendency to tighten up you gauge.

2)  When trimming your fringe, lay it over your fingers so that the trimmed yarns fall on the solid black back, and NOT on the light portions of the front design.  Why?  You will be picking off the black yarn tips for hours just to clean up your picture.  How do I know???? Guess!!!

Here is the pattern.  equine sunset pillow pattern and notes

In the past I have made and effort to include all the special instructions with every pattern design, however since I have written the e-books for you to download free, in the future I will be only uploading the charts of the designs, the yarns required, and the necessary knitting notes.  However, if I do anything different than what I have previously posted for you, I will include it in the pattern.

In the case of “Equine Sunset,”  the back chart will not be included.  You can work up your own chart, or knit it plain.

Happy knitting – KT

Read Full Post »

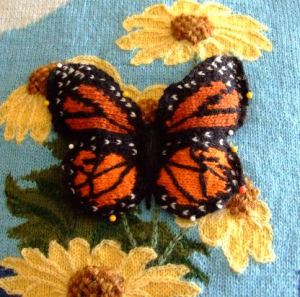
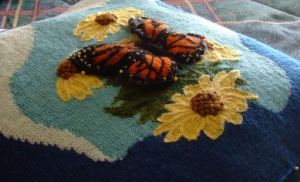
Having just finished my Daisy and Butterfly pillow top, I thought it would be the proper time to upload the tutorial for the 3D butterfly.  I can just see it being used on a knitted purse or hat, maybe both, knitted as a set.  Humm….?  Anyway, here it is for you to upload and use for whatever your imagination can come up with.

butterfly 1

butterfly 2

Butterfly tutorial 2

The tutorial includes chart and instructions.   For any Intarsia questions feel free to upload my e-books on the subject.

Oop’s!  I almost forgot, this butterfly chart is gauged for 8 stitches and 11 rows per inch.  I used fingering yarn.  The approximate size is about 4 inches square.  Of course, you can use any yarn you have to try it, then resize it to fit your project.

Got to get back to knitting the back of the pillow, so for now-Happy knitting!

KT

Read Full Post »

I just finished knitting a pair of infant socks for our expected arrival in about 2 weeks.  Since my daughter’s theme is “Jungle Pets,”  I decided to do an elephant head on the leg portion of the sock.  Below is the right foot.  I flipped the head chart for the left foot, so that they face each other.  If you noticed the color variation in the photo, it  is due to the fact that the sock is not quite dry yet. 🙂

elephant sock

I used the same method as I described in the “Seamless Cables Tutorial”   to join the outside edge of the design, so as to not have a seam in my sock.  The inner ears of pink are one area that I chose to use the Fair Isle approach, as it eliminated the need to add additional yarn strands to the design, thus cutting down the number of yarn ends having to be woven in at the completion of the project.   On this particular sock, I chose to interlock the rows at the color change on the right edge of the design.

cropped elephant sock

I have also discovered that it is advantageous to leave a longer tail when adding an additional yarn, as these shorter strands(double or single ply) can be used to add duplicate stitches for detail(such as the eye or added grey stitch at the bottom that opens his mouth a bit).

POINT!!  I don’t like to have any more yarn strands to weave in than is absolutely necessary.

When I find the time, I will try to write up a row by row tutorial for the charted design so you can become better acquainted with the technique, but for now, I just wanted to give you a sneak peek at what I did with it.

Happy knitting – KT

Read Full Post »

I just finished knitting a sweater and hat for my new granddaughter who is scheduled to arrive in February.  In the process of working on this design, I was determined NOT to have seams, as it just adds bulk.  That said, I started with a simple raglan sleeve pattern and had fun from there on.  I wanted a contrasting cable design down the center of the sleeve, which was simple until I was ready to pick up the sleeve stitches to be knitted in the round.  Now, I had that old  “Intarsia” problem, the yarn was on the other side.

OK!  I have tried most the methods thus far out there- Ann Berk’s loops(which works great,but I don’t like fighting with the loops), and other various methods connected with YO’s (loops again), then those knitting or purling “loops” together with the stitch at the end of the round, but I didn’t want a seam.

Then it hit me, I was not looking for a seam at all, I was looking for a “stitch” connection that would mimic the interlocking of any typical color change- and….I found it.

001

The result is that my Valentine Babe will be ready for the Ski slopes in this seamless cable designed hat and sweater.

I have just completed a tutorial that shares my discovery and I hope you try it.  You can also use this method to knit an Intarsia pattern in anything that is seamless.

*The tutorial includes a cable panel, but just for practice you could replace it with a plain panel of any contrasting color.  The technique will be the same.

I will be writing up this pattern soon, and will share it when it comes up the presses, but for now, here is the Seamless Cables Tutorial to learn the technique.

Here is Rebecca’s Seamless Cable Sweater and Hat

Happy Knitting

KT

Read Full Post »

Older Posts »