Feeds:
Posts
Comments

Posts Tagged ‘yarn’

I recently finish a lace curtain set I made for my bathroom.  I used Curio from Knitpicks for my yarn.  It is truly a luxury crochet weight (lace)with a softness and sheen that is very lovely.  Below is a picture of the finished project.

lace curtain finished

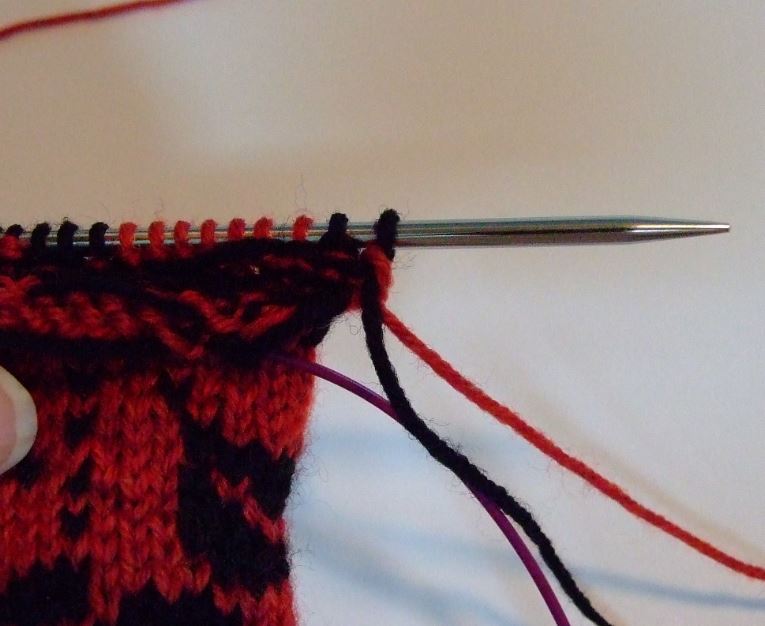
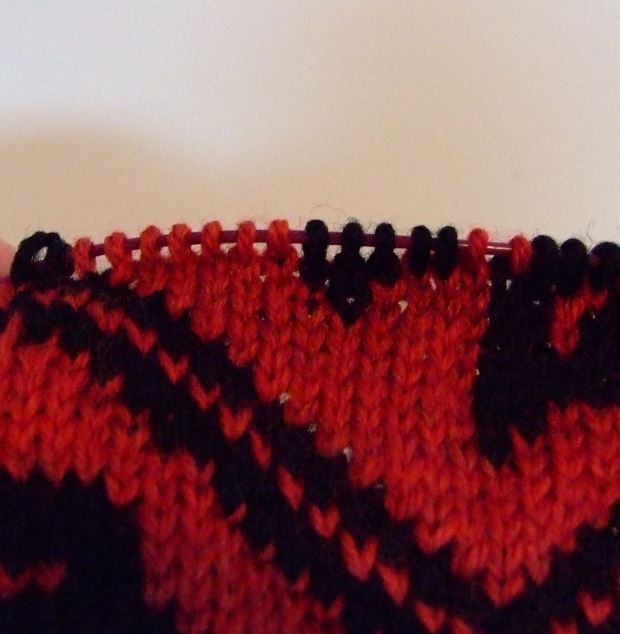
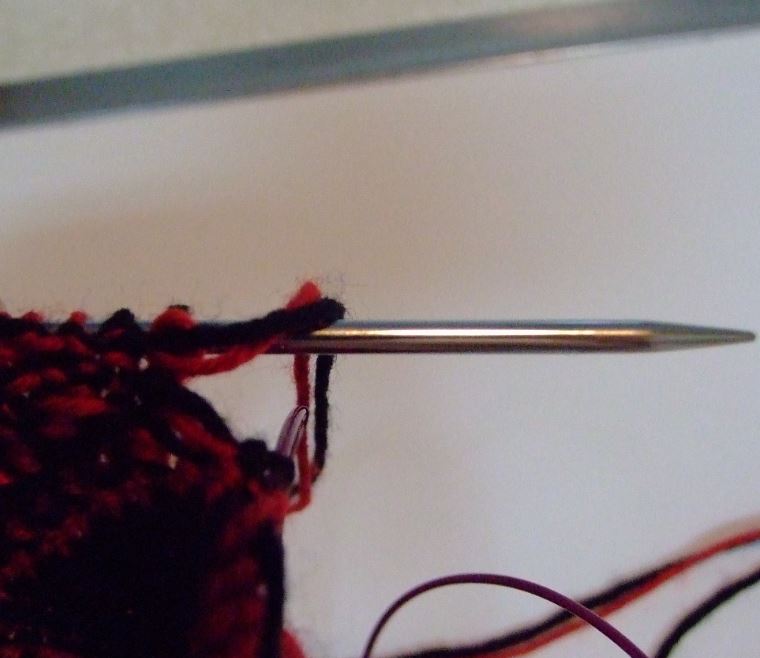
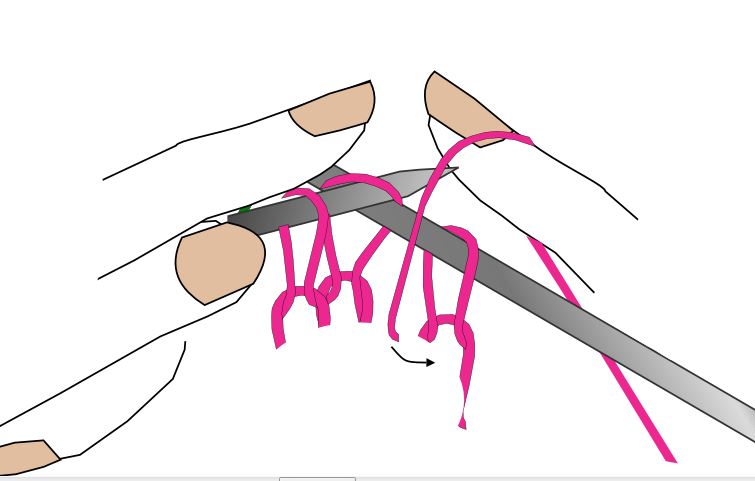
When I had finished the main panel, I decide to get”cute” and trim the bottom edge  with rose colored beads to add a little contrast.

lace curtain bottom edge of center panel

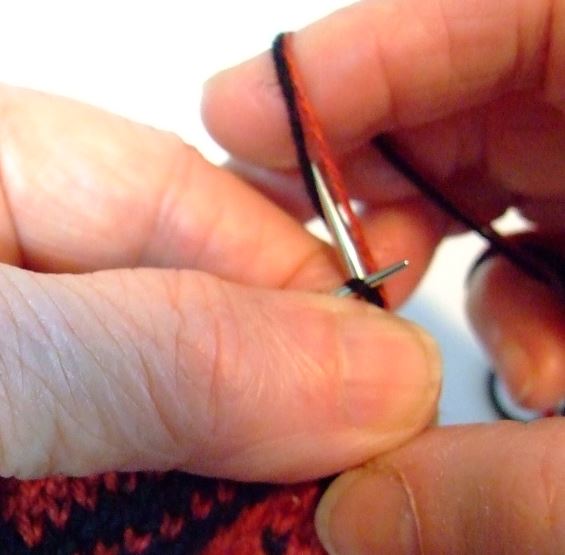
When it came to the valance, I decided to try replacing the Nubbs/Bobbles with the rose colored beads.

lace curtain, beads for nubbs 3

*I know that there are some who will want to quibble over the terms bobbles and Nubbs, but for me, any time a pattern calls for me  to knit up more than 3sts in one knit, and gather it together in the purl row, I think of it as a bobble.  Maybe that is because I think of a bobble as something that “hangs,” and a nubb, as something that just makes a bump.  Anyway, it is the end results that counts.

It has been fun working with this great yarn, and adding the beads was just an extra bonus.

I have charted this pattern for you, along with instructions on how to replace the Nubbs/Bobbles with beads.  I am sure you will come up with more ideas once you get started.

Please take time to practice and swatch each section.  The cast on will be determined by your window.  I advise adding at least 4 inches in width for ease.

Lace Curtain Pattern

The lace curtain pattern includes instructions and charts for lower panel and valance.

* Note- you do not have to print off the last page of the pdf pattern.  As you will note, it has cross stitch info that is not for knitting-it’s just part of my charting program.

By the way, my window opening was 24 by 36, which is the area I wanted to cover.


Happy knitting- KT

PS – If you are a Ravelry member, you can get the free pattern there.  Just type in “Lace Curtain Set” by Judith Helms


Read Full Post »

Well- I promised I would work on this, so here it is.

cake pan jacket

I used cotton yarn(Peaches and Cream), and 1 inch elastic (non-roll).  I also opted for a variegated MC (main color) and used a solid black for my CC(contrast color).

In the process of working on this I also discover how to make a alternating color cable cast on, which is match on on the top with and alternating color cast off, both edges mirroring each other.  I think it is pretty cool.

The main body of the knit is done in double knitting, which forms the casing for the elastic.  The elastic band is knitted right in, so when you are done-your done!

Below I have uploaded instructions for this project, in which I have included instructions for the “alternate color cable cast on, and off.  There is a swatch practice for you to use for establishing your gauge and practicing both the cast on, and cast off.

If you are not sure why you should make one or two of these “pan jackets”  then check out this post


Cake Pan Jacket

Happy knitting- KT

PS-Because of my discovery, I also can use this method to make straps for my purses.  Having the casing open on both ends will allow me to insert a piece of ribbon into the strap, stabilizing the stretching, and…..I will have two pretty edges to boot.  Yeah!!!!

Oh,just an observation-

I washed my jacket, squeezed it out, put it on my pan, blocked it out and let it dry.   Then  I  observed that the cotton yarn holds the moisture quite a bit longer than wool, so  I finally, tossed it in a low dryer.  It didn’t hurt it a bit.  I can’t wait to bake with it.  I will let you know the results.

Read Full Post »

In my last post I illustrated in photos my understanding of one-handed  double knitting- meaning carrying both yarns in one hand.  That say,  today I wanted to share with you what other little gem I observed as I was in the middle of finishing up my double knitted heel.

I noticed that if I was careful to move my wrist and index finger as one unit when “throwing” the yarn (English), my yarns stayed in place, making the purl stitch much easier to complete.

keeping the yarns in order 1

As you can see in the above photo, I have just completed making my knit stitch in red.  You will also see that the alternate (black) is to the right, as it should be.  Now in order for this to be in the same order when I bring my yarns forward between the needles, I must lift my index finger up and to the left to go around the needle, but at the same time I need to turn my wrist and follow it, instead of just giving the yarn a toss.

keeping the yarns in order 2

In the photo above you can see that not only my finger, but my whole hand is turned toward the left.  Now when I come down between the needles the yarn is still in the same place, and ready for me to purl the second half of the double knit by slipping the needle tip between the yarns as I demonstrated in the previous post.

I also tried this using Continental style knitting while carrying both yarns in the left hand.  The only difference is that the primary or MC needs to be the one on the bottom.  And… in this case you only need to move straight forward between the needles to pick up the back yarn to create your purl.  Either way, with practice, the even tension in my double knitting has become very evident.

One more thing- if the pattern requires a change in colors, I reach under the previous MC, to retrieve the new one.   In doing it this way, the alternate color falls into its proper position.

It works for me.

KT


Read Full Post »

While double knitting the toe and heel on my Nordic Rose stockings, I decided to try holding the yarns in one hand.  Why?  Because, all methods so far, have always yielded an occasional uneven stitch.  I don’t like that. 😦    There are  instructions on the net for holding the yarns separated on one hand, but for me it was very awkward.

After thinking about this problem for a while, I started really paying attention to how the yarns lay in my right hand, and I discovered that if I made sure that my main color(black) for the knit stitch was to the left of the alternate color on my right index finger(or on top), I was able to move right along, smooth transitioning from knit to purl, while maintaining an even stitch tension.

Below are some photos of the process I used.

dk knitting-setting up for new row

In the photo above I have just slipped the knit and purl of the short row of my heel, and am preparing to work on the right side row.

dk knitting with one hand -1

Since black is my main color, I made sure when I picked up the yarns with my right hand that black was to the left of the red, or on top.

dk knitting -knitting the first stitch

You can see in this photo that I am picking off the black for the first stitch.

dk knitting- setting up for purl stitch

Now that the knit stitch is completed, both yarns have been moved to the front in preparation for the purl stitch in red.

dk knitting -picking up yarn for purl

To pick off the red yarn to complete the purl stitch, the right needle tip passed between the two yarns, as my right hand move to the left to wrap it on the needle to complete the purl stitch.

dk knitting - finishing purl stitch

The purl stitch is now completed.  Once done, both yarn are moved to the back, between the needles.

Also- I decided rather than working with the balls of yarn in each pocket of my stranded knitting bag (see free pattern page for upload), I opted for single strands about 2 yards long.  Why?  It makes it easier to refresh your yarn position in the right hand (English), or left(Continental).

When your strands are not attached to their respective balls, they get less tangled, and it only takes a few seconds to pull out a single strand to straighten everything out.  Then the strands get down to about a foot left, I simply “spit” splice on another addition.

*Note- the one thing I noticed when using the “one handed” method is that you need to make sure that the yarn from your knit stitch (MC) is laying over the purl yarn when they are swung to the back in preparation for another set of stitches. If not, then you caught the MC when you attempted the purl stitch.  The solution-take it out and do it over.  I have done this many times.  Now I quickly glance at the yarn position before I move on.

Hope this is of some help.

KT

PS-thought I would upload the photo of my results.

dk knitting - results from one hand method

Quite often when knitting double knitting with two hands, every other row is tighter, resulting in ridges in your knitting.  To me, the method above seems to bring a much better result.

Read Full Post »

This is actually post script to my last post as I realized that it might be advantageous for me to share my” re-arranging the needles” ritual.

1) Leave yarns lying between the needles.

nordic rose - rp needles 1

2) Pull right needle through, allowing stitches to rest on cord.

nordic rose - rp needles 2

3) Select point of needle exit, usually between the 12-13 stitch, or where the stitches change colors. Pinch needle together to form a small loop between the stitches.

nordic rose  - rp needles 3

4) Pull the right leg of the cord through to form a loop.  Release it.  Pull you needle back to the right to allow the chosen stitches to rest on the needle. Turn work counter clockwise.

nordic rose - rp needles 4

5) Next, bring both yarn over the top and to the back of the right needle, so they are out of the way.

nordic rose  - rp needles 5

6) Now it is time to adjust the left needle.  As it is already resting on the cord, select the section of the pattern you want to work on, then pinch the cord together at this point and gently pull the cord through to form a loop.

nordic rose  - rp needles 6

7) As before, you will pull the metal part of the needle through to the left, so that the chosen stitches now rest on the working part of the left needle.

nordic rose  - rp needles 7

8) Gently push your stitches on both needles into the “go” position.

nordic rose  - rp needles 8

Now you are on your way again.

This is my ritual, I am sure you all have your own.  I hope it helps!

One more thing- I always turn my work clockwise.

Happy knitting!

PS- I uploaded a practice chart on my last post for you to work with.

KT

Read Full Post »

One of my discoveries in dealing with the “yarn over” issue is the uneven holes that are created by the traditional method.  If you are working in a lace pattern, it is not hard to see that the YO purls are a bit larger.  Why, because they are really “not” a yarn over,  they are in fact a “yarn around needle,” creating a full loop.

Since I am a bit picky about my knitting, I tried some experiments.  The easiest answer, was to mirror the traditional yarn over.  Yep, that fixed the problem.   From that point on, when instructed to make a YO purl, I bought my yarn to the back, and purled the next stitch.  Now, my holes in the lace pattern were the same.

Next, I experimented with the “yarn around ” needle.  It works just as well.  The key is to have the lengths of yarns creating the yarn overs, or around needle, the same.

I use the “yarn around needle” to increase stitches.  It makes a very nice transition.

Below are some demos illustrating both methods on the knit side.  For the purl side you would just reverse the process.

yarn over demo


This first demo shows the yarn being brought forward in preparation to accomplish the , YO(yarn over) knit.   This is the traditional method, but actually creates a half loop between the two stitches.

yarn around needle demoThe second demo illustrates creating a yarn around needle by bringing the yarn over the top of the needle and then again to the back in preparation to knit the next stitch.  This method make a complete circle around the needle, creating a full stitch, or loop.

Either way, I get the best results by doing a swatch of each type of yarn over before getting into a complicate piece of work.  The goal is always to make you stitches look even.

Hope this helps.

KT


Read Full Post »

In the middle of trying to purchase and move into a new home, I have been working on a  pillow design for my “horse loving ” grand-daughter’s birthday.  I just finished the top last night, and finally have it blocked on my zero circle needles.  Here is a peek.

equine sunset - s

The back will be a solid black, with her initials in the Chickory blue of the sunset.  I will be finishing it off with 1 1/2 to  2 inch black fringe.

By the way, the designed sunset was taken from a photo.  The colors and contrasts were stunning.  Believe it or not, there are those who don’t believe that this is from a photo, but then maybe they haven’t observed the beautiful tapestry of colors that God created in our universe.

As always, I will add this to the charted designs on the “pillow” page as soon as I have time.  It may be a while, as I need to settle in my new home first.

Just sharing- KT

Read Full Post »

Having just finished my Daisy and Butterfly pillow top, I thought it would be the proper time to upload the tutorial for the 3D butterfly.  I can just see it being used on a knitted purse or hat, maybe both, knitted as a set.  Humm….?  Anyway, here it is for you to upload and use for whatever your imagination can come up with.

butterfly 1

butterfly 2

Butterfly tutorial 2

The tutorial includes chart and instructions.   For any Intarsia questions feel free to upload my e-books on the subject.

Oop’s!  I almost forgot, this butterfly chart is gauged for 8 stitches and 11 rows per inch.  I used fingering yarn.  The approximate size is about 4 inches square.  Of course, you can use any yarn you have to try it, then resize it to fit your project.

Got to get back to knitting the back of the pillow, so for now-Happy knitting!

KT

Read Full Post »

Since I got into the “slipper mode” a few weeks ago, I have been playing around with ideas to warm my cold feet.  The howling winds outside and the snow covering the ground, are constant reminded to get busy, so I forged ahead.

Tonight I finally finished my new design, for a partially felted slipper.  Why, partially?  Its sole and sides are felted, while the upper toe and instep area is twined knitted in wool.  The ankle and upper leg are ribbed, then the leg warmer cuff is knitted with a fun fur and 4 ply wool knitted together.  It will be after the holidays before I get the pattern written up, but thought you might like to see it anyway.

felted slipper with leg warmer cuff

The leg warmer section can be as long as you like.  I’ve already decided I will make this section about 12 inches, so I can pull it up when things get really cold; otherwise it just stacks neatly on the top of the foot.

felted slipper with leg warmer cuf 2 f

As you can see in the photo, I used two colors in the felted area, while using two strands of black in the sole.

Below is a peek at the felted section before the knitted upper toe and instep area was attached.

felted slipper before upper toe attached

I felted this by hand, leaving the circle needle cords in the finishing stitches.

It was a fun project.

KT

Read Full Post »

I have a friend who is wild, and I mean “wild” about her chickens.  Having decided some time ago to design her a special pillow, I finally came to the conclusion that only a “chicken” would do.  Now, she isn’t into the average chickens, she prefers the exotic, and unusual, so enter the Golden Sebright Hen and Chicks.

This new design not only gives me a chance to do the many techniques of color knitting, but also gives me an opportunity to use various kinds of yarns for special affects.  The chicks are really little fuzz balls, so Mohair will give them a more realistic look.  The spotted area you see in the design is actually going to be a blend of black Mohair and one ply of beige grey fingering yarn.  I will also be using White Mohair on the chests.

The border was another matter altogether.  I wanted a lacy grid in the design you see, but cabling the black fingering yarn over the bronze, was much to bulky looking.  What to do?  I began to think “lace.”    I pulled out my lace silk and wool cone, and went to work, using white in the background, I worked “floating” chain loops between the stitches to form the design I drew on the pattern.  Here is the result.

This gave me the affect I wanted.  So I am now waiting for the Black lace yarn to be delivered, so I can get started.  Meanwhile, I will be knitting up swatches of the various shades and combination shades that I will be using in the main design, and recording them in my color chart for later use.

If you might be interested in learning how to knit these free floating chains, take a look at the “Wandering Chains” tutorial on my “Fun Stuff” page, or you can use this Floating chains tutorial.  I will be add to the info as I work on this project and develop the pattern for sale.

Just thought I would share –

Knit-tweaker

Read Full Post »

Older Posts »