Feeds:
Posts
Comments

Posts Tagged ‘pillow’

sparky pillow finished

Tada!  May I present “Sparky.”

This was absolutely a fun project, and I thought I  would share the finishing process with you.

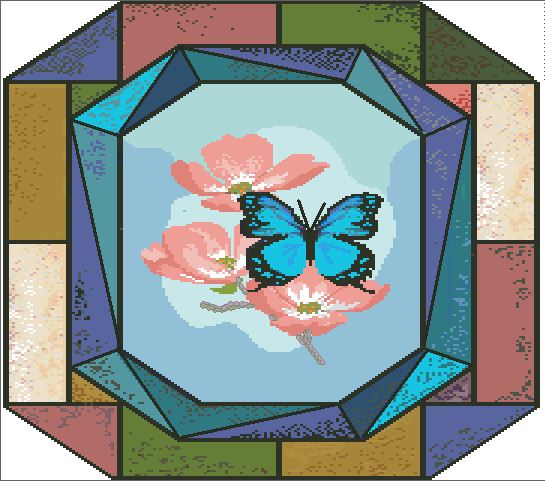
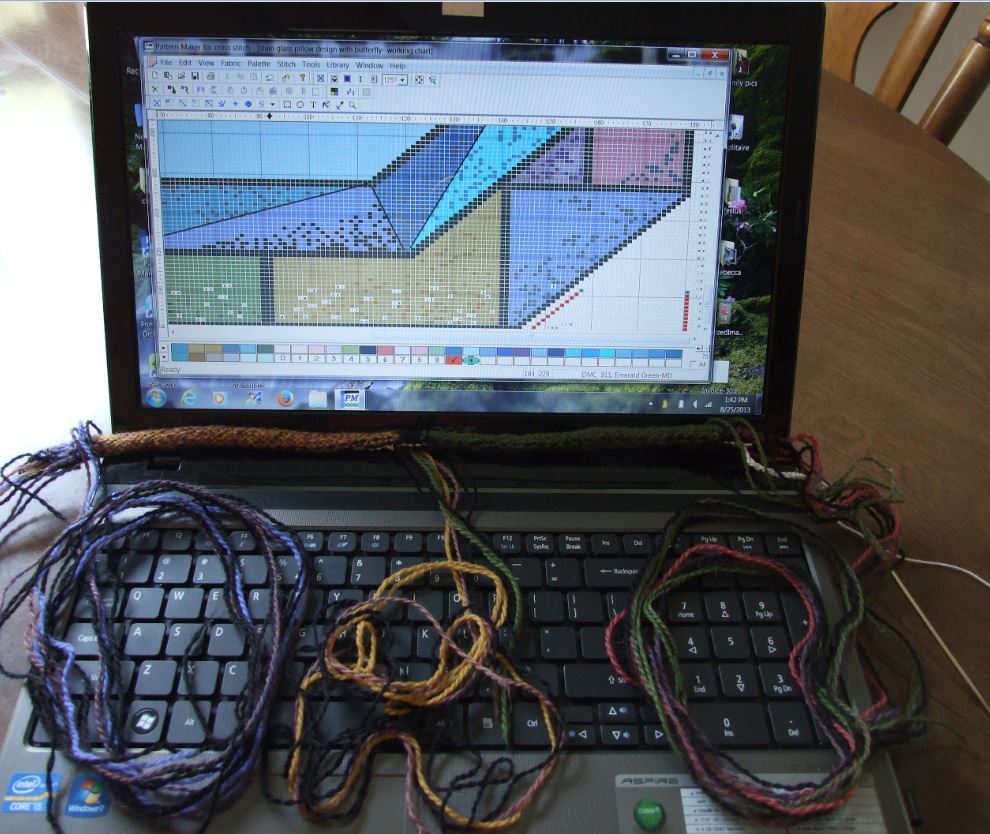
The various modes of construction consisted of  Intarsia, Armenian knitting  and basic stockinette.  The subject in the design was created to be a relief sculpture.  This was accomplished by using 3 strands of lace weight mohair.  The additional strand enlarged the dog without adding stitches to the chart.  The background was done in Palette fingering weight from Knitpicks..

Once the knitting was complete, I washed and blocked the pillow top.

sparky pillow-blocked

The outside edges were blocked to an 18 inch square.  Next, I pinned out the dog, so that all the knitting lines in the background were straight, leaving all the extra width and length in the dog to puff up.

After the piece had dried, it was ready for me to start filling in the sculpture.

sparky pillow-creating relief - 1

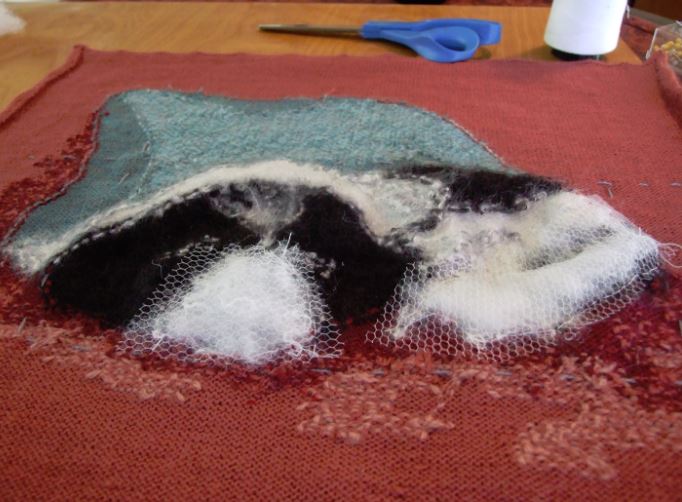
In this case, the first area I filled was the muzzle, as I wanted it to stand out more than the rest of the head.  The next area was the tail, which he loves to swish around.  After putting a bit of fiber fill in these areas, I secured them by putting a piece of netting over the top and stitching it to the knitted surface that outlined the various parts, being careful to just catch a small amount of fiber from the back of the yarns.

sparky pillow-creating relief -  2

The next step was to fill in the head.  I pout more in the center of the head, then tapered the rest out to the edge of the ears.  the hip and legs were next.  How did I know how much to use- I didn’t.  I just turn it over and look.

sparky pillow-creating relief -  3

Once these areas have been filled I placed a piece of netting over the entire dog, and stitched around the edge of the subject to secure the filling.  Next, I turned it to the right side.  Using straight pins, I pinned down the areas I wanted to flatten, or define.  To secure the shape, I stitched it to the netting, from the back, always being careful to not have any threads show on the right side.   The next phase is making the pillow back.

Constructing the Back

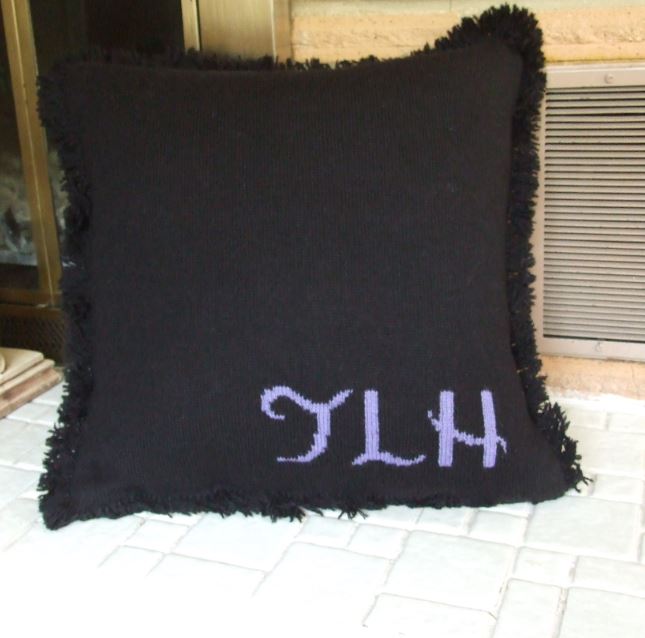
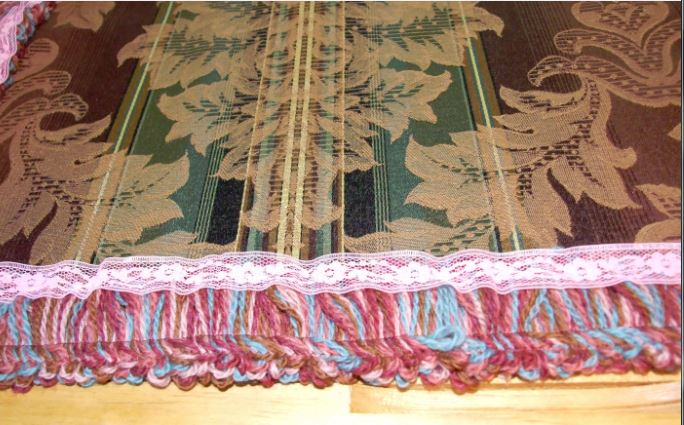
For this particular pillow I wanted to make a looped fringe, using most of colors in the pillow top construction.  To do this I loosely knotted the yarns together, placed them in a bag, and hung the bag on the door adjacent to my sewing machine.

sparky pillow - making the looped fringe -1

With the right side of the back facing me, I placed a piece of tape 1 1/2  inches in from the edge of the fabric.  I set my foot for a 1/2 inch seam.

Using a figure 8 motion, I looped the yarns back and forth, extending the right side loop 1/4 in past the right edge of the fabric ( so I could hang on to it), and extended the left loop to just touch the tape.  I pushed these loops under the foot of my machine ( tight), and using tiny stitches, stitched them to the fabric.  It took a bit of practice, but soon I was moving right along.

sparky pillow - making the looped fringe -2

Here you can see that I have turned the corner.  I cropped my corners a bit, too.  It worked out well.

sparky pillow - making the looped fringe -3

About 2 hours later-  I’m just kidding, but it isn’t a quick job.

sparky pillow - making the looped fringe -4

Now I am ready to sew the pillow top to the back- well maybe.

To avoid any chance that the loops should get caught in my sewing I opted to baste them in place, using some old seam binding.  This just took a few minutes, but was well worth it, as I didn’t have to worry where those pesky loops were lying.  I also zigzagged the fringe to the fabric edge, then trim the over hanging loops from the edge, leaving a clean edge to line up my pillow top.  sparky pillow finished - relief demo

Here is a side view of the relief.

Yeah!  Now I have two Sparky’s!

Just sharing- KT

Read Full Post »

As I was contemplating the possibility of beginning on one of my latest pillow designs, I thought it might be fun for me to share my thought process with you.

Below is a clip of the condensed chart, which gives me a view of “what you see is what you get,” with a 33 % view.

The design is from a simulated stain glass window that I created for my home in the mountains of Idaho.  I painted the original on plexiglass then mounted it on the window of my kitchen door.  The knitted design incorporates the frame, but I have added a South American butterfly to my Dogwood flowers, instead of the original Hummingbird.

stain glass window designYou will notice that there are 2 separate rings of colors surrounding the center motif.  The first, or outside ring, shapes the pillow.  The black edges will be knitted as part of the design.  The technique I use for this is called Armenian knitting.  I will be using 2 colors in each section and will be weaving the unused color in every other stitch.  This will give me a bit of a textured look, simulating old rough glass.  Any additional colors I might desire will be added using a single ply of the selected yarn, and applied as a duplicate stitch.

The second ring will also be knitted using the same technique, but this time the lines you see with be inserted after the work is finished.  This will give me the option of using an embroidery stitch or crocheted chain to add this detail.

The center motif will be created using the Intarsia knitting technique described in my e-book.

To begin, I roll all my colors into small balls.  Next,  crochet thread, and crochet hook, I make a chain long enough to support the number of stitches on the bottom edge of row#1 on the chart, plus 10.  Breaking the yarn, I leave a 6 inch tail, pull the yarn through and tied a loop in it.  This chain provides me a base for my provisional cast on.

Turning this chain over to the back side, I count in 5 loops from the end before I start picking up the stitches of the first row, inserting the tip of my knitting needle in to the single back loop of each chain stitch.  When all the necessary stitches have been placed on my knitting needle, row one of the chart has been completed.

The next row(purl) begins by adding a stitch.  You can do this anyway you like.  I will be using the following method: knit in front and back of same stitch at beginning and end of row for right side rows, then purl in back and front of stitches at beginning and end of purl rows.  This gives me a more compact addition.

I can’t wait to see the results of my labor.  Once I get started with one of these patterns, it is hard for me to put it down.  I love seeing the picture develop, one row at a time.

I am going to drop this pillow top chart into my Designer Pillow page.  You can also upload this 18 by 18 pillow top chart here.

stain glass pillow design chart

All the yarns are Palette by Knitpicks.  The gauge is 9/12  using a #1 needle

One skein of each color is sufficient.  You can also use fingering yarns from your stash. I have chosen to used  “heathers” for the darkened areas, in the outside ring.    I work with long strands of each color and spit splice yarn additions as needed.

I have not decided what kind of back I will create for this design, but there is plenty of time for that later.  This is definitely not an overnight knitting project.

Below is a photo of what I see on my computer screen using my Pattern Maker Pro.

pm screen view 1If you have this program, then I can send you the actual file to work with.

The second photo is a shot that shows how I number the larger areas of stitches, which helps me to read the chart.

pm screen view 2

It may be a bit hard to see, but I have inserted the stitch count of the main color.


Happy knitting – KT

Read Full Post »

I haven’t posted for a while as I have been in the process of moving to our new home, so as you can imagine, there has been very little time for knitting, but alas, my Equine Sunset designer pillow is finally finished.  As a final touch, I added a short fringe to complete the project.  Below are photos of the front and back.  You can see that I added my grand-daughters initials in the lower right corner to break up the solid black back (I get board easily when knitting solid colors).

taylors pillow - frontFront

taylors pillow - backBack

There are a couple of tips I want to share with you in regards to this design:

1)  When working on the back, check your gauge often.  Why?  Sometimes when you are switching back to a solid color after working with intense color changes there is a tendency to tighten up you gauge.

2)  When trimming your fringe, lay it over your fingers so that the trimmed yarns fall on the solid black back, and NOT on the light portions of the front design.  Why?  You will be picking off the black yarn tips for hours just to clean up your picture.  How do I know???? Guess!!!

Here is the pattern.  equine sunset pillow pattern and notes

In the past I have made and effort to include all the special instructions with every pattern design, however since I have written the e-books for you to download free, in the future I will be only uploading the charts of the designs, the yarns required, and the necessary knitting notes.  However, if I do anything different than what I have previously posted for you, I will include it in the pattern.

In the case of “Equine Sunset,”  the back chart will not be included.  You can work up your own chart, or knit it plain.

Happy knitting – KT

Read Full Post »

In the middle of trying to purchase and move into a new home, I have been working on a  pillow design for my “horse loving ” grand-daughter’s birthday.  I just finished the top last night, and finally have it blocked on my zero circle needles.  Here is a peek.

equine sunset - s

The back will be a solid black, with her initials in the Chickory blue of the sunset.  I will be finishing it off with 1 1/2 to  2 inch black fringe.

By the way, the designed sunset was taken from a photo.  The colors and contrasts were stunning.  Believe it or not, there are those who don’t believe that this is from a photo, but then maybe they haven’t observed the beautiful tapestry of colors that God created in our universe.

As always, I will add this to the charted designs on the “pillow” page as soon as I have time.  It may be a while, as I need to settle in my new home first.

Just sharing- KT

Read Full Post »

This project has been a delight to work on.  It not only is colorful but has given me the opportunity to use various yarns and weights in the same project.  My Red Hat Silkie pillow is also another of my knitted sculpture designs.  Below is a photo of the top blocked on the needles, awaiting the back portion to be finished.

ms red hat silkie pillow top

This project incorporates, lace weight floating chains over a fingering yarn base, lace weight mohair in different strand counts to create raised areas in the design for the sculptured relief, a lace weight crocheted ruffle on the parasol, and crocheted chain detail on feet, hat and swirls.

Below is a photo of the sculptured relief areas.

silkie relief portions

As you can see I concentrated mainly on the chest and tail area.  I was able to accomplish this by just adding an extra strand of the lace weight mohair when knitting in these spots.  I used 3 strands for the flat, and 4 strands for the raised.  It worked great!   As in all my sculpted designs, it is secured on the back with a 3 step process.

1)  encircling the area with a yarn strand, or strands, then pulling in the area to return to the original gauge

2) filling the area with yarn or fiber fill

3) over laying the area with netting or Tule, then stitching it down with a single ply of the appropriate yarn color. this insures that it will hold it’s shape, even when it is washed.

I can’t wait to get the back done.  The design for the back uses the same floating chain design as I used for the front.

I will update the photo of the finished produce soon, as Ms Silkie is scheduled to make her debut at a Red Hat gathering in southern Idaho in May.

Just thought I would share-

KT

Read Full Post »

This project has been particularly interesting, as I not only had fun knitting Intarsia , Armenian knitting and Fair Isle, but I also was able to combine three different types of yarns in this design.  The border was done in fingering yarn with lace weight wool and silk strands of  free floating chains riding over the top.

The chicks were especially fun to do with a combination of Aloft mohair, added to a ply of fingering yarn.  Their  3D look was accomplished by adding an additional  two strands of the black mohair to the belly and wing area.  Adding these extra strands automatically increased the gauge without changing the stitch count.  I was able to restore the  gauge around the area by filling the void with poly fill stuffing, then running a few strands of lace weight across the back, side to side, and top to bottom.   Taking up the slack with these strands, allowed me to contract the surrounding stitches back to their proper gauge.  The next move after blocking the top was covering the back with nylon net, (great stuff, by the way) and stitching around the expanded portion of the chicks,so that it would remain securely in place.

The  combination of the Mohair and the 3 D affect  made my chicks look like the little “fuzz balls” they really are.     They are the first thing people touch when they pick up the pillow and comment, ” Oh my gosh!  They look so real!”  And so they do.

The details on the legs, feet, and beak were done with duplicate stitches and crocheted chains of one and two plies of the various yarns.   The various shades on the hen are yarns that have been blended, using  of one ply of each color that have been hand spun back together.   Check out my post on blending yarns if you are interested .

So….the most clarifying  statement I can make about this pillow is that I was never bored knitting it.  It definitely was a challenge to my adventurous knitting spirit.

I also loved working with the free floating chains on the frame of the picture.  Of course as I looked at it more closely I realized this free floating chain pattern would look great on the bottom of a tunic, or the cuff area of a sleeve, or……..  Hummm????  Maybe?   …….

I have included a  tutorial describing the entire process with this  pattern.  I even included charts for practicing the process.  This tutorial is also on my “Fun Stuff”page.  It includes a sample swatch chart of the border for you to practice with.  Enjoy!

At present the pattern is available  in my Ravelry  and Etsy stores.

Again, it was an extremely fun knit.

Happy Knitting

KT

Read Full Post »

I have a friend who is wild, and I mean “wild” about her chickens.  Having decided some time ago to design her a special pillow, I finally came to the conclusion that only a “chicken” would do.  Now, she isn’t into the average chickens, she prefers the exotic, and unusual, so enter the Golden Sebright Hen and Chicks.

This new design not only gives me a chance to do the many techniques of color knitting, but also gives me an opportunity to use various kinds of yarns for special affects.  The chicks are really little fuzz balls, so Mohair will give them a more realistic look.  The spotted area you see in the design is actually going to be a blend of black Mohair and one ply of beige grey fingering yarn.  I will also be using White Mohair on the chests.

The border was another matter altogether.  I wanted a lacy grid in the design you see, but cabling the black fingering yarn over the bronze, was much to bulky looking.  What to do?  I began to think “lace.”    I pulled out my lace silk and wool cone, and went to work, using white in the background, I worked “floating” chain loops between the stitches to form the design I drew on the pattern.  Here is the result.

This gave me the affect I wanted.  So I am now waiting for the Black lace yarn to be delivered, so I can get started.  Meanwhile, I will be knitting up swatches of the various shades and combination shades that I will be using in the main design, and recording them in my color chart for later use.

If you might be interested in learning how to knit these free floating chains, take a look at the “Wandering Chains” tutorial on my “Fun Stuff” page, or you can use this Floating chains tutorial.  I will be add to the info as I work on this project and develop the pattern for sale.

Just thought I would share –

Knit-tweaker

Read Full Post »

I was so glad to get this one done so I could send it to my grandson.  He has been checking on it’s progress the last few months, so now he won’t have to wait anymore.

I had great fun knitting this one.  I even knitted some extra leaves, which I placed in the front of the duck, stuffing them a bit to give it a 3 dimensional look.

One other thing I did differently from the last pillow was to make my own pillow form.  I discovered that most of the forms  (no matter what you pay for them) are made with clumps of fiber fill, often leaving a lumpy surface.  Of course, that is unacceptable when you have spent many hours working on one of these pillow tops.  The only solution-make it yourself.

I began the process with a sheet of Poly-fill quilt batting.   I cut two 17 inch squares, then machine sewed them together on three sides, using a long stitch.   I stuffed the middle with tiny pieces of fill, poked them in place with a #1 DPN, then whipped the open edge shut.  You could even use two thickness (sheets) for each side to unsure an even smoother surface.   Anyway, it  worked great.  It will also dry much faster as there is no cloth on the inside.

I will be making all my pillow forms from now on.

Now it’s time to box it up and head to the UPS store.  My grandson will be a happy camper!

I hope to have this pillow pattern available soon.  I will be starting my J’s Designer Pillow page soon.

KT

Read Full Post »

It definitely is Spring around here, as the wild  flowers are blooming and the mountains are turning green.  Add this to the birds singing and the butterflies checking out the blooms and next thing you know I found myself drawing up a new pillow design of daisies and butterflies.

As before, this chart is gauged for 8 stitches and 11 rows, knitted with fingering yarn.  I will be using Knitpicks Palette yarn for this design.  The chart for the detailed crocheted lines and specialty stitches are included in the download.  The knitted cording instructions are in the PDF file listed below.

Of course, you can use the center motif on other projects.  Here is the pattern – daisies and butterfly pillow

For knitted cording instructions, Knitted Cording Instructions   This file includes instructions for joining knitted back.

Give it a try –

KT

Read Full Post »

I finally finished the pillow.  Even though the stain I discussed last post is still there, it looks quite nice now that it is finished.  I put a fabric backing on the pillow, but will be using a knitted back  for the 16 inch version.

Here it is -flaws and all


I found this lovely washable brush suede at Joanne Fabrics for the back, but before I could do that I had to do some prep work.

First, I select my gold yarn, as it was the closest color to the fabric I had chosen.  Using it, I knitted 4 rows around the pillow, adding one stitch each side of the corner stitches, every row but the last.  After binding off the gold, I steam pressed it out so that it would lay relatively flat.


During the steaming process I made sure that my pillow measured 14 3/4 inches square.   Next, I took a square piece of heavy bleached muslin,(slightly larger than my pillow), and beginning  where the two edges of the squares met, began to pin them together using the line created at the beginning of the salvage edge.

When the pinning was done, I chose a gold sewing thread and stitched through the layers.  That stitching line was my guide when I was ready to sew the fabric back on to the knitted front.  I hand stitched the bottom together after inserting the form.  I have to say that this particular pillow form has a lot to be desired, as the corners were not stuffed very well.

For those of you who might wonder, I did try put a cording on it, but it was not as attractive as I thought it might be.  A knit covered cord might work-I will try it next time.  I also decided not to put a zipper or Velcro closure in the fabric back, as all the parts of the pillow are washable in cold water.  I have found the my Tropicana Rose Pillow washes beautifully right on the poly filled pillow form.


Just an update – KT


Read Full Post »

Older Posts »