Feeds:
Posts
Comments

Posts Tagged ‘knitted cording’

Since my last post, I have been playing around with the idea of double knitting the handbag. Below is a sample of my efforts.

Double Knit Hand bag Sample

Right side- Honeycomb

Wrong side = Stockinette

double knit honeycomb sample

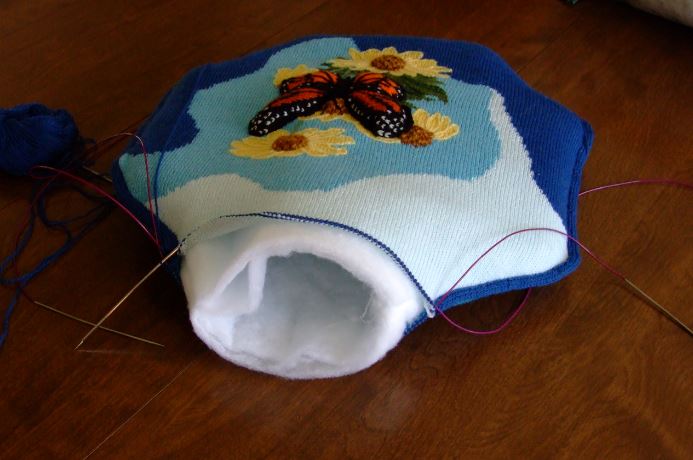
Above is the outside (or right side) knit in the honeycomb stitch.

double knit  hand bag inner lining

Here you can see the lining of the handbag in white.  It is knit in  the stockinette stitch.  It really wasn’t as hard as I thought it might be.  You only have to work with both yarns every other round.  The second and fourth rounds require that you work the yarns separately, as the honeycomb stitch is purled in those rounds.

The Stuffed I-cord

Now, the next sample is the result of working out the idea of a “stuffed” I-cord.  This creates a true cording that will stand up along the edge, and is worked from the back side of the fabric.  In this sample I cast on 3 extra stitches, connecting the 4th st with the 5 fth by knitting them together through the back loop.

stuffed I-cord

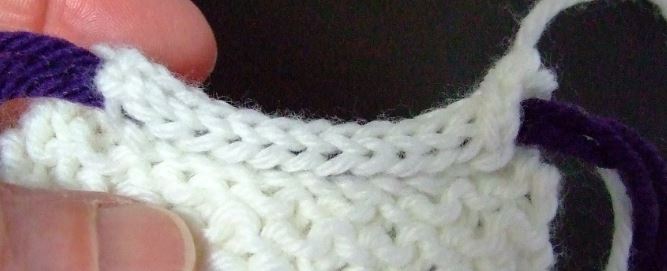
*I just knit this up on the spur of the moment so I knitted the I-cord onto a swatch I had been working on, so that’s why you see the wrong side of the fabric.

Before bringing the yarn across the back I inserted 3 strands of the purple.  To keep it in its proper place, I only had to make sure to bring the working yarn(white) under neath the 3 strands before pulling it across to knit the next section of the I-cord.

stuffed I-cord - 2

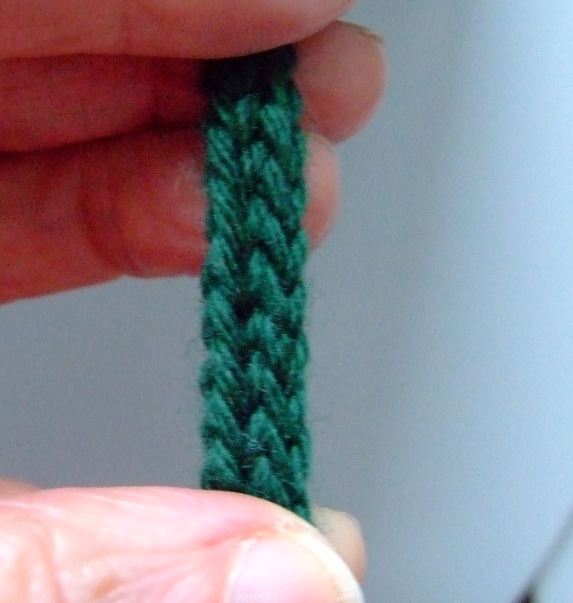
Here is a top view.  You can see that the tube is nicely rounded.  I am definitely going to try it on one of my pillows.

I will also use the same color yarn to fill the center, that way nothing will show through.  You could also use commercial cotton cording if you prefer.

Just thought I would share.

I can’t wait to get the yarn for the final version of my handbag.  🙂

KT

Read Full Post »

As I put the finishing touches on my latest pillow design, and then took a good look at the finished product, I decided that only one word could be used to describe the design – Spring.  The blues are as clear as our Idaho skies, the yellow daisies adds the warmth of the sun, and the butterfly- a touch of real life

butterfly pillow - the finished product

I have already share the pattern and instructions for the butterfly, so I won’t repeat that here.  Instead I thought I would walk you through the finishing process as I learned a few things worth passing on.

First, I cut the shape of the pillow form using 4 layers of heavy lofted quilt batting, then sewed the 7 sides together, leaving the top open.

butterfly pillow  oct -form

Next, I  slipped it inside the pillow which has been knitted together on 7 sides, and has had the I-cord applied as well.

buttterfly pillow - ready to fill

 Now it is time to filled the center with fiber fill.

Having done that, I  folded the quilt batting into itself and hand stitched the edge together.  Next step- close the top.

butterfly pillow - closing the top

The first trick here is to make sure that you slip your stitches on to the smallest circle needles you have.  I used my 47 inch zero’s.  They are my “go to ” needles for this use and also for setting my pillow sections up to be blocked.

*Note -When I knitted the last of the 7 sections together, I had left a long strand of yarn just for the purpose of this closure, so it was waiting there for me to pick up and start the last leg of my journey across the top. 

And…just in case you are wondering, yes, I did add 1 stitch to each side of  corners so that the i -cord would flow nicely around the turns.  Once the top row was completed, I secured my yarn ,weaving in the end.

butterfly pillow- finishing the I-cord

The next step is completing the I-cord.  Here again, I first picked up the top row with my zero needle, so as to have more flexible  space to work with.   Using my working needle (#2), which has the 5 stitches of my cord already it, I proceeded across the top.  To make it easier,  instead of trying to knit through the back loops of the 5th stitch and the one to its right, I slipped the 5th stitch, knitted the next stitch through the back loop, then pass the 5th stitch over the new stitch.  Once across,  using the live stitches of my I-cord, I attached it to the beginning of the I-cord with a modified duplicate stitch.

For instructions on the I-cord, type in “I-cord” in the search box to find the post.  the only difference is that I cast on 4 stitches, instead of 2, knitting the base stitch( #5) and the one to its left together.

It has definitely been an interesting design.  Oh, about the spider web I originally thought I would put in the corner- I nixed it.  The butterfly just took on a life of it’s own, and I didn’t want anything to spoil it.  One can change one’s mind you know!  🙂

I have uploaded the charts and basic instructions on my “design pillow” page.

Happy Knitting – KT

Read Full Post »

In my internet surfing the other night, I watched some videos on how to make an separate I-cord,  and also one on how to apply it to a cast off edge.  Using the method suggested for making the cord by itself seemed rather tedious. So…. I asked myself, why can’t  you “apply” an I-cord to a cast on row only?  Answer, you can.  It makes a rather nice roped cord and you can cast on the number of stitches you need for the length, then simply work across.  Here is a photo of the one I made to replace the drawstring in my Twine Knitted Slippers.

I-cord example

In my case I used a #3 needle, as I did for my slipper.  Cast on the amount of stitches I needed for 24 inches.  I then proceeded as follows:

Cast on 2 sts, [:Knit  2, knit  2 together  through back loop:].  Slip three stitches back onto left needle, and repeat the process in the brackets [   ].  I DID NOT pull the yarn hard across the back as some instructions suggest, I simply  used the same tension as in my normal knitting.  It worked just fine and ended up very close to the exact measurement I wanted.  The example in the photo was done with Sports weight yarn.

As you can see in the photo below, the slipper on the right has the new cord.  It does not curl up like the crocheted chain, making a much neater looking finish.

I-cord example 2

Give it a try!

Happy Knitting!

KT

Read Full Post »

I was so glad to get this one done so I could send it to my grandson.  He has been checking on it’s progress the last few months, so now he won’t have to wait anymore.

I had great fun knitting this one.  I even knitted some extra leaves, which I placed in the front of the duck, stuffing them a bit to give it a 3 dimensional look.

One other thing I did differently from the last pillow was to make my own pillow form.  I discovered that most of the forms  (no matter what you pay for them) are made with clumps of fiber fill, often leaving a lumpy surface.  Of course, that is unacceptable when you have spent many hours working on one of these pillow tops.  The only solution-make it yourself.

I began the process with a sheet of Poly-fill quilt batting.   I cut two 17 inch squares, then machine sewed them together on three sides, using a long stitch.   I stuffed the middle with tiny pieces of fill, poked them in place with a #1 DPN, then whipped the open edge shut.  You could even use two thickness (sheets) for each side to unsure an even smoother surface.   Anyway, it  worked great.  It will also dry much faster as there is no cloth on the inside.

I will be making all my pillow forms from now on.

Now it’s time to box it up and head to the UPS store.  My grandson will be a happy camper!

I hope to have this pillow pattern available soon.  I will be starting my J’s Designer Pillow page soon.

KT

Read Full Post »

I can see from the response to my last post, that I need to write up separate instructions for this process.  This knitted cording can be done on any pillow you are knitting.  Even though I have assembled it with a cloth back, you can make a tubing for one with both sides knitted by incorporating the pick up stitches from the knitted back with the purl bars picked up in closing the tubing as instructed in the tutorial.

However, another option uses the double knitting technique, and a Kitchener stitch closure.  I will work out a tutorial for this soon, as I have a heart shaped pillow planned and this one will require a knitted back.

Knitted Cording Instructions


The next addition to the “Wild Life Series” is a Wood duck.  Vibrantly colored, with defined color changes, it is one of my favorite patterns.  I will be using different stitches to add texture and detail to the finished piece.  My yarn is ordered and I am anxiously waiting it’s arrival.

Hummm…..??????  I wonder what color border I should put on this one?

 Happy Knitting!

KT

Read Full Post »