Feeds:
Posts
Comments

Posts Tagged ‘I-cord’

taylors purse

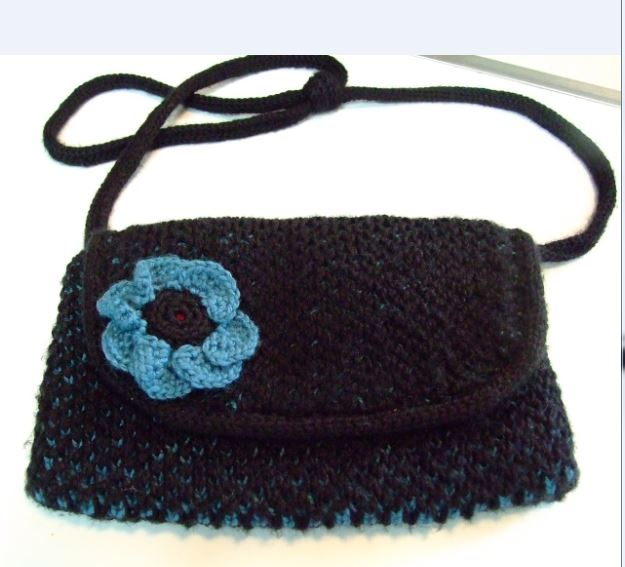
I recently finished the purse I was making for my grand-daughter, so thought I would give you a peek.

This time I knitted the honeycomb stitch in two colors.  You can see the blue peeking out from underneath the black.

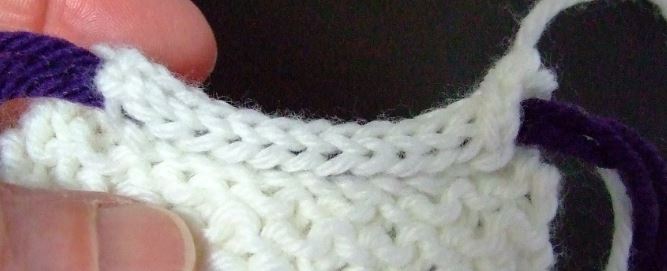
This project was accomplished with a double knit for the body, with the flap knitted in the round.  To keep the gauge equal while knitting the flap, I knitted in the round only on the knit rows.  I will demonstrate how this is done, when I complete the pattern.  Below you can see the smooth result of this method.


taylors purse-flap lining-2


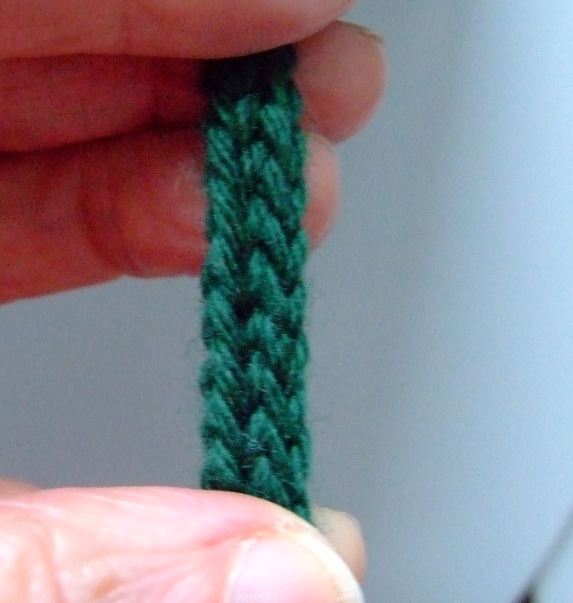
You will notice that I used an I-cord to complete the flap edge.  To keep it from stretching, I ran a piece of satin cord through the opening.  It worked great.

One thing that I have come a conclusion about is that you need to firm up the top of the purse edge with a traditional, non-stretchy bind off.  Next time I make the purse, I will bind off the lining stitches, then pick up new stitch in the bound off edge before proceeding with the flap.  This will insure that my flap will retain it’s shape, especially since the outer edge will be kept in tow with the I-cord.

Below is a photo of the closure.  No button to stretch, just a tab of ribbon to pull it open.

taylors purse- velcro illust

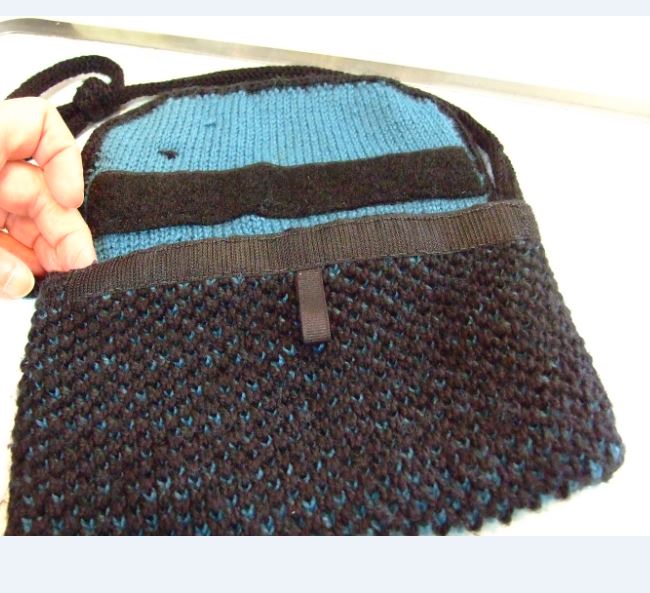
You will notice that the corresponding Velcro is about 1/2 inch above the top edge of the purse.  I find that this assures that the closure doesn’t have to be exact to be secure-especially for a 9 year old.  The tab of ribbon aids in opening the purse.

taylors purse-color close up


I love the two-tone version.  I think it would be really attractive if you used a variegated  jeweled tone under neath, perhaps even one with a bit of sparkle.  Hummmm???????


Just sharing- KT

Read Full Post »

Since my last post, I have been playing around with the idea of double knitting the handbag. Below is a sample of my efforts.

Double Knit Hand bag Sample

Right side- Honeycomb

Wrong side = Stockinette

double knit honeycomb sample

Above is the outside (or right side) knit in the honeycomb stitch.

double knit  hand bag inner lining

Here you can see the lining of the handbag in white.  It is knit in  the stockinette stitch.  It really wasn’t as hard as I thought it might be.  You only have to work with both yarns every other round.  The second and fourth rounds require that you work the yarns separately, as the honeycomb stitch is purled in those rounds.

The Stuffed I-cord

Now, the next sample is the result of working out the idea of a “stuffed” I-cord.  This creates a true cording that will stand up along the edge, and is worked from the back side of the fabric.  In this sample I cast on 3 extra stitches, connecting the 4th st with the 5 fth by knitting them together through the back loop.

stuffed I-cord

*I just knit this up on the spur of the moment so I knitted the I-cord onto a swatch I had been working on, so that’s why you see the wrong side of the fabric.

Before bringing the yarn across the back I inserted 3 strands of the purple.  To keep it in its proper place, I only had to make sure to bring the working yarn(white) under neath the 3 strands before pulling it across to knit the next section of the I-cord.

stuffed I-cord - 2

Here is a top view.  You can see that the tube is nicely rounded.  I am definitely going to try it on one of my pillows.

I will also use the same color yarn to fill the center, that way nothing will show through.  You could also use commercial cotton cording if you prefer.

Just thought I would share.

I can’t wait to get the yarn for the final version of my handbag.  🙂

KT

Read Full Post »

honeycomb handbagThe photo above is in the development stage.  I have combined the Honeycomb stitch, I-cord, and stockinet to come up with this design.  The purpose is to create a small bag for just my wallet and lipstick, etc, to take with me when going out for an evening.

honeycomb handbag- inside

As you can see, I knitted the inside in white.  Why?  I want to find what I am looking for without having to turn on the lights.:)

This bag has no seams, except the inside join in the bottom, and that was accomplished by flipping the edges to the backside (purl), joining them with a three needle bind off.

The rolled edge on the flap and the strap are created with an I-cord.

The flap has the honeycomb stitch on the right side and with stockinet stitch as the liner-constructed in the round.

The basic bag construction incorporates provisional chains of waste yarn,  short row shaping for the corners at the bottom of the bag, and knitting the Honeycomb stitch in the round, as well as back and forth.

At present, I am trying out a double knit version, so as to eliminate the need for knitting the lining separate.  By separate, I don’t mean detached.  Why?  Because all additions in this pattern come off those “great” provisional chains, so I have live stitches to begin the next section.

If you have been following this website for a while, you know that I always use this method when possible, as I base my pattern engineering on the short row heel and toe idea, and working in the round when ever possible, as to avoid seams.  I used the I-cord method described on this website for the strap.  If you want to see that, just type in “I-cord” in the search box.

I will be making a final copy of this model in black Galileo sports yarn from Knitpicks.  I will be using a silver for the lining.  The model above was made from leftover sports yarn, (from different dye lots) using a #5 circle needle.   I used about 1 1/2 skeins of the main color for this mock up, but I will probably use the full 2 skeins of the black, as I will be making the strap longer( about 30 inches).

I will post the complete pattern for you to upload as soon as I finish the final copy.

I am sending this one to my grand-daughter to play with.  I think I might even add on of my Pansies…….?  Hummmm??????  or a Butterfly………..? I think she will love it- that is if mom doesn’t snatch it first.

It has been a fun project.  I can just imagine making one of these for each one of my “evening out” outfits.

KT

Read Full Post »

In my internet surfing the other night, I watched some videos on how to make an separate I-cord,  and also one on how to apply it to a cast off edge.  Using the method suggested for making the cord by itself seemed rather tedious. So…. I asked myself, why can’t  you “apply” an I-cord to a cast on row only?  Answer, you can.  It makes a rather nice roped cord and you can cast on the number of stitches you need for the length, then simply work across.  Here is a photo of the one I made to replace the drawstring in my Twine Knitted Slippers.

I-cord example

In my case I used a #3 needle, as I did for my slipper.  Cast on the amount of stitches I needed for 24 inches.  I then proceeded as follows:

Cast on 2 sts, [:Knit  2, knit  2 together  through back loop:].  Slip three stitches back onto left needle, and repeat the process in the brackets [   ].  I DID NOT pull the yarn hard across the back as some instructions suggest, I simply  used the same tension as in my normal knitting.  It worked just fine and ended up very close to the exact measurement I wanted.  The example in the photo was done with Sports weight yarn.

As you can see in the photo below, the slipper on the right has the new cord.  It does not curl up like the crocheted chain, making a much neater looking finish.

I-cord example 2

Give it a try!

Happy Knitting!

KT

Read Full Post »