Feeds:
Posts
Comments

Posts Tagged ‘overlay stitches’

I just had to share my latest pillow top with you.  Although it is still a work in progress, I have taken my “Intarsiamania” to a new level and have used it to create a relief sculptured design.    The pattern below consists of 3 levels; the base knit of daisies and background; the butterfly, then finally the spiderweb.

hexagon pillow -butterfly and daisies

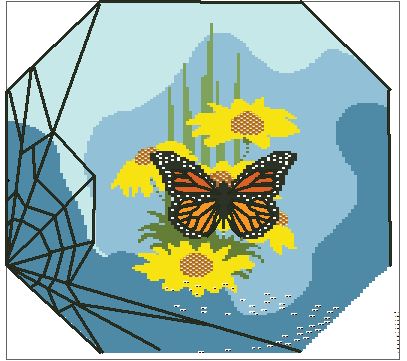
I chose to knit up the butterfly wings at mid point in the design, so that I would not have the bulk of the entire pillow top to deal with.   Below is a close up of the completed butterfly.  All I have to add is the antenae.

Completed Butterfly

I have also rounded the main body out and stuffed it with yarn strands before closing the back.

It has become a very enjoyable knitting project.  The daisies also have raised centers, which I accomplished with the two tone Pine Cone stitch I developed while designing my, “The Quail in the Snow” motif.

I have charted the butterfly and will upload as soon as possible so that you might be able to use it for a project of your own.

In the meantime, I have been able to finish the second book on Intarsia and invite you to peruse its pages at your leisure.   This second book is focused on planning the project, marking up the chart, and choosing the best method of color knitting for the design.  Check it out.  A peek is just a click away!  Who knows, it might spark your adventure into color knitting.

Intarsiamania Book II

That’s it for now!!

Happy Knitting -KT

Read Full Post »

This project has been particularly interesting, as I not only had fun knitting Intarsia , Armenian knitting and Fair Isle, but I also was able to combine three different types of yarns in this design.  The border was done in fingering yarn with lace weight wool and silk strands of  free floating chains riding over the top.

The chicks were especially fun to do with a combination of Aloft mohair, added to a ply of fingering yarn.  Their  3D look was accomplished by adding an additional  two strands of the black mohair to the belly and wing area.  Adding these extra strands automatically increased the gauge without changing the stitch count.  I was able to restore the  gauge around the area by filling the void with poly fill stuffing, then running a few strands of lace weight across the back, side to side, and top to bottom.   Taking up the slack with these strands, allowed me to contract the surrounding stitches back to their proper gauge.  The next move after blocking the top was covering the back with nylon net, (great stuff, by the way) and stitching around the expanded portion of the chicks,so that it would remain securely in place.

The  combination of the Mohair and the 3 D affect  made my chicks look like the little “fuzz balls” they really are.     They are the first thing people touch when they pick up the pillow and comment, ” Oh my gosh!  They look so real!”  And so they do.

The details on the legs, feet, and beak were done with duplicate stitches and crocheted chains of one and two plies of the various yarns.   The various shades on the hen are yarns that have been blended, using  of one ply of each color that have been hand spun back together.   Check out my post on blending yarns if you are interested .

So….the most clarifying  statement I can make about this pillow is that I was never bored knitting it.  It definitely was a challenge to my adventurous knitting spirit.

I also loved working with the free floating chains on the frame of the picture.  Of course as I looked at it more closely I realized this free floating chain pattern would look great on the bottom of a tunic, or the cuff area of a sleeve, or……..  Hummm????  Maybe?   …….

I have included a  tutorial describing the entire process with this  pattern.  I even included charts for practicing the process.  This tutorial is also on my “Fun Stuff”page.  It includes a sample swatch chart of the border for you to practice with.  Enjoy!

At present the pattern is available  in my Ravelry  and Etsy stores.

Again, it was an extremely fun knit.

Happy Knitting

KT

Read Full Post »

One of the premier lessons in working with color is pre-planning.  Instead of just winging it, I have discovered that a few minutes of thinking through the placement of new colors, saves me lots of stress.   Because I chart all my pictures, it only takes a few minutes to go over the color changes and plan my attack.  My focus is always to eliminate  yarn ends that have to be woven in later, and to reduce as much bulk as possible.  Smooth and flat is the goal.

Below is an example of my thinking process –

Marking up the Chart

First, I look for those spots where I can work my new color in two directions.  The box in teal ( the eye) is a perfect example.

The “V”  indicates where I will make my new stitch by picking up the yarn in the middle of my long strand of white.  I will then have two long tails to work with.  One (A) will be used to go up the right side; and the other (B) will be used to go up the left side of the eye.  The “black” or center of the eye, will be worked with one single strand.  Just by using this method to work the white around the eye, I have eliminated 2 yarns ends that would have had to be woven in when the project was finished.

2.  The box in “yellow” indicates stitches that I have marked to be made later as “overlay stitches.”

3.  If you look closely, you can see two more “V’s” in the antler area.  Yes, I have found a couple of more places to use the double long tails.  I have also indicated the direction that I intend to work those ends.

All this is to say that no matter how you decide to work your color project, you will be much happier with the results if you take a little time to do some planning before you start.


Happy Knitting!

KT

Read Full Post »