Feeds:
Posts
Comments

Posts Tagged ‘colorworks tips’

I have been at this a while, but finally completed the project. This size 44, is made of fingering yarn on a size 3 circle needle. It is designed to go over the top of thermo ski clothing. My thinking was “sweat shirt.”

The overlayed design on the bottom of the body of the sweater is done with lace weight yarn. The stitches are worked in between the stockinette stitches of the sweater. Every other row the black decorative stitches are slipped, then the following row are cabled over in whatever direction I want them to go. They ride freely between the stitches. It has the appearance of crocheted stitches.

You will notice in the photo above that I also worked the same design at the top of the sleeves.

All the ribbed sections began with an invisible cast on.

I made this for my grandson who is in the Navy.

You can be sure I will include washing instructions and moth deterrent in the box.

Happy Knitting!!

KT

Read Full Post »

As most of you know, I love knitting something challenging.  That is why I am “into” knitting relief sculptures.  To that end, I thought I might share my thought process in planning for this type of knitting.

sparky pillow finished


The above pillow design (Sparky) has become the number one attraction in my home.  Everyone who comes has to pet the “dog.”  I can see that I will be sending this one to the groomer quite often.

As a result of the reaction to the realism of this design, I took on the project of creating another”doggie” pillow for one of my singing companions.

This is Angus!

angus chart plan

This time I will not only raise the dog, but I want realistic folds in his favorite blanket.

relief sculpture fans

So-besides adding an extra ply of yarn to the areas of the dog that I want to raise, I will create increases on one side of the ridges (solid black lines) which will allow me to create life like folds in the blanket surrounding the subject. Fans A,B, and C will be folded under, and the ridge will be on top. Fan “D” is just the opposite. The additional stitches forming the out side edge of the fan ( dotted line) will fold up to resemble the natural fold of the mounded fabric. The areas immediately adjacent to the fans will be filled to soften the incline to the folds.

* To see how I fill these areas, go to my post,”One Doggie Pillow, Done!”

OK! Now how will I mark the chart? Humm????

I will designate the ridge stitches with a solid circle.   I will place a marker on the each side of the ridge stitch.  As I add stitches I will move the fan side marker. to indicate the added stitch.  This way, I won’t have to mess with the chart, as these stitches will not be counted, I will simply knit the next stitch in the color indicated on the chart.   All the additional stitches will be added in the color of the ridge stitches.   I plan on keeping my fan width at no more than one inch, or 9 stitches at its widest part.  I will post the results of my experiment when finished.

Another possibility is to pick up stitch along the side of the head and knit the ear separately.  Hummmmmm…???????

I have ordered a  “fudge” colored kid mohair to be worked in with the varied colors on the dogs coat, and will use white mohair to add his graying hair on the face.  This should be a fun project.  I can’t wait to get started.


Just sharing-  KT

Read Full Post »

In my last post I illustrated in photos my understanding of one-handed  double knitting- meaning carrying both yarns in one hand.  That say,  today I wanted to share with you what other little gem I observed as I was in the middle of finishing up my double knitted heel.

I noticed that if I was careful to move my wrist and index finger as one unit when “throwing” the yarn (English), my yarns stayed in place, making the purl stitch much easier to complete.

keeping the yarns in order 1

As you can see in the above photo, I have just completed making my knit stitch in red.  You will also see that the alternate (black) is to the right, as it should be.  Now in order for this to be in the same order when I bring my yarns forward between the needles, I must lift my index finger up and to the left to go around the needle, but at the same time I need to turn my wrist and follow it, instead of just giving the yarn a toss.

keeping the yarns in order 2

In the photo above you can see that not only my finger, but my whole hand is turned toward the left.  Now when I come down between the needles the yarn is still in the same place, and ready for me to purl the second half of the double knit by slipping the needle tip between the yarns as I demonstrated in the previous post.

I also tried this using Continental style knitting while carrying both yarns in the left hand.  The only difference is that the primary or MC needs to be the one on the bottom.  And… in this case you only need to move straight forward between the needles to pick up the back yarn to create your purl.  Either way, with practice, the even tension in my double knitting has become very evident.

One more thing- if the pattern requires a change in colors, I reach under the previous MC, to retrieve the new one.   In doing it this way, the alternate color falls into its proper position.

It works for me.

KT


Read Full Post »

As I was working on my second Nordic Rose stocking I decided to experiment with some Armenian knitting in the sole area.  Below are the results.

The first picture is of the area I constructed by “stacking the floats.” What’s that?  I make sure that I weave the  alternate yarn in at the same place( vertically) every round.  The result is a ridge of stacked stitches that are slightly raised above the stitches on either side.

armenian knitting - stacked ridges

As you can see the ridges are quite visible.  Now, this could be a problem if you want a smooth finish, but it could also be used to form a ridged textured fabric if so desired.

The second method, or alternate floats, give you a much more even texture.  This requires that you recognize how to set up the first stitch of the round to off set the floats.  I will see if I can draw up an illustration soon, but for now, the results are in the photo below.

armenian knitting -  alternate floatsYou can see in this (not quite so clear) photo that it is much smoother than the one above.  The alternate floats eliminate the ridges.

Now compare the above methods with using Fair Isle with long floats. Not as sturdy, but definitely the smoothest.

fair isle with long floats

Why did I use Armenian knitting on the sole?  Simple.  It makes a very sturdy fabric.   It provides a way for you to construct your socks so that the areas that have the most wear are reinforced.

Just passing this on-

Happy Knitting!

KT

Read Full Post »

While working on my Nordic Rose stocking I did a little experimenting.  Why?  The pattern for this stocking has large areas of one color, and kind of stretches the Fair Isle method to its limits.  How to handle this problem became my challenge.

The first chart section I constructed using the Fair Isle method with short floats, say at least every 3/4 inch, and established breaks on my one circle needle for NA(needle A-front) and NB(back).

The second portion of the chart I changed my needle positions to suit the pattern, allowing me to work across the design portion without any ladders to worry about.  I also did not weave in my alternate yarn color as before.   The results were stunning.

fair isle comparison

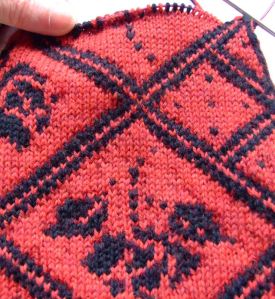
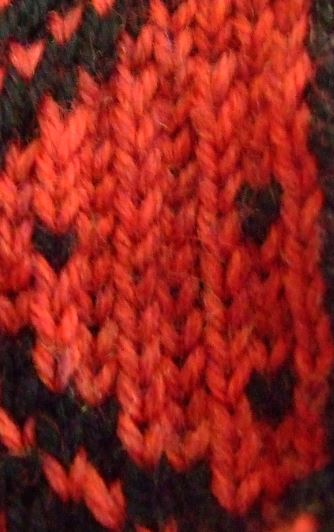
The upper section of the above photo was done in the second method, repositioning the needles as I worked around the chart.  Of course, another benefit of this method is that you yarns don’t get tangled as they remained in the same place all the time(black on the right, red on the left).

The lower section of the example where the floats were kept shorter, shows slight dimples( see photo below)in the surface. This happens no matter how loose you leave the float.

fair isle with short floats

If you use the second method and leave your float too loose, the stitches at the opposite ends of any section of the color can loosen and affect your gauge.

fair isle with long floats

The remedy-

By securing or capturing the alternate yarn at the change of the new color, and then again one stitch before the change at the other end, the float will stay in its proper place.  To make the capture of the alternate yarn on the far end of the float smooth, first stretch out the stitches to the right, then bring your yarn(black) firmly across the expanse-

1) wrap as to knit,

2)wrap main color(red) as to knit

3)unwrap alternate color(black)

4)complete stitch with main color (red).

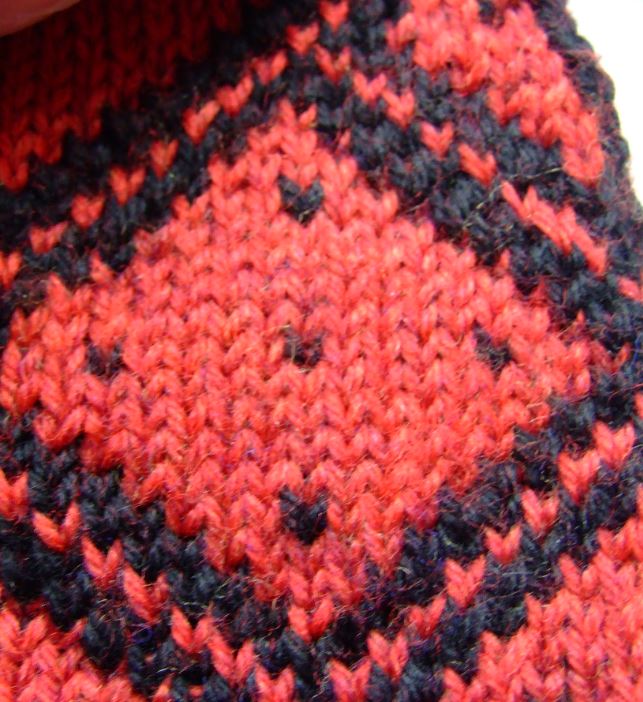
The next stitch will be the new color (black).  Now the float will stay in place and lay horizontally(with no discernible dip) across the back of the red stitches.  I always tip the work forward to check the tension of the float before proceeding to the next section.  I make sure that everything stretches out equally.  Taking the time to do this will save you lots of headaches later.

You will notice that the diamond above is very smooth.  The long floats on the inside that I deem might pose a problem when sliding on the stocking will be tacked down with a needle and one ply of the background yarn ( in this case, red).

The process of moving the needles as I go has  eliminated the need to deal with the “ladders” of  circle needle knitting.  One thing that makes this easy is that this pattern always has a center back pattern, and the last stitch of the round completes the right side border of this section.  This lets me know where the round starts without using a marker.

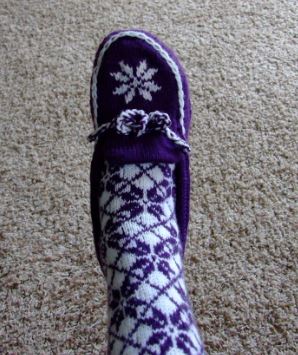
Below is a photo of a new needle position, as I retain about 10-12 stitches on my right needle, and prepare the left one to knit across the rose diamond section.

nordic rose-repositioned needles

It works for me!  Give it a try. Below is a practice chart for you to try.

Nordic Rose float Practice Chart

Of course, I could do this pattern in Intarsia, as the center back stitches make an excellent point for a turn around.  Hummmmm????

Happy knitting!

KT

Read Full Post »

While I was working on my latest sock design, I began to pay particular attention to my color change where NA(needle A) and NB (needle B) meet as I start a new round.  Normally, I make this back seam design lie in the center of NA, but this time I decided to put it at the beginning of the round.  Why?   Since these few stitches involve changing colors more often, it forms a firmer, less stretchy surface; therefore it is a great place to hide and secure any loose floats that happen to be hanging around.  By working your extra yarn across to this area, from either side, you can tuck them under and stitch them down, with no one the wiser.

Below is a photo of the area in question.

nordic rose back seam transition

You will notice that there are 5 red stitches between 2 black ones, this is the center back pattern of my Nordic Rose knee high.  These stitches are riding on NA.  NB is laying on the counter to the right, with its cord pulled across the surface of the knitting to the left.  You can see how this move frees up the stitches to lie closely together, just as if you would be working on a straight needle.   However, there is another move that is just as important, freeing the stitches at the other end of needle A to ride on the needle tip.  See photo below.

nordic rose back seam transition 2

You can see that I have pushed the stitches onto the needle tip so that they might ride smoothly on the needle itself and NOT on the cord.  With these two moves completed, I can make a smooth transition when starting my next round, eliminating any loose stitch at the beginning.

I use the same procedure when I make the transition from NA to NB in the middle of the chart.

Give it a try!

Happy knitting!

KT


Read Full Post »

nordic knee highs

Well, they are finally off the needles and covering my “tooties.”

nordic knee highs 2

I thought I might let you in on my secret of keeping them UP!

I have found that elastic thread crocheted to the inside of the top of the rib does a good job.  You might also notice, if you take the time to look at some of the commercial socks, they also use this method.

nordic knee highs- elastic finish

It is really easy to do.  Using a small crochet hook, make a slip knot in the elastic thread leaving about 6 inches for a tail.  I begin my crocheting about 2 sts down from the top edge.  I use the knit 2 sequence of the rib to anchor the crocheted chain, then chain 2 between the sections of the rib.   Slip stitch you elastic into the right leg of the first selected knit stitch, then slip stitch into the left leg of the knit stitch directly to the left.  The next step is to chain 2(which take care of the purl 2 section), then repeat the 2 slip stitches as before in the next group of knit 2’s to your left.  The tension you use to hold back on the elastic thread will determine how tight it is, so be gentle.  When you have completed the round, leave a 6 inch tail and pull the elastic through the last slip stitch.

DO NOT TIE IT OFF.

Put the stocking on, and see how it works.  If you need to tighten it a bit, then simply release the elastic, pull it out and tighten your tension a bit more.

You can work 1-3 rounds of this elastic chain, spacing the chains about 2-3 stitches apart.  I made my second round 3 stitches below the first round.

  They worked for me.

Give it a try!

nordic knee highs- paired with twine knitted mocassinsHere is a photo of these knee highs paired with my Twine knitted moccasin.

Happy knitting!!!

KT

Oh!  Be sure to check out the pattern charts I uploaded for you in my last post.  Check out “Nordic Boot Sock Ideas.”

Read Full Post »

I haven’t posted for a while as I have been in the process of moving to our new home, so as you can imagine, there has been very little time for knitting, but alas, my Equine Sunset designer pillow is finally finished.  As a final touch, I added a short fringe to complete the project.  Below are photos of the front and back.  You can see that I added my grand-daughters initials in the lower right corner to break up the solid black back (I get board easily when knitting solid colors).

taylors pillow - frontFront

taylors pillow - backBack

There are a couple of tips I want to share with you in regards to this design:

1)  When working on the back, check your gauge often.  Why?  Sometimes when you are switching back to a solid color after working with intense color changes there is a tendency to tighten up you gauge.

2)  When trimming your fringe, lay it over your fingers so that the trimmed yarns fall on the solid black back, and NOT on the light portions of the front design.  Why?  You will be picking off the black yarn tips for hours just to clean up your picture.  How do I know???? Guess!!!

Here is the pattern.  equine sunset pillow pattern and notes

In the past I have made and effort to include all the special instructions with every pattern design, however since I have written the e-books for you to download free, in the future I will be only uploading the charts of the designs, the yarns required, and the necessary knitting notes.  However, if I do anything different than what I have previously posted for you, I will include it in the pattern.

In the case of “Equine Sunset,”  the back chart will not be included.  You can work up your own chart, or knit it plain.

Happy knitting – KT

Read Full Post »

I just had to share my latest pillow top with you.  Although it is still a work in progress, I have taken my “Intarsiamania” to a new level and have used it to create a relief sculptured design.    The pattern below consists of 3 levels; the base knit of daisies and background; the butterfly, then finally the spiderweb.

hexagon pillow -butterfly and daisies

I chose to knit up the butterfly wings at mid point in the design, so that I would not have the bulk of the entire pillow top to deal with.   Below is a close up of the completed butterfly.  All I have to add is the antenae.

Completed Butterfly

I have also rounded the main body out and stuffed it with yarn strands before closing the back.

It has become a very enjoyable knitting project.  The daisies also have raised centers, which I accomplished with the two tone Pine Cone stitch I developed while designing my, “The Quail in the Snow” motif.

I have charted the butterfly and will upload as soon as possible so that you might be able to use it for a project of your own.

In the meantime, I have been able to finish the second book on Intarsia and invite you to peruse its pages at your leisure.   This second book is focused on planning the project, marking up the chart, and choosing the best method of color knitting for the design.  Check it out.  A peek is just a click away!  Who knows, it might spark your adventure into color knitting.

Intarsiamania Book II

That’s it for now!!

Happy Knitting -KT

Read Full Post »

Today I just finished the first of a series of e-books focused on my adventures in color knitting.  It has been a real challenge as well as a great joy to put together.  My hope is that someone will get something out of it.  If not, then perhaps some member of my family will be able to “pick” grandma’s brain when I’m gone.

The 26 page book I am uploading for you is mostly focused on Intarsia, although I do have a section on knitting and purling with both hands.  The information and illustrations in it are from my experience in developing my designer pillow patterns, which are intense color knitting; thus the title“Intarsiamania.”  The book has two sections.  The first deals with Intarsia basics; the second, focuses on yarn management.

Capture

Painting with Yarn – Intarsiamania

I hope you enjoy the book.   I hope that some of the techniques will be helpful on your next color knitting project.

Happy knitting-  KT

Read Full Post »

Older Posts »