Feeds:
Posts
Comments

Posts Tagged ‘socks’

Waynes snake sox 3

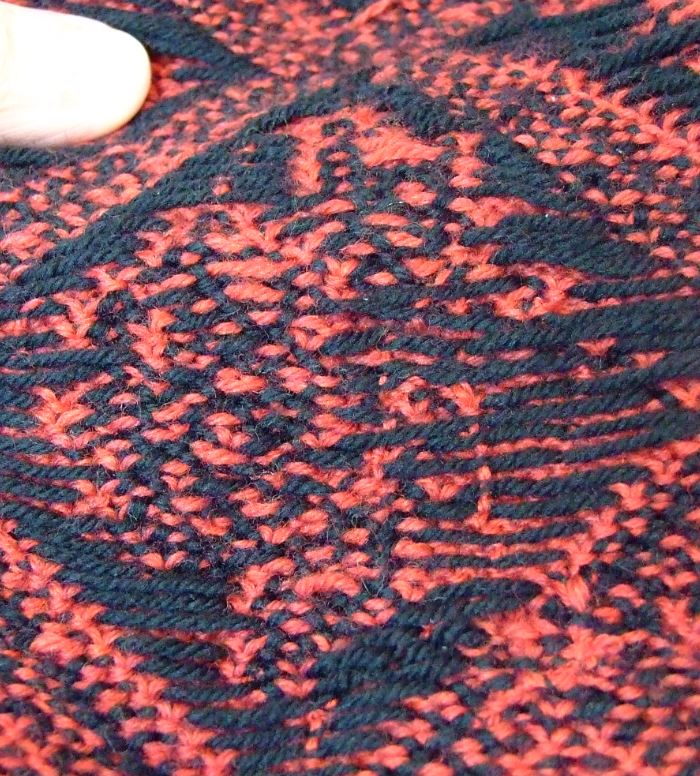
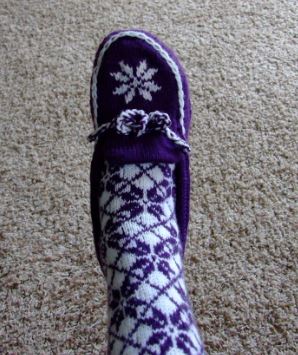
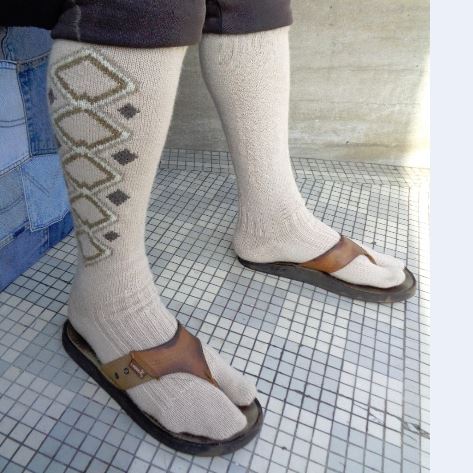
These are the snake skin socks that I have been working on for my brother.  In previous posts I have given you the chart for the leg portion.  In this post I will share with you my method of keeping these socks up where they belong all day long.  And he said that they indeed stayed up all day long.

One of the secrets of making knee highs stay “up” is making them big enough at the calf so that they just lay nicely on the skin.  Once past the calf portion I worked a 2 by 2 rib for about  1 1/2 inches or until I reach the indent at the back of the knee, putting in lifelines to mark my casing stitches that I would pick up later.

Since this pattern is establish for 121 sts, I have 3 knit stitches as my center back.  I will be making a yo buttonhole for the 1/4 inch elastic to be inserted when done. As my gauge for these socks were 8sts to 11 rows, I calculated that a 5 or 6 rounds(rows)would be close to, or slightly over 1/2 inch.

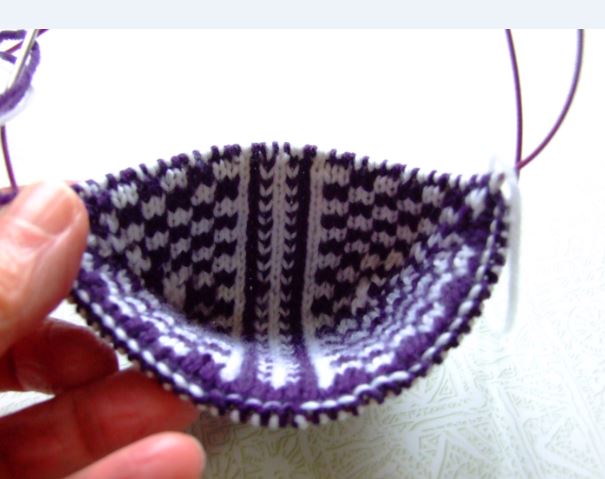
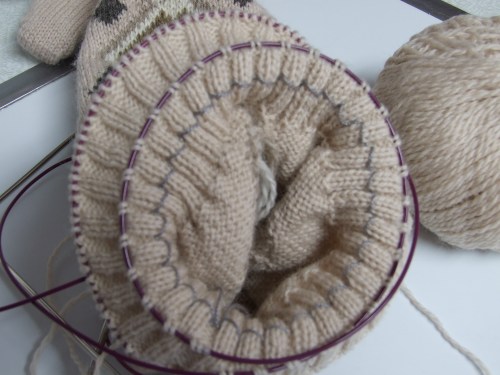
In the photo below you can see the gray lifeline (#1) that I established at round 7 using #10 crochet thread, picking up the purl bumps only, on the back side of my knitting. These were picked up after I knitted round #8, so that they would lie directly under my needle cord.

Once this is done work another half inch, then repeat the same process.

008

Once you have finished you 1 1/2 inch rib, now you need to complete the inside casing.  Knit 2 rounds.  Beginning at the center back 3 sts; knit 1, yo (twice), K 2 tog.  This YO will make your buttonhole opening for the elastic.  Next round , center three stitches; K 1, k YO, K 1. Finish ribbing round.  Continue your rib until you are a little more than one inch from you from you top(second) life line.

Next, using a smaller circle needle(I used a #o circle needle) pick up the sts from your second life line from bottom top, beginning at the center back, where you have 3 purl bumps.  Line up both needles, placing about 1/4 of the total sts on the steel part of the needles. Your knit sts on the front side should line up with the purl pairs on you pick up needle.

waynes sock top 1

Work rib across as before, but this time knit the knit stitches from the front needle with the purl pairs on the back needle.  Purl the next 2 sts from the front needle only.  Repeat, until all sts are knitted for this round. Release the pick-up needle.

Work the next half inch as before, making buttonhole opening for elastic in center back.  Pick up the next stitches off the next life line.

waynes sock top

Line up the needles.  This time bind off the knit stitches with the purl stitches on the pick-up needle.  bind off the next purl stitches on the front needle by themselves. Repeat on all stitches are bound off.

014

Now they are finished and ready for the elastic to be inserted into the button hole at the center back.  I have found that 1/4 inch elastic works very well.  I like it better than the round elastic, as it seems to hold up better.

Below is a detailed description of this process using my gauge.

I knitted 17 rounds of rib to my desired height.  My life lines were put in on round 7, and 12.  Rounds 18-19 were worked even.  At round 20, I made my YO opening in the center back 3 stitches. Worked 3 more round even, then stopped and pickup the stitches off my nearest lifeline.  Next I worked 2 more rounds. Next round ,worked buttonhole(YO), then worked next 2 rounds even.  Picked up stitches off last lifeline, and cast off.  I inserted elastic, overlapped it one inch, and stitched it by hand. My brother had previously sent me the measurement for the elastic, so I knew I was in the ballpark.


Happy Knitting- KT


Read Full Post »

I promised that I would upload this pattern, so here it is.  The instructions are general, as I know most of you knit socks already.  This pattern includes the following techniques – Fair Isle, tubular cast on, double knit short row heel and toe, and Kitchener closure.  I have also given instructions on how to prepare for the inserting elastic in the rib casings.    If you have forgotten what they look like, below is a photo. nordic rose knee  high for website

I have altered the pattern a bit, realigning the roses and adding rose buds at the top.  The pdf’s below are available for you to upload.

Nordic Rose Leg and Instep Chart

Nordic Rose – Knee High Pattern

Nordic Rose Hell and Toe Charts

You might want to check out my post on “Oops Becomes a Blessing.”  This post gives you more info on the elastic insertion.  I am still finding the after several washing, the stockings stay up all day.  The combo of using a larger needle for the calf area, combined with the 1/4 inch elastic rounds enclosed in the ribbing works like magic.

I you have any questions, you know where to reach me.

Happy knitting- KT

Read Full Post »

nordic rose knee high finish 1

When I finished these “Nordic Rose” knee highs, I found that they were a bit loose for me.  At first, I just washed them in the washer and put them into the dryer to shrink them a mite.  That helped a little but they were still a tad to big around the ankle.
To compensate, I pulled them up higher, which left me with a ribbed band that was a bit long.   The fix-fold it over, encasing  1/8 th inch elastic bands to secure them around the top of the calf.

nordic rose knee high finish 2

Because I had striped the ribbing, I was able to use a crochet hook to slip stitch the opposing purl bumps  that formed the black strips together (top of photo) to form a casing for the joined  elastic band.  The next step was to slip another elastic ring over the sock in into the area just under the first casing.  Using the crochet hook again, I slip stitched the top edge of the stocking to the base of the ribbing.

The real lesson here is that because the stockings are a bit looser, and they have the elastic rings in the top to pull them in, they stay up all day.

The next time I make this design, I will plan my casings in the ribbed( using #2″s)  area, use the #3 needle for the calf area before the decreases, then return to the #2 to finish the stocking.  That extra stitch per inch in the calf area, allows the knitting to move with you, without seeking a path of least resistance to the ankle- just like water flowing down hill.  The secret is to make them long enough to have the elastic ride above the largest calf portion, so that it pulls in just below the knee.

Below are the charts for this stocking.

Nordic Rose Knee High Pattern

Nordic Rose Knee High Chart

Nordic Rose Heel, Toe, and Border Charts

Happy Knitting-

KT

Read Full Post »

Finishing up a project is very rewarding, and for me, is not a “get it done” thing, but more of a “see how neat you can make” thing.  I have learned to take my time, concentrating on the details.

In the case of this Fair Isle design, this means securing those long floats we discussed in my previous posts.  So before proceeding with this part of the task I have a couple of things to remember-

1)  check to make sure that all my loose stitches have been secured

2) check the end stitches of the long float areas to see if they have become loose.  If they have then I will pull the float in the back toward the center of the diamond to take up the slack and secure it close to the beginning or ending of the float first before attempting to secure the middle.

3) use only a single ply or 2 of the background color for stitching down the yarn floats.  In the case of this sock yarn, I am using 2 plies of the red.

Below is a photo of one of the large rose sections that I am presently working on.

long float tie down

Using a sharp needle, I pick up a few thread of the red background yarn, then stick through the middle of the black float, repeating this move across the desired area, pulling the tie down strand just tight enough so it lays smoothly and stretches with the knitted fabric.

I usually begin at the bottom to the top of the diamond, working about 3/8 inch from the left edge.  After weaving in the ends of my thread, I repeat the process for the right side.  Once the sides are secure then I work on the center area if needed.  Below is a photo of one diamond that I have finished.

long float tie down finished

You can see that it is very hard to see the tie down yarn, but every black float in the picture is tied down securely, yet will move freely with the stocking.

In step #2– if you find that after you have secured your floats about 3/8 inch in from its beginning and end, and still have loops in your float as in the photo below-

loose loops 1

Here is what to do.  First, if possible using a dp needle, carefully equal out the excess across the span.  Next, lay the work across you leg, give it a bit of a stretch, then using your needle and single(or two) yarn ply begin weaving across the middle of the affected area, as in the photo below.

loose loops 2

Repeat this process with with each span. You will notice that this time I am using the black yarn.  Why?  I ran out of red. 🙂  But I’m not concerned because I am only picking up a tiny bit of the red yarns in the background, so it will not show through.

Below is a picture of the finished diamond.

loose loops 3

The extra yarn in the loops has been secured and will not be moving back to form loose stitches at the color change on the right side.

Happy Knitting-

KT

Read Full Post »

As I was working on my second Nordic Rose stocking I decided to experiment with some Armenian knitting in the sole area.  Below are the results.

The first picture is of the area I constructed by “stacking the floats.” What’s that?  I make sure that I weave the  alternate yarn in at the same place( vertically) every round.  The result is a ridge of stacked stitches that are slightly raised above the stitches on either side.

armenian knitting - stacked ridges

As you can see the ridges are quite visible.  Now, this could be a problem if you want a smooth finish, but it could also be used to form a ridged textured fabric if so desired.

The second method, or alternate floats, give you a much more even texture.  This requires that you recognize how to set up the first stitch of the round to off set the floats.  I will see if I can draw up an illustration soon, but for now, the results are in the photo below.

armenian knitting -  alternate floatsYou can see in this (not quite so clear) photo that it is much smoother than the one above.  The alternate floats eliminate the ridges.

Now compare the above methods with using Fair Isle with long floats. Not as sturdy, but definitely the smoothest.

fair isle with long floats

Why did I use Armenian knitting on the sole?  Simple.  It makes a very sturdy fabric.   It provides a way for you to construct your socks so that the areas that have the most wear are reinforced.

Just passing this on-

Happy Knitting!

KT

Read Full Post »

While working on my Nordic Rose stocking I did a little experimenting.  Why?  The pattern for this stocking has large areas of one color, and kind of stretches the Fair Isle method to its limits.  How to handle this problem became my challenge.

The first chart section I constructed using the Fair Isle method with short floats, say at least every 3/4 inch, and established breaks on my one circle needle for NA(needle A-front) and NB(back).

The second portion of the chart I changed my needle positions to suit the pattern, allowing me to work across the design portion without any ladders to worry about.  I also did not weave in my alternate yarn color as before.   The results were stunning.

fair isle comparison

The upper section of the above photo was done in the second method, repositioning the needles as I worked around the chart.  Of course, another benefit of this method is that you yarns don’t get tangled as they remained in the same place all the time(black on the right, red on the left).

The lower section of the example where the floats were kept shorter, shows slight dimples( see photo below)in the surface. This happens no matter how loose you leave the float.

fair isle with short floats

If you use the second method and leave your float too loose, the stitches at the opposite ends of any section of the color can loosen and affect your gauge.

fair isle with long floats

The remedy-

By securing or capturing the alternate yarn at the change of the new color, and then again one stitch before the change at the other end, the float will stay in its proper place.  To make the capture of the alternate yarn on the far end of the float smooth, first stretch out the stitches to the right, then bring your yarn(black) firmly across the expanse-

1) wrap as to knit,

2)wrap main color(red) as to knit

3)unwrap alternate color(black)

4)complete stitch with main color (red).

The next stitch will be the new color (black).  Now the float will stay in place and lay horizontally(with no discernible dip) across the back of the red stitches.  I always tip the work forward to check the tension of the float before proceeding to the next section.  I make sure that everything stretches out equally.  Taking the time to do this will save you lots of headaches later.

You will notice that the diamond above is very smooth.  The long floats on the inside that I deem might pose a problem when sliding on the stocking will be tacked down with a needle and one ply of the background yarn ( in this case, red).

The process of moving the needles as I go has  eliminated the need to deal with the “ladders” of  circle needle knitting.  One thing that makes this easy is that this pattern always has a center back pattern, and the last stitch of the round completes the right side border of this section.  This lets me know where the round starts without using a marker.

Below is a photo of a new needle position, as I retain about 10-12 stitches on my right needle, and prepare the left one to knit across the rose diamond section.

nordic rose-repositioned needles

It works for me!  Give it a try. Below is a practice chart for you to try.

Nordic Rose float Practice Chart

Of course, I could do this pattern in Intarsia, as the center back stitches make an excellent point for a turn around.  Hummmmm????

Happy knitting!

KT

Read Full Post »

After completing the Nordic socks, I ventured to come up with a double knit heel to replace the two I knitted in the original design.  Below is a photo of the results.

double knit short row heel-1I began this heel “test” with a provisional crocheted chain of waste yarn, ( as I do all my experiments),then picked up 37 sts using the MC, then set up my double knitting row.  Setting aside the 5 stitches in the center, I worked a alternate checker board design for the rest of the heel.

I treated the short rows the same as I would if I were working with a single thread, except for the fact that I brought both yarns to the back when slipping the front knit stitch, and both yarns to the front, before slipping the back purl stitch.

Below is a photo of the inside.

double knit short row heel-2

Here is a photo of the completed turns.

double knit short row heel-4

double knit short row heel-5

Both sides are completely finished and ready to complete the rest of the sock.  You can also use this method to make you toe section.

double knit short row heel-6

I closed the short rows in the same manner as I use in J’ Short Row Heel instructions, using the appropriate color to retain the design.  The only difference is that you will be working one side at a time.  After completing the knit side closure, I  bring the yarn to the front, then turn the work around. With the left needle tip, I pick up the slipped st in the row below the stitch to the right of the slipped st, place it on the needle, then turn the work again back to my original knitting position, then purl the two stitches together.  The rest is the same.

I have charted this design, you can upload to practice with in the near future, but for now, it’s something you might think about trying.  The instructional PDF includes several charts for you to choose from. I have also included some illustrations.

Double Knit Short Row Nordic Heel

I definitely will be using this in my next knee high stocking design, and my husbands socks as well.

Happy knitting !!!

KT

Read Full Post »

nordic knee highs

Well, they are finally off the needles and covering my “tooties.”

nordic knee highs 2

I thought I might let you in on my secret of keeping them UP!

I have found that elastic thread crocheted to the inside of the top of the rib does a good job.  You might also notice, if you take the time to look at some of the commercial socks, they also use this method.

nordic knee highs- elastic finish

It is really easy to do.  Using a small crochet hook, make a slip knot in the elastic thread leaving about 6 inches for a tail.  I begin my crocheting about 2 sts down from the top edge.  I use the knit 2 sequence of the rib to anchor the crocheted chain, then chain 2 between the sections of the rib.   Slip stitch you elastic into the right leg of the first selected knit stitch, then slip stitch into the left leg of the knit stitch directly to the left.  The next step is to chain 2(which take care of the purl 2 section), then repeat the 2 slip stitches as before in the next group of knit 2’s to your left.  The tension you use to hold back on the elastic thread will determine how tight it is, so be gentle.  When you have completed the round, leave a 6 inch tail and pull the elastic through the last slip stitch.

DO NOT TIE IT OFF.

Put the stocking on, and see how it works.  If you need to tighten it a bit, then simply release the elastic, pull it out and tighten your tension a bit more.

You can work 1-3 rounds of this elastic chain, spacing the chains about 2-3 stitches apart.  I made my second round 3 stitches below the first round.

  They worked for me.

Give it a try!

nordic knee highs- paired with twine knitted mocassinsHere is a photo of these knee highs paired with my Twine knitted moccasin.

Happy knitting!!!

KT

Oh!  Be sure to check out the pattern charts I uploaded for you in my last post.  Check out “Nordic Boot Sock Ideas.”

Read Full Post »

cozy toes nordic sock

This is my latest knitting endeavor.  This sock is knitted in Fair Isle, with a double heel and toe.

Below is the inside of the sock.  You can see that the toe and heel are smooth, as the knitted side is on the face.

inside of cozy toes nordic sock

I accomplished this by first setting up the heel section for double knitting ( knitting and purling in the same stitch with the appropriate colors).  The next step was to put the white(or inside stitches) on a #0 circle needle, letting them ride on the cord while I knitted the short row heel in purple. Once the outside heel was done, I simply slipped the “white” stitches on to my #3, and completed a duplicate heel.  Next, I matched up the short row turns, connecting them together with one ply of the yarn. I did this to keep the two heels in proper alignment.

** One trick I learned with this experiment was to set up for the double knitting with a size smaller needle.  If you don’t, then you need to take the slack out of the stitches before you start knitting the heel/toe, working from the right to left toward the working yarn end.

The next step was to join knit last row of the heels together.  From here I continued the pattern of the instep and heel.

At the toe portion, I repeated the heel procedure, joined the two toes together as before, then Kitchener stitched the final stitches to the remaining stitching of the sole.

outside of cozy toes nordic sock

The heel and toes are  soft and padded.  The extra thermal layer should give me the extra warmth and flexible room to wiggle my toes in. 🙂

The basic sock is knitted form the top down, and is tapered in to fit my leg. I had the star pattern from another sock.  You could use any of your favorite designs for this sock.

Design your own.

I will be working on a demo for the heel and toe, and will upload it when it is finished.

Knit-tweaker

Read Full Post »

While completing the heel section of my husband’s new pair of boot socks, I played around with different needle arrangements that would take the strain off the short row closures.  What I settled on was the following method.

First the set-up.

I use one 47 inch circle needle to make all my socks.  I always label the top of the sock as riding on NA( needle A), and the heel or bottom of my sock, as NB(needle B).

When I am ready to make the heel, I now pull out a loop of my needle cord in the center of the top of my sock(section A).  I do the same for the heel section B.

repositioning needles

You can see the arrangement above.  As I was working a wedge heel,(or Sweet Tomato heel) I marked the beginning of my short row turns with a marker.  In the picture above I have completed one wedge and it is hardly visible.

This arrangement of needles definitely takes the strain off of the yarn bars between the short rows turns, and makes the closing round much easier to accomplish.

Just thought I would pass along this tip!

Happy knitting!

KT

PS- I have added recipes to my low carb e-book.  Check it out.

Read Full Post »

Older Posts »