Feeds:
Posts
Comments

Archive for the ‘Knitting Tutorials’ Category

Not long ago, I posted the photo and pattern of the bathroom curtain set I designed.

lace curtain finishedSince that time I have had over 700 uploads of the pattern. As a result, I have also had a request for a larger version.  To that end I have designed a 60 inch valance for those of you who have larger windows to cover.  It should go nicely with a 36-48 inch window.

Why only the valance?  If you make the valance first, the fullness and drape will let you know if you want the bottom panel larger or not.  You will get the full affect of the lace-and you might not even need to knit a bottom panel, the valance might just do the trick nicely.  I have included the original chart for the bottom panel in this tutorial.

Below is a graphic of the valance chart.  It gives you a feel for the overall design.  This chart is for a 60 by 30 valance.

graphic of lace valanceEach side panel is graduated toward the center.  The original center panel has been expanded two extra repeats.  The possibilities are endless.  You could continue adding the Lilly of the Valley arches to the side panels, blending them in to the center.

2006-06-21 06.38.14

2006-06-28 00.44.01


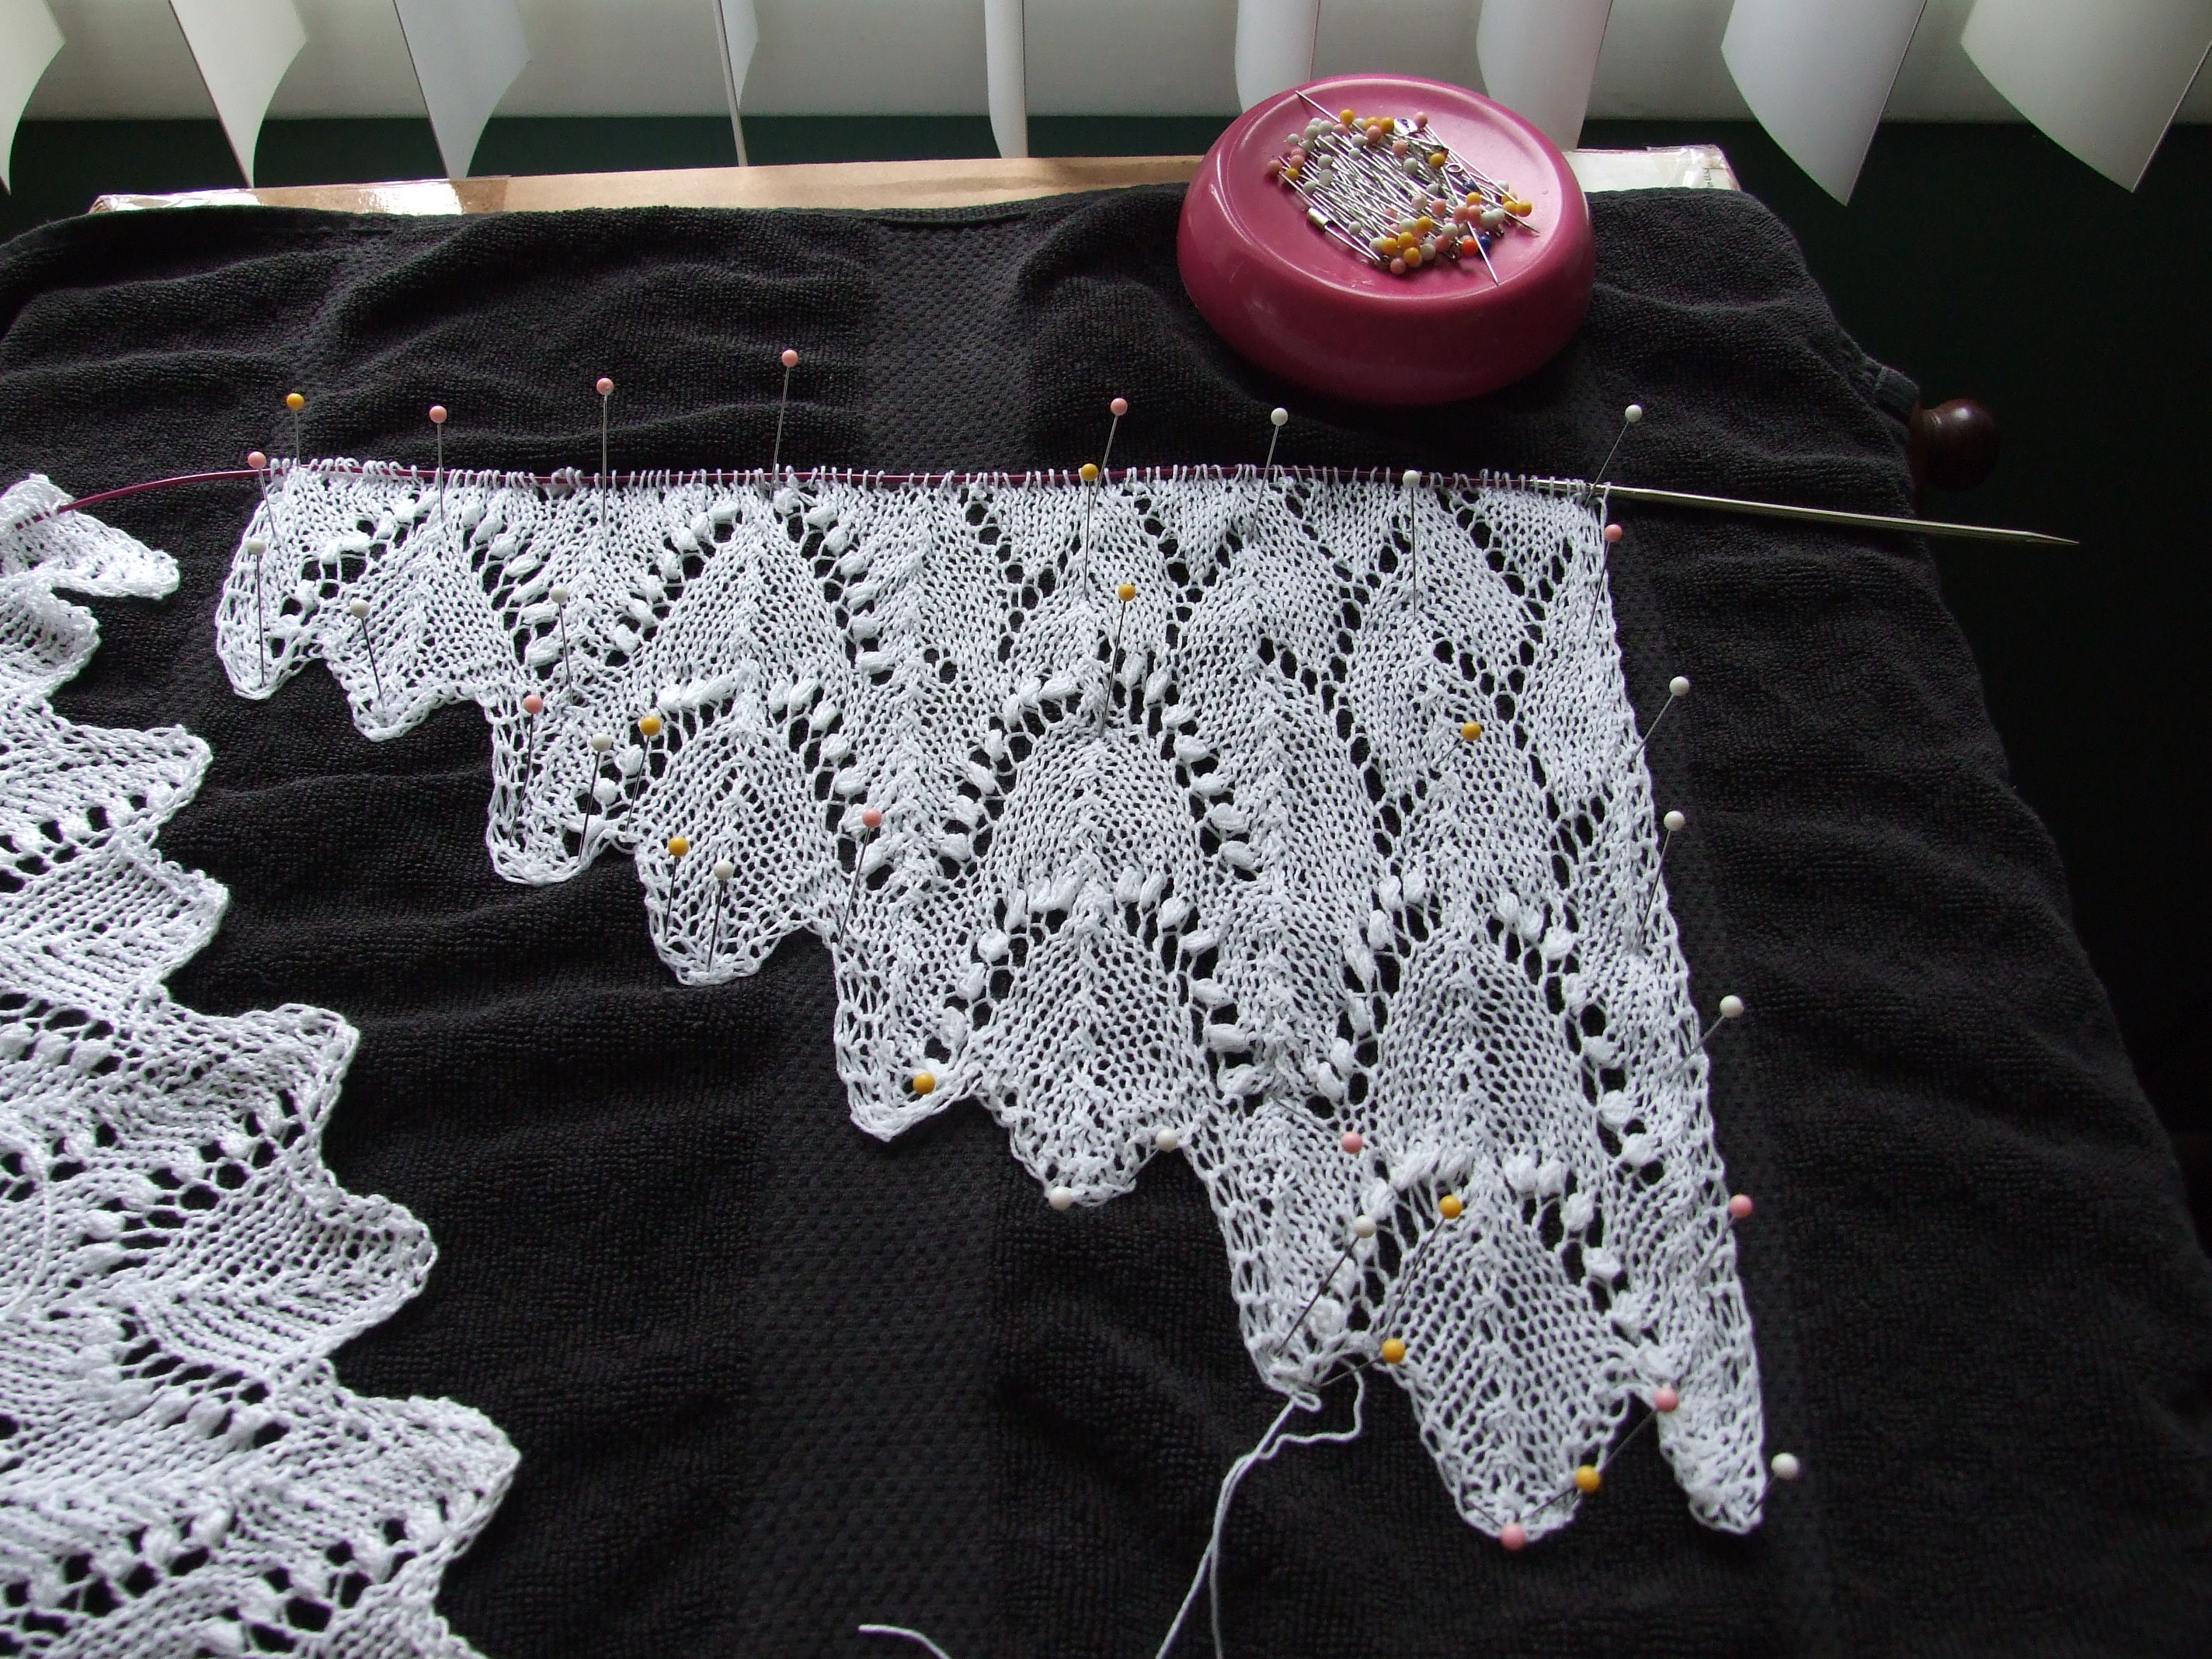
Each side panel in this 60 inch version measures 12 -13 inches, including the 3 stitch border. Each added arch equals approximately 3 inches in width.  If you needed a 72 inch version, you simply add two extra arches to the side panels (6 inches on both sides).  You can also add to the length of the side panels by adding on or two extra vertical arch repeats.  You also have the option of adding to the top as you knit you Stockinette finish for the casing.

There are 4 files in this pattern because of the size.  The first one includes instructions and chart symbols.  The last 3 are the charts for each section.

*Note-  I did  not write instructions for every row, only those that need extra explanations.  These rows are starred in red on the right side of the charts.  The rows are also number, and each chart has the corresponding numbers to the others.  The chart symbols are explained in the tutorial.  I have also illustrated special techniques when necessary.

Instruction manual – large lace curtain valance

Right Panel – large lace valance right side

Left Panel – large lace valance left side

Center Panel – large lace valance-center panel

Of course my brain is just full of creative possibilities for this type of project.  Pictures of flowers, animals, scenes from nature- hum…………………………………?

Happy knitting – KT

Read Full Post »

becky's finished purse

becky's finished purse- -casing detail

Knitting in the beaded daisies in the casing of this evening bag requires a little practice, but is not hard.

I have applied the “wrap” method that I use to set the beads on top of the knitting.   This application is described in my first beaded evening bag tutorial, but just for a review I will explain it again here.bead wrap 1When you come to the stitch that you need to apply the bead, slip the stitch to the right needle, bring the working yarn (in pink) forward, then slip the stitch (green) back to the left needle.

bead wrap 2Slide the bead to the base of the stitch.

bead wrap 3While holding the bead in place with your left thumb, bring the yarn to the back and knit the stitch (green) through the back loop.

bead wrap 4Adjust any tension errors before you move on.  Make sure that the bead is resting at the base of the stitch.

Using this same method, I used a string of beads, instead of one, to make the petals of the daisy.

bead wrap 5The only difference using the string of beads is the drape.  On the knit side swing the beads to the right, hold in position and then bring the yarn to back and knit in the back loop of the stitch as before.

bead wrap 6The purl side is handled in the same manner only your beads will be on the side of the needle opposite you.  But to clarify –

Purl side-  slip stitch indicated in chart for bead (single or string) placement to the right needle.  Bring yarn to knit side between needles.  Slip stitch back to left needle.  Swing bead string to the left, hold in place with right index finger, then bring yarn to purl side.  Purl the stitch as usual.  Make tension adjustments, snugging bead string up so it lies smoothly at the base of the designated stitch.  Not too tight!

Charted Daisy

daisy flower charted

In the chart for the casing of the evening bag the daisy flower is charted as above.  The blue square indicates the center (accent bead) of the flower.    The outside petals (bead string) are dropped in on the purl row above.  The yellow square with the star, indicates the placement stitch for the bead string.

After the knitting is all done, I secure the beads in place with a single strand of the yarn.  In this case, the Lindy Chain is unchained and used for my sewing thread- a perfect match.

Here is the pattern for the evening bag-Daisy Flower Beaded Evening Bag

I crochet the daisies on the strap tabs with bead wire.

If you have any question you know where to find me.

Happy New Year!!

KT

Read Full Post »

bead evening bag flap 2Since my recently knitted purse expanded my knowledge of knitting with beads, I thought I would try and take it one step further-paint with them.  The above photo is of an evening bag flap that will cover the hex frame and lay smoothly to about 1 1/2 inches from the bottom edge of the purse.  The design features the letter”T” in the middle, with various swirls etc to complete the shape.  In order to accomplish this I had to come up with a method that did not interfere with the gauge, and yet allow me to insert beads every stitch if need be.  Hummmm……..?????????????????????

Let see–,using the slip stitch method on YOUTUBE requirew first  pre-stringing your beads onto the yarn; then work to where you want your bead, bring your yarn forward, slip the stitch purlwise, lay the bead at the base of the slipped stitch, then bring the yarn around the back to knit the next stitch.

So what’s the problem with that??  Well, the problem is that you can’t line up your beads together, you can only put them in every other stitch.

The next method uses a crochet hook to go through the bead, and bring the newly knitted stitch through the bead hole before replacing it on the right knitting needle.  This method does not require you to pre-string the beads, however, you can’t stack them or place them every stitch without greatly changing the gauge of your knitting.

Well, that won’t work!  So what to do?????

I want the beads to set on top of the knitted surface, so they will not affect the gauge.

I want to be able to chart my design.

I don’t want to have to count stitches and rows in order to put them in, if I wanted to do that I would do counted cross stitch.

I want to be able to tweek them a bit if needed to make the design.

After playing around a bit, beginning with the idea I shared with you in the lace curtain design, I came up with this.  You can call it whatever you want.  The nice thing is it works, as you can see in the photo above.

Here it is for you to play with- Painting with Beads

I have added some illustrations to make this process more clear.


I know you will come up with your own great ideas.

Go for it!


Happy knitting!  KT

Read Full Post »

This project has been developing as a possibility for some time, but I finally got my act in gear and just went for it.  This evening bag is knitted with “Navy Lindy Chain” yarn (Knitpicks) and combines both a Honeycomb stitch, with a bead inserted in the middle of each diamond formation. The casing for the facile hex purse frame is knitted in Stockinette.  The dazzling strap is beaded spiral rope construction of  .06 multi iris transparent beads and Curio crochet thread, both from Knitpicks.

beaded purse- night shot

The evening bag is 9 by 5, with a 42 inch spiral beaded strap.

beaded purse finished


Each of these photos were taken with different setting of the camera, because shiny beads are hard to capture.  The “night” and sunset” modes seem to do the best.


037

In the above photo, you can see the inside of the bag.  You will notice that I put a zipper pocket in the inside purse.   I made a complete purse with lining in a nice cotton fabric, then hand stitched the knitted purse over the top.  This gave me great stability, and as you can see, it even stands by itself.

There are “D” rings on each end, which hold the strap in place, yet don’t interfere with the hinge.

Beaded Honeycomb Purse

I have created a pdf instructional guide/pattern for you to use if you like.  Caution! This is not a quick knit, and it takes patience, but I think it was well worth it.

I will be working on various alternative straps and will upload the instructions as each one is completed.

This has been great fun, and definitely has gotten all kinds of “oo’s and ah’s” from everyone who has seen it.

I have never worked with beads before I designed the bathroom curtain that I shared in my recent post, but now that I have-look out!

Happy Knitting- KT

Read Full Post »

I recently finish a lace curtain set I made for my bathroom.  I used Curio from Knitpicks for my yarn.  It is truly a luxury crochet weight (lace)with a softness and sheen that is very lovely.  Below is a picture of the finished project.

lace curtain finished

When I had finished the main panel, I decide to get”cute” and trim the bottom edge  with rose colored beads to add a little contrast.

lace curtain bottom edge of center panel

When it came to the valance, I decided to try replacing the Nubbs/Bobbles with the rose colored beads.

lace curtain, beads for nubbs 3

*I know that there are some who will want to quibble over the terms bobbles and Nubbs, but for me, any time a pattern calls for me  to knit up more than 3sts in one knit, and gather it together in the purl row, I think of it as a bobble.  Maybe that is because I think of a bobble as something that “hangs,” and a nubb, as something that just makes a bump.  Anyway, it is the end results that counts.

It has been fun working with this great yarn, and adding the beads was just an extra bonus.

I have charted this pattern for you, along with instructions on how to replace the Nubbs/Bobbles with beads.  I am sure you will come up with more ideas once you get started.

Please take time to practice and swatch each section.  The cast on will be determined by your window.  I advise adding at least 4 inches in width for ease.

Lace Curtain Pattern

The lace curtain pattern includes instructions and charts for lower panel and valance.

* Note- you do not have to print off the last page of the pdf pattern.  As you will note, it has cross stitch info that is not for knitting-it’s just part of my charting program.

By the way, my window opening was 24 by 36, which is the area I wanted to cover.


Happy knitting- KT

PS – If you are a Ravelry member, you can get the free pattern there.  Just type in “Lace Curtain Set” by Judith Helms


Read Full Post »

The other day I was looking at my bathroom window and trying to decide whether I wanted to purchase a curtain or not.  Then, I came up with the brilliant idea of knitting one.

As I have a lot of knitting shawl patterns, I chose to use one that called for a “Lilly of the Valley” lace on the bottom edge.  Of course, that called for working with “Nubbs”,- you know, that stitch that calls for you to YO, knit one umpteen times, then purl all those loops together on the next row.

The results of this endeavor was that I came up with a short tutorial with some tips on how to handle the process so that my Nubbs were neat, and easier to purl together.

Below is a photo of the work in progress-

knitting nubs- lilly of the valley

This will look a lot better when it is blocked , but at least you can get an idea of what I am talking about.  My bathroom is grey, white and pink, so I opted for this silver lace cotton yarn from Knitpicks.

I hope this little tutorial will be of some help.  I mainly wrote is up for myself, so I can remember how I did it.

Ain’t old age great? 🙂

Knitting Nubbs tutorial

One more tip- if you you find one with a loop not laying right, on the knit side, you can insert a DPN into the center of the loops and gently work the slack out.

Happy knitting- KT

Read Full Post »

sparky pillow finished

Tada!  May I present “Sparky.”

This was absolutely a fun project, and I thought I  would share the finishing process with you.

The various modes of construction consisted of  Intarsia, Armenian knitting  and basic stockinette.  The subject in the design was created to be a relief sculpture.  This was accomplished by using 3 strands of lace weight mohair.  The additional strand enlarged the dog without adding stitches to the chart.  The background was done in Palette fingering weight from Knitpicks..

Once the knitting was complete, I washed and blocked the pillow top.

sparky pillow-blocked

The outside edges were blocked to an 18 inch square.  Next, I pinned out the dog, so that all the knitting lines in the background were straight, leaving all the extra width and length in the dog to puff up.

After the piece had dried, it was ready for me to start filling in the sculpture.

sparky pillow-creating relief - 1

In this case, the first area I filled was the muzzle, as I wanted it to stand out more than the rest of the head.  The next area was the tail, which he loves to swish around.  After putting a bit of fiber fill in these areas, I secured them by putting a piece of netting over the top and stitching it to the knitted surface that outlined the various parts, being careful to just catch a small amount of fiber from the back of the yarns.

sparky pillow-creating relief -  2

The next step was to fill in the head.  I pout more in the center of the head, then tapered the rest out to the edge of the ears.  the hip and legs were next.  How did I know how much to use- I didn’t.  I just turn it over and look.

sparky pillow-creating relief -  3

Once these areas have been filled I placed a piece of netting over the entire dog, and stitched around the edge of the subject to secure the filling.  Next, I turned it to the right side.  Using straight pins, I pinned down the areas I wanted to flatten, or define.  To secure the shape, I stitched it to the netting, from the back, always being careful to not have any threads show on the right side.   The next phase is making the pillow back.

Constructing the Back

For this particular pillow I wanted to make a looped fringe, using most of colors in the pillow top construction.  To do this I loosely knotted the yarns together, placed them in a bag, and hung the bag on the door adjacent to my sewing machine.

sparky pillow - making the looped fringe -1

With the right side of the back facing me, I placed a piece of tape 1 1/2  inches in from the edge of the fabric.  I set my foot for a 1/2 inch seam.

Using a figure 8 motion, I looped the yarns back and forth, extending the right side loop 1/4 in past the right edge of the fabric ( so I could hang on to it), and extended the left loop to just touch the tape.  I pushed these loops under the foot of my machine ( tight), and using tiny stitches, stitched them to the fabric.  It took a bit of practice, but soon I was moving right along.

sparky pillow - making the looped fringe -2

Here you can see that I have turned the corner.  I cropped my corners a bit, too.  It worked out well.

sparky pillow - making the looped fringe -3

About 2 hours later-  I’m just kidding, but it isn’t a quick job.

sparky pillow - making the looped fringe -4

Now I am ready to sew the pillow top to the back- well maybe.

To avoid any chance that the loops should get caught in my sewing I opted to baste them in place, using some old seam binding.  This just took a few minutes, but was well worth it, as I didn’t have to worry where those pesky loops were lying.  I also zigzagged the fringe to the fabric edge, then trim the over hanging loops from the edge, leaving a clean edge to line up my pillow top.  sparky pillow finished - relief demo

Here is a side view of the relief.

Yeah!  Now I have two Sparky’s!

Just sharing- KT

Read Full Post »

I have been working on the idea of double knitting my Honeycomb purse design, but ran into an interesting problem.  The Honeycomb stitch I created with my #4 needle and Galileo sports yarn, worked out to have 5 sts to 12 rows per inch, and the stockinette stitch with the same yarn and needles worked out to 6 sts and 8 rows per inch- needless to say,that ain’t gonna work!  So… how to solve the dilemma?  I had to eliminate 4 rows somewhere.

I had to think about that one for a bit, but the answer was quite simple-slip every 3rd row, of the stockinette stitch.  I tried it and it worked.


Below is a sample of a solid color honeycomb pattern.

001 (7)

This sample is knitted in the round.

002 (8)

The above photo is what the inside of the sample swatch looks like.  I have slipped every 3rd round of these Stockinette rounds.

How do I know it works?  When I pulled out the needle the top of both side lined up perfectly.

003 (9)

In this photo, I was working back and forth in rows, and decided to pull out the needle to show you what happens.  both sides are the same.  With this discovery, my purse lining will always fit.  The flap will be flat, and Ican insert a woven interfacing to stabilize the shape before finishing off the edge.

I have charted this process for you to try.  There is a swatch chart for knitting it in the round, so you can make a purse or whatever, and there is a chart for a swatch for practicing using it in rows.  I have also upload a tutorial that illustrates the Honeycomb stitch.

 There are also instructions for a long tail  1 x1 ribbed cast on.  The purl cast on is illustrated here.   The knit stitch is created by the normal method of creating the stitch with a long tail cast.  These two methods are alternated, creating  what I call a “ribbed cast on.”  It works great for setting up double knitting.

I hope you give it a try.  I can see all kinds of possibilities for this technique.  Hummmm??????

Honeycomb Stitch Illustration

Honeycomb Pattern Swatch Charts

Happy Knitting- KT

Read Full Post »

Well- I promised I would work on this, so here it is.

cake pan jacket

I used cotton yarn(Peaches and Cream), and 1 inch elastic (non-roll).  I also opted for a variegated MC (main color) and used a solid black for my CC(contrast color).

In the process of working on this I also discover how to make a alternating color cable cast on, which is match on on the top with and alternating color cast off, both edges mirroring each other.  I think it is pretty cool.

The main body of the knit is done in double knitting, which forms the casing for the elastic.  The elastic band is knitted right in, so when you are done-your done!

Below I have uploaded instructions for this project, in which I have included instructions for the “alternate color cable cast on, and off.  There is a swatch practice for you to use for establishing your gauge and practicing both the cast on, and cast off.

If you are not sure why you should make one or two of these “pan jackets”  then check out this post


Cake Pan Jacket

Happy knitting- KT

PS-Because of my discovery, I also can use this method to make straps for my purses.  Having the casing open on both ends will allow me to insert a piece of ribbon into the strap, stabilizing the stretching, and…..I will have two pretty edges to boot.  Yeah!!!!

Oh,just an observation-

I washed my jacket, squeezed it out, put it on my pan, blocked it out and let it dry.   Then  I  observed that the cotton yarn holds the moisture quite a bit longer than wool, so  I finally, tossed it in a low dryer.  It didn’t hurt it a bit.  I can’t wait to bake with it.  I will let you know the results.

Read Full Post »

I promised that I would upload this pattern, so here it is.  The instructions are general, as I know most of you knit socks already.  This pattern includes the following techniques – Fair Isle, tubular cast on, double knit short row heel and toe, and Kitchener closure.  I have also given instructions on how to prepare for the inserting elastic in the rib casings.    If you have forgotten what they look like, below is a photo. nordic rose knee  high for website

I have altered the pattern a bit, realigning the roses and adding rose buds at the top.  The pdf’s below are available for you to upload.

Nordic Rose Leg and Instep Chart

Nordic Rose – Knee High Pattern

Nordic Rose Hell and Toe Charts

You might want to check out my post on “Oops Becomes a Blessing.”  This post gives you more info on the elastic insertion.  I am still finding the after several washing, the stockings stay up all day.  The combo of using a larger needle for the calf area, combined with the 1/4 inch elastic rounds enclosed in the ribbing works like magic.

I you have any questions, you know where to reach me.

Happy knitting- KT

Read Full Post »

« Newer Posts - Older Posts »