Feeds:
Posts
Comments

Posts Tagged ‘circle needle’

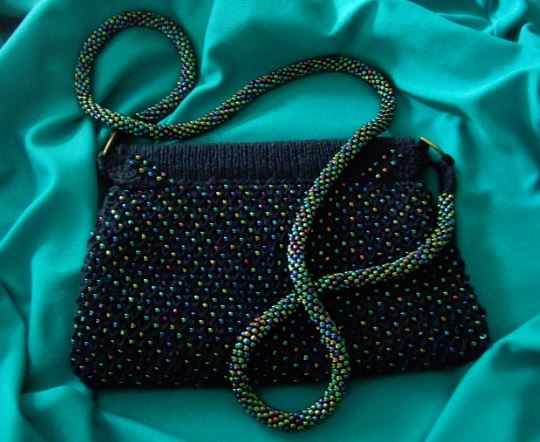
This project has been developing as a possibility for some time, but I finally got my act in gear and just went for it.  This evening bag is knitted with “Navy Lindy Chain” yarn (Knitpicks) and combines both a Honeycomb stitch, with a bead inserted in the middle of each diamond formation. The casing for the facile hex purse frame is knitted in Stockinette.  The dazzling strap is beaded spiral rope construction of  .06 multi iris transparent beads and Curio crochet thread, both from Knitpicks.

beaded purse- night shot

The evening bag is 9 by 5, with a 42 inch spiral beaded strap.

beaded purse finished


Each of these photos were taken with different setting of the camera, because shiny beads are hard to capture.  The “night” and sunset” modes seem to do the best.


037

In the above photo, you can see the inside of the bag.  You will notice that I put a zipper pocket in the inside purse.   I made a complete purse with lining in a nice cotton fabric, then hand stitched the knitted purse over the top.  This gave me great stability, and as you can see, it even stands by itself.

There are “D” rings on each end, which hold the strap in place, yet don’t interfere with the hinge.

Beaded Honeycomb Purse

I have created a pdf instructional guide/pattern for you to use if you like.  Caution! This is not a quick knit, and it takes patience, but I think it was well worth it.

I will be working on various alternative straps and will upload the instructions as each one is completed.

This has been great fun, and definitely has gotten all kinds of “oo’s and ah’s” from everyone who has seen it.

I have never worked with beads before I designed the bathroom curtain that I shared in my recent post, but now that I have-look out!

Happy Knitting- KT

Read Full Post »

I recently finish a lace curtain set I made for my bathroom.  I used Curio from Knitpicks for my yarn.  It is truly a luxury crochet weight (lace)with a softness and sheen that is very lovely.  Below is a picture of the finished project.

lace curtain finished

When I had finished the main panel, I decide to get”cute” and trim the bottom edge  with rose colored beads to add a little contrast.

lace curtain bottom edge of center panel

When it came to the valance, I decided to try replacing the Nubbs/Bobbles with the rose colored beads.

lace curtain, beads for nubbs 3

*I know that there are some who will want to quibble over the terms bobbles and Nubbs, but for me, any time a pattern calls for me  to knit up more than 3sts in one knit, and gather it together in the purl row, I think of it as a bobble.  Maybe that is because I think of a bobble as something that “hangs,” and a nubb, as something that just makes a bump.  Anyway, it is the end results that counts.

It has been fun working with this great yarn, and adding the beads was just an extra bonus.

I have charted this pattern for you, along with instructions on how to replace the Nubbs/Bobbles with beads.  I am sure you will come up with more ideas once you get started.

Please take time to practice and swatch each section.  The cast on will be determined by your window.  I advise adding at least 4 inches in width for ease.

Lace Curtain Pattern

The lace curtain pattern includes instructions and charts for lower panel and valance.

* Note- you do not have to print off the last page of the pdf pattern.  As you will note, it has cross stitch info that is not for knitting-it’s just part of my charting program.

By the way, my window opening was 24 by 36, which is the area I wanted to cover.


Happy knitting- KT

PS – If you are a Ravelry member, you can get the free pattern there.  Just type in “Lace Curtain Set” by Judith Helms


Read Full Post »

nordic rose knee high finish 1

When I finished these “Nordic Rose” knee highs, I found that they were a bit loose for me.  At first, I just washed them in the washer and put them into the dryer to shrink them a mite.  That helped a little but they were still a tad to big around the ankle.
To compensate, I pulled them up higher, which left me with a ribbed band that was a bit long.   The fix-fold it over, encasing  1/8 th inch elastic bands to secure them around the top of the calf.

nordic rose knee high finish 2

Because I had striped the ribbing, I was able to use a crochet hook to slip stitch the opposing purl bumps  that formed the black strips together (top of photo) to form a casing for the joined  elastic band.  The next step was to slip another elastic ring over the sock in into the area just under the first casing.  Using the crochet hook again, I slip stitched the top edge of the stocking to the base of the ribbing.

The real lesson here is that because the stockings are a bit looser, and they have the elastic rings in the top to pull them in, they stay up all day.

The next time I make this design, I will plan my casings in the ribbed( using #2″s)  area, use the #3 needle for the calf area before the decreases, then return to the #2 to finish the stocking.  That extra stitch per inch in the calf area, allows the knitting to move with you, without seeking a path of least resistance to the ankle- just like water flowing down hill.  The secret is to make them long enough to have the elastic ride above the largest calf portion, so that it pulls in just below the knee.

Below are the charts for this stocking.

Nordic Rose Knee High Pattern

Nordic Rose Knee High Chart

Nordic Rose Heel, Toe, and Border Charts

Happy Knitting-

KT

Read Full Post »

While waiting for the postman to deliver my gorgeous yarn to make the evening purse I have planned, I decided to play around with this intriguing stitch.  But first, I had to come up with a cast on method that would allow me to work in the round from the get-go.

First, I tried my usual provisional crocheted chain.  It worked OK, as I made the first  hand bag of my design, but it still wasn’t what I was looking for.  It was very difficult to properly align the main “V” design in the pattern when knitting the first row of stitches picked up from the provisional chain.  I did it, but I was still looking for an easier way to begin.

After playing around for hours, I finally think I have something workable.  Below is a photo of my efforts.

honeycomb stitch -two color

This sample I did using a #9 needle and Sports yarn.  I wanted to see the stitch definition.  You will notice that I gradually tried using two colors.  This affect was really simple to create, as all I had to do was use the purple on my purl rounds.

Now to the cast on-

honeycomb stitch -cast on set up for purse

The photo above is the bottom edge of my sample.  I accomplished this by beginning with a knitted cast on, plus one extra stitch.  When I had 21 stitches cast on the needle, I knitted across the 21 stitches, then pulled out the cord of my circle needle between stitch 20 and 21.  With the right side up, and the cast on edge away from me, I began picking up 19 stitches in the loops at the bottom edge.  Once on, all I had to do was set up for knitting magic loop in the round, with the wrong side facing up.  For this sample I just began my first round on NA, knit 1, knit in st below, then repeated this sequence across.  the second half of the round on NB, was a repeat of the first section on NA.   The effect was that there was no definite seam line and the pattern seemed to flow right out of the bottom of the sample.

If you have never attempted this stitch before, you might want to check out the illustrations in the pdf I have uploaded for you.  I hope my drawings help.  They are an attempt at helping you to recognize that long strand that makes this pattern stitch so great.

Honeycomb Stitch Illustration

Happy Knitting

KT

Here is a photo of the purse I finished for my grand-daughter.

butterfly handbag

Read Full Post »

honeycomb handbagThe photo above is in the development stage.  I have combined the Honeycomb stitch, I-cord, and stockinet to come up with this design.  The purpose is to create a small bag for just my wallet and lipstick, etc, to take with me when going out for an evening.

honeycomb handbag- inside

As you can see, I knitted the inside in white.  Why?  I want to find what I am looking for without having to turn on the lights.:)

This bag has no seams, except the inside join in the bottom, and that was accomplished by flipping the edges to the backside (purl), joining them with a three needle bind off.

The rolled edge on the flap and the strap are created with an I-cord.

The flap has the honeycomb stitch on the right side and with stockinet stitch as the liner-constructed in the round.

The basic bag construction incorporates provisional chains of waste yarn,  short row shaping for the corners at the bottom of the bag, and knitting the Honeycomb stitch in the round, as well as back and forth.

At present, I am trying out a double knit version, so as to eliminate the need for knitting the lining separate.  By separate, I don’t mean detached.  Why?  Because all additions in this pattern come off those “great” provisional chains, so I have live stitches to begin the next section.

If you have been following this website for a while, you know that I always use this method when possible, as I base my pattern engineering on the short row heel and toe idea, and working in the round when ever possible, as to avoid seams.  I used the I-cord method described on this website for the strap.  If you want to see that, just type in “I-cord” in the search box.

I will be making a final copy of this model in black Galileo sports yarn from Knitpicks.  I will be using a silver for the lining.  The model above was made from leftover sports yarn, (from different dye lots) using a #5 circle needle.   I used about 1 1/2 skeins of the main color for this mock up, but I will probably use the full 2 skeins of the black, as I will be making the strap longer( about 30 inches).

I will post the complete pattern for you to upload as soon as I finish the final copy.

I am sending this one to my grand-daughter to play with.  I think I might even add on of my Pansies…….?  Hummmm??????  or a Butterfly………..? I think she will love it- that is if mom doesn’t snatch it first.

It has been a fun project.  I can just imagine making one of these for each one of my “evening out” outfits.

KT

Read Full Post »

This is actually post script to my last post as I realized that it might be advantageous for me to share my” re-arranging the needles” ritual.

1) Leave yarns lying between the needles.

nordic rose - rp needles 1

2) Pull right needle through, allowing stitches to rest on cord.

nordic rose - rp needles 2

3) Select point of needle exit, usually between the 12-13 stitch, or where the stitches change colors. Pinch needle together to form a small loop between the stitches.

nordic rose  - rp needles 3

4) Pull the right leg of the cord through to form a loop.  Release it.  Pull you needle back to the right to allow the chosen stitches to rest on the needle. Turn work counter clockwise.

nordic rose - rp needles 4

5) Next, bring both yarn over the top and to the back of the right needle, so they are out of the way.

nordic rose  - rp needles 5

6) Now it is time to adjust the left needle.  As it is already resting on the cord, select the section of the pattern you want to work on, then pinch the cord together at this point and gently pull the cord through to form a loop.

nordic rose  - rp needles 6

7) As before, you will pull the metal part of the needle through to the left, so that the chosen stitches now rest on the working part of the left needle.

nordic rose  - rp needles 7

8) Gently push your stitches on both needles into the “go” position.

nordic rose  - rp needles 8

Now you are on your way again.

This is my ritual, I am sure you all have your own.  I hope it helps!

One more thing- I always turn my work clockwise.

Happy knitting!

PS- I uploaded a practice chart on my last post for you to work with.

KT

Read Full Post »

While working on my Nordic Rose stocking I did a little experimenting.  Why?  The pattern for this stocking has large areas of one color, and kind of stretches the Fair Isle method to its limits.  How to handle this problem became my challenge.

The first chart section I constructed using the Fair Isle method with short floats, say at least every 3/4 inch, and established breaks on my one circle needle for NA(needle A-front) and NB(back).

The second portion of the chart I changed my needle positions to suit the pattern, allowing me to work across the design portion without any ladders to worry about.  I also did not weave in my alternate yarn color as before.   The results were stunning.

fair isle comparison

The upper section of the above photo was done in the second method, repositioning the needles as I worked around the chart.  Of course, another benefit of this method is that you yarns don’t get tangled as they remained in the same place all the time(black on the right, red on the left).

The lower section of the example where the floats were kept shorter, shows slight dimples( see photo below)in the surface. This happens no matter how loose you leave the float.

fair isle with short floats

If you use the second method and leave your float too loose, the stitches at the opposite ends of any section of the color can loosen and affect your gauge.

fair isle with long floats

The remedy-

By securing or capturing the alternate yarn at the change of the new color, and then again one stitch before the change at the other end, the float will stay in its proper place.  To make the capture of the alternate yarn on the far end of the float smooth, first stretch out the stitches to the right, then bring your yarn(black) firmly across the expanse-

1) wrap as to knit,

2)wrap main color(red) as to knit

3)unwrap alternate color(black)

4)complete stitch with main color (red).

The next stitch will be the new color (black).  Now the float will stay in place and lay horizontally(with no discernible dip) across the back of the red stitches.  I always tip the work forward to check the tension of the float before proceeding to the next section.  I make sure that everything stretches out equally.  Taking the time to do this will save you lots of headaches later.

You will notice that the diamond above is very smooth.  The long floats on the inside that I deem might pose a problem when sliding on the stocking will be tacked down with a needle and one ply of the background yarn ( in this case, red).

The process of moving the needles as I go has  eliminated the need to deal with the “ladders” of  circle needle knitting.  One thing that makes this easy is that this pattern always has a center back pattern, and the last stitch of the round completes the right side border of this section.  This lets me know where the round starts without using a marker.

Below is a photo of a new needle position, as I retain about 10-12 stitches on my right needle, and prepare the left one to knit across the rose diamond section.

nordic rose-repositioned needles

It works for me!  Give it a try. Below is a practice chart for you to try.

Nordic Rose float Practice Chart

Of course, I could do this pattern in Intarsia, as the center back stitches make an excellent point for a turn around.  Hummmmm????

Happy knitting!

KT

Read Full Post »

nordic rose knee  high for website I just finished the first sock of my new pattern.  I had originally planned to make the field black and do the roses in red, but these old eyes just couldn’t handle the dark background, so I opted instead to reverse the colors.  I like it.

This knee high pattern consists of tubular 2 by 2 cast on, fair isle knit pattern on leg and instep and a double knit heel and toe.  I also retained the center stitch down the back, sole and toe.  Below is a close up of the right side toe cap. You can see how the reverse center stitches come round to meet the top, where the unit is joined together with the Kitchener stitch.

nordic rose toe cap

Here is the wrong side view.

nordic rose inside toe cap

Here is the inside of the heel.

nordic rose inside heel

This was definitely an interesting knit.  I am at present completing the pattern instructions and will be uploading them soon.  The pattern will include several design options for the toe and heel.

The one thing that stood out to me was the necessity to break you yarns at the conclusion of the last round before setting up for the heel, and toe.

nordic rose set up for heel

The above photo shows the center stitches I have set up to begin my DK heel.  The black stitch border, just to the right of the center stitches is the last stitch of the round.  Here is where I broke off my yarns, leaving a 6 inch tail to weave in later.  I begin the DK set using 2 new yarns and #1 circular needle( which is 2 sizes smaller than the #3’s I used for the main stocking).  These new strands will complete the instep when the heel is finished, and move right on to the toe section, where the process is repeated again.

Why?  As most patterns have to do a partial round to set up your heel, this method allows you to keep the rounds even, as you will be centering your heel on the sole stitches and when finished you will be able to move right on to the next round of the instep as if you never stopped.  It also doesn’t off set your center stitches as the last round is totally completed.  You can also opt for any pattern you like on the sole-I simply used the leg chart.

It’s been fun!

Happy Knitting!

KT

Read Full Post »

While I was working on my latest sock design, I began to pay particular attention to my color change where NA(needle A) and NB (needle B) meet as I start a new round.  Normally, I make this back seam design lie in the center of NA, but this time I decided to put it at the beginning of the round.  Why?   Since these few stitches involve changing colors more often, it forms a firmer, less stretchy surface; therefore it is a great place to hide and secure any loose floats that happen to be hanging around.  By working your extra yarn across to this area, from either side, you can tuck them under and stitch them down, with no one the wiser.

Below is a photo of the area in question.

nordic rose back seam transition

You will notice that there are 5 red stitches between 2 black ones, this is the center back pattern of my Nordic Rose knee high.  These stitches are riding on NA.  NB is laying on the counter to the right, with its cord pulled across the surface of the knitting to the left.  You can see how this move frees up the stitches to lie closely together, just as if you would be working on a straight needle.   However, there is another move that is just as important, freeing the stitches at the other end of needle A to ride on the needle tip.  See photo below.

nordic rose back seam transition 2

You can see that I have pushed the stitches onto the needle tip so that they might ride smoothly on the needle itself and NOT on the cord.  With these two moves completed, I can make a smooth transition when starting my next round, eliminating any loose stitch at the beginning.

I use the same procedure when I make the transition from NA to NB in the middle of the chart.

Give it a try!

Happy knitting!

KT


Read Full Post »

nordic knee highs

Well, they are finally off the needles and covering my “tooties.”

nordic knee highs 2

I thought I might let you in on my secret of keeping them UP!

I have found that elastic thread crocheted to the inside of the top of the rib does a good job.  You might also notice, if you take the time to look at some of the commercial socks, they also use this method.

nordic knee highs- elastic finish

It is really easy to do.  Using a small crochet hook, make a slip knot in the elastic thread leaving about 6 inches for a tail.  I begin my crocheting about 2 sts down from the top edge.  I use the knit 2 sequence of the rib to anchor the crocheted chain, then chain 2 between the sections of the rib.   Slip stitch you elastic into the right leg of the first selected knit stitch, then slip stitch into the left leg of the knit stitch directly to the left.  The next step is to chain 2(which take care of the purl 2 section), then repeat the 2 slip stitches as before in the next group of knit 2’s to your left.  The tension you use to hold back on the elastic thread will determine how tight it is, so be gentle.  When you have completed the round, leave a 6 inch tail and pull the elastic through the last slip stitch.

DO NOT TIE IT OFF.

Put the stocking on, and see how it works.  If you need to tighten it a bit, then simply release the elastic, pull it out and tighten your tension a bit more.

You can work 1-3 rounds of this elastic chain, spacing the chains about 2-3 stitches apart.  I made my second round 3 stitches below the first round.

  They worked for me.

Give it a try!

nordic knee highs- paired with twine knitted mocassinsHere is a photo of these knee highs paired with my Twine knitted moccasin.

Happy knitting!!!

KT

Oh!  Be sure to check out the pattern charts I uploaded for you in my last post.  Check out “Nordic Boot Sock Ideas.”

Read Full Post »

« Newer Posts - Older Posts »