Feeds:
Posts
Comments

Archive for the ‘Uncategorized’ Category

susan's hand bag

Just thought I would let you take a peek at my latest Honeycomb purse set.  This version was made for my daughter.  Unlike the last one, I finished the edge of the flap with a single crochet using  3 strands of yarn.  The coin purse is made of the same yarn, but in a two tone version for the main body.

I am working on a pattern for you to upload, and will post it as soon as it is done.

I love the Gallileo yarn for this project.

Just sharing-KT

Read Full Post »

Well- I promised I would work on this, so here it is.

cake pan jacket

I used cotton yarn(Peaches and Cream), and 1 inch elastic (non-roll).  I also opted for a variegated MC (main color) and used a solid black for my CC(contrast color).

In the process of working on this I also discover how to make a alternating color cable cast on, which is match on on the top with and alternating color cast off, both edges mirroring each other.  I think it is pretty cool.

The main body of the knit is done in double knitting, which forms the casing for the elastic.  The elastic band is knitted right in, so when you are done-your done!

Below I have uploaded instructions for this project, in which I have included instructions for the “alternate color cable cast on, and off.  There is a swatch practice for you to use for establishing your gauge and practicing both the cast on, and cast off.

If you are not sure why you should make one or two of these “pan jackets”  then check out this post


Cake Pan Jacket

Happy knitting- KT

PS-Because of my discovery, I also can use this method to make straps for my purses.  Having the casing open on both ends will allow me to insert a piece of ribbon into the strap, stabilizing the stretching, and…..I will have two pretty edges to boot.  Yeah!!!!

Oh,just an observation-

I washed my jacket, squeezed it out, put it on my pan, blocked it out and let it dry.   Then  I  observed that the cotton yarn holds the moisture quite a bit longer than wool, so  I finally, tossed it in a low dryer.  It didn’t hurt it a bit.  I can’t wait to bake with it.  I will let you know the results.

Read Full Post »

black hand bag

The Gallileo yarn from Knitpicks really brings out the beauty of this stitch, even in black.  This particular purse measures 9 by 5.  Unlike the one I posted before, I chose to finish the flap edge with single crochet, stopping at mid point to chain up a loop for the button closure before moving on to the main body of the purse.  I similarly joined the lining and main body together, slipping in the strap ends before closing.  It worked great.  No sewing.

The button was worked on a plastic ring, single crocheting around the circumference, then adding an additional round (with increases) to make it a bit larger.

The strap on this particular purse is 40 inches long, worked as a single I-cord.  I contained the stretch ( to 45 inches)by inserting a strand of yarn through the tube and fastened it to the main body of the purse.  Once set, it seems to hold it’s length very well.  You could also insert a piece of any kind of piping or cording to accomplish the same thing.

I particularly like this length as I can wear it around my neck and drape my purse on the side of my hip, having it available at my finger tips.

black hand bag- lining

You will notice that I used the silver lining yarn as my main color in the two tone coin purse.  This is not as hard as it looks.  It comes down to setting up with the MC (in this case silver), knitting the knit rounds of the pattern in black, and the purl rounds in silver.  Yes, this is a magic loop knit, no seams in either item.

black hand bag and coin purse

 The companion coin purse measure about 4 by 3, and has a squeeze frame closure.

black hand bag coin purse-squeeze frame demo

I found the squeeze frames at “Hardware Elf.”   They have them in large and small for coin purses, and also have them for larger openings, as for the entire top of a purse.

 Everywhere I go with this purse I have had may compliments.  It only weighs 3.6 ounces.

I am working on the pattern and hope to have it available for you to upload soon.

This pattern includes working double knit on the flap, which give you the opportunity to connect the lining with the right side to avoid slippage.  By knitting a dotted lining pattern, your outside flap will hold it’s shape.  I didn’t do it on this one, but I have experimented and found I had better results with the double knitting.

This purse flap was simply stitched together by weaving in between the layers with one ply of the yarn and a sharp needle.  I did try to insert some light weight plastic mesh, but I didn’t like the results-to stiff.

Just sharing-

Happy knitting!

KT

Read Full Post »

I promised that I would upload this pattern, so here it is.  The instructions are general, as I know most of you knit socks already.  This pattern includes the following techniques – Fair Isle, tubular cast on, double knit short row heel and toe, and Kitchener closure.  I have also given instructions on how to prepare for the inserting elastic in the rib casings.    If you have forgotten what they look like, below is a photo. nordic rose knee  high for website

I have altered the pattern a bit, realigning the roses and adding rose buds at the top.  The pdf’s below are available for you to upload.

Nordic Rose Leg and Instep Chart

Nordic Rose – Knee High Pattern

Nordic Rose Hell and Toe Charts

You might want to check out my post on “Oops Becomes a Blessing.”  This post gives you more info on the elastic insertion.  I am still finding the after several washing, the stockings stay up all day.  The combo of using a larger needle for the calf area, combined with the 1/4 inch elastic rounds enclosed in the ribbing works like magic.

I you have any questions, you know where to reach me.

Happy knitting- KT

Read Full Post »

There is nothing more disheartening than to be working along with two colors on a double knit and discover that you have an uneven row on one side or the other, creating an unattractive line across the face of your knitted surface.   Some people call this “rowing out.” Who wants that??

As a rule I knit very evenly in stockinette, but when I double knit I have run into this problem.  What’s the answer?

I tried knitting with the yarns carried in one  hand, but soon knew that this was definitely NOT the answer.  Next, I tried using both hands, just as I do when color knitting.  It worked much better, but the purls were still  a bit loose.  Then, I took the time to work just a few stitches (about 16) in a swatch, examining every row.

I soon discovered that I needed to take up more slack when I purled the alternate color.  The results were stunning.  The trick- look for the purl bump.  Raise it up so that you can see it near the top of your needle.  You might even feel the yarn taking up the slack as you make the lift-I did.

If you are knitting Continental, and purling English the “purple” on the right-hand index finger below will be raising the “purl bump” toward the top of the needle.

double knitting tension 1I you are knitting English and purling Continental, then your left-hand index finger will be lifting the purl bump into position before the right hand swings the yarn back to begin the next set of yarns in the sequence.

double knitting tension 2


The results-

double knitting sample 1

No ridges

double knitting sample 2

My advice- practice this.  See what results you get.  I works for me, maybe it will work for you.

One more thing.  I don’t know if you have noticed but when you are double knitting the gauge changes.  In my experience, I find that it usually runs 6 stitches to 8 rows, instead of the 6 stitches to 9 rows that I knit in a flat pattern.  Because of this, I have uploaded both charts, as one can be used for regular color knitting and the 6 by 8’s can be used for DK knitting.  These charts are in on my “Free Patterns” page.

double knitting sample 3

As this is the first block of my “Idaho Memories Afgan”  I did not want to be dealing with this problem for 30 blocks of the design.  Now I don’t have to.  Yeah!!!!

Hope this helps-  KT

Read Full Post »

I know that many of you who come to my website are multi-talented.  Most of us who are creative do not limit ourselves to one subject, but instead find interest in anything that challenges us to learn a new thing.  To that end, I would like to share a newly discovered baking secret.

Since I started my new website devoted to creating low carb recipes, I have been perusing the web for all kinds of information on working with oat flour, and various forms of sugar replacements.  The results of all of this investment of time has been well worth it, if only for the little secret I am going to share with you.

I don’t know if you have trouble with cakes cracking, or rising more in the middle, but I have, especially with the alternate flours.  The answer to this problem is “baking pan jackets.”   The results of this discovery is the perfect layer you see in the photo below.

choco layer cake 1

If you look closely you will see that I have surrounded my pan with strips of toweling.  These strips slow down the baking process so that the cake batter bakes more evenly, thus producing a layer as seen above.

I have written a tutorial for making these “pan jackets’ so that you can share them with friends and family.  I think they would make a delightful gift.

Baking Pan Jacket

I have more information on my recipe website if you are interested.

At present I am working on a knitted version (dk), made with cotton yarn.  I will upload it when I get it done.  I know once you see these, you will be coming up with designs of your own.  One thought- as knitting stretches, elastic might not be necessary.  Hum?????????? 🙂

KT


Read Full Post »

nordic rose knee high finish 1

When I finished these “Nordic Rose” knee highs, I found that they were a bit loose for me.  At first, I just washed them in the washer and put them into the dryer to shrink them a mite.  That helped a little but they were still a tad to big around the ankle.
To compensate, I pulled them up higher, which left me with a ribbed band that was a bit long.   The fix-fold it over, encasing  1/8 th inch elastic bands to secure them around the top of the calf.

nordic rose knee high finish 2

Because I had striped the ribbing, I was able to use a crochet hook to slip stitch the opposing purl bumps  that formed the black strips together (top of photo) to form a casing for the joined  elastic band.  The next step was to slip another elastic ring over the sock in into the area just under the first casing.  Using the crochet hook again, I slip stitched the top edge of the stocking to the base of the ribbing.

The real lesson here is that because the stockings are a bit looser, and they have the elastic rings in the top to pull them in, they stay up all day.

The next time I make this design, I will plan my casings in the ribbed( using #2″s)  area, use the #3 needle for the calf area before the decreases, then return to the #2 to finish the stocking.  That extra stitch per inch in the calf area, allows the knitting to move with you, without seeking a path of least resistance to the ankle- just like water flowing down hill.  The secret is to make them long enough to have the elastic ride above the largest calf portion, so that it pulls in just below the knee.

Below are the charts for this stocking.

Nordic Rose Knee High Pattern

Nordic Rose Knee High Chart

Nordic Rose Heel, Toe, and Border Charts

Happy Knitting-

KT

Read Full Post »

While waiting for the postman to deliver my gorgeous yarn to make the evening purse I have planned, I decided to play around with this intriguing stitch.  But first, I had to come up with a cast on method that would allow me to work in the round from the get-go.

First, I tried my usual provisional crocheted chain.  It worked OK, as I made the first  hand bag of my design, but it still wasn’t what I was looking for.  It was very difficult to properly align the main “V” design in the pattern when knitting the first row of stitches picked up from the provisional chain.  I did it, but I was still looking for an easier way to begin.

After playing around for hours, I finally think I have something workable.  Below is a photo of my efforts.

honeycomb stitch -two color

This sample I did using a #9 needle and Sports yarn.  I wanted to see the stitch definition.  You will notice that I gradually tried using two colors.  This affect was really simple to create, as all I had to do was use the purple on my purl rounds.

Now to the cast on-

honeycomb stitch -cast on set up for purse

The photo above is the bottom edge of my sample.  I accomplished this by beginning with a knitted cast on, plus one extra stitch.  When I had 21 stitches cast on the needle, I knitted across the 21 stitches, then pulled out the cord of my circle needle between stitch 20 and 21.  With the right side up, and the cast on edge away from me, I began picking up 19 stitches in the loops at the bottom edge.  Once on, all I had to do was set up for knitting magic loop in the round, with the wrong side facing up.  For this sample I just began my first round on NA, knit 1, knit in st below, then repeated this sequence across.  the second half of the round on NB, was a repeat of the first section on NA.   The effect was that there was no definite seam line and the pattern seemed to flow right out of the bottom of the sample.

If you have never attempted this stitch before, you might want to check out the illustrations in the pdf I have uploaded for you.  I hope my drawings help.  They are an attempt at helping you to recognize that long strand that makes this pattern stitch so great.

Honeycomb Stitch Illustration

Happy Knitting

KT

Here is a photo of the purse I finished for my grand-daughter.

butterfly handbag

Read Full Post »

Since my last post, I have been playing around with the idea of double knitting the handbag. Below is a sample of my efforts.

Double Knit Hand bag Sample

Right side- Honeycomb

Wrong side = Stockinette

double knit honeycomb sample

Above is the outside (or right side) knit in the honeycomb stitch.

double knit  hand bag inner lining

Here you can see the lining of the handbag in white.  It is knit in  the stockinette stitch.  It really wasn’t as hard as I thought it might be.  You only have to work with both yarns every other round.  The second and fourth rounds require that you work the yarns separately, as the honeycomb stitch is purled in those rounds.

The Stuffed I-cord

Now, the next sample is the result of working out the idea of a “stuffed” I-cord.  This creates a true cording that will stand up along the edge, and is worked from the back side of the fabric.  In this sample I cast on 3 extra stitches, connecting the 4th st with the 5 fth by knitting them together through the back loop.

stuffed I-cord

*I just knit this up on the spur of the moment so I knitted the I-cord onto a swatch I had been working on, so that’s why you see the wrong side of the fabric.

Before bringing the yarn across the back I inserted 3 strands of the purple.  To keep it in its proper place, I only had to make sure to bring the working yarn(white) under neath the 3 strands before pulling it across to knit the next section of the I-cord.

stuffed I-cord - 2

Here is a top view.  You can see that the tube is nicely rounded.  I am definitely going to try it on one of my pillows.

I will also use the same color yarn to fill the center, that way nothing will show through.  You could also use commercial cotton cording if you prefer.

Just thought I would share.

I can’t wait to get the yarn for the final version of my handbag.  🙂

KT

Read Full Post »

honeycomb handbag
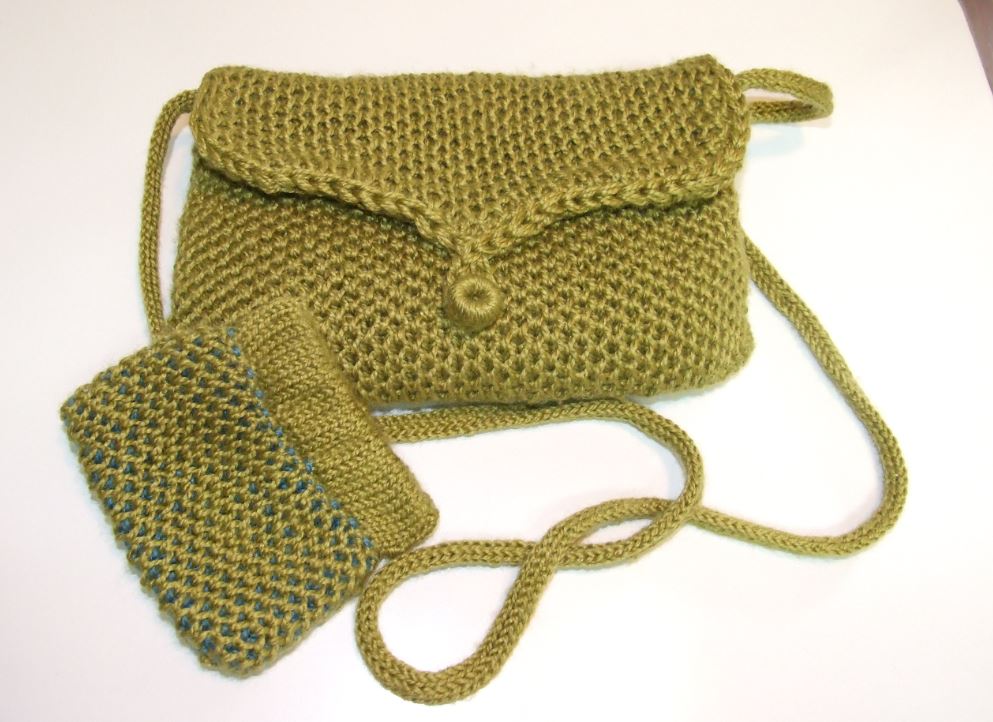
The photo above is in the development stage.  I have combined the Honeycomb stitch, I-cord, and stockinet to come up with this design.  The purpose is to create a small bag for just my wallet and lipstick, etc, to take with me when going out for an evening.

honeycomb handbag- inside

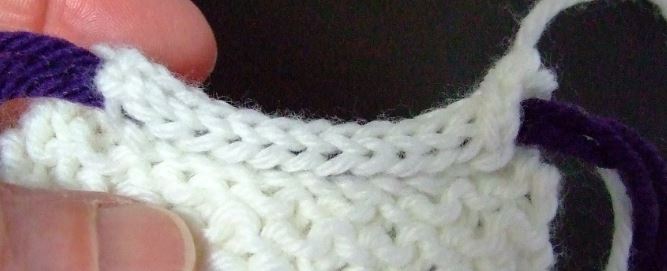
As you can see, I knitted the inside in white.  Why?  I want to find what I am looking for without having to turn on the lights.:)

This bag has no seams, except the inside join in the bottom, and that was accomplished by flipping the edges to the backside (purl), joining them with a three needle bind off.

The rolled edge on the flap and the strap are created with an I-cord.

The flap has the honeycomb stitch on the right side and with stockinet stitch as the liner-constructed in the round.

The basic bag construction incorporates provisional chains of waste yarn,  short row shaping for the corners at the bottom of the bag, and knitting the Honeycomb stitch in the round, as well as back and forth.

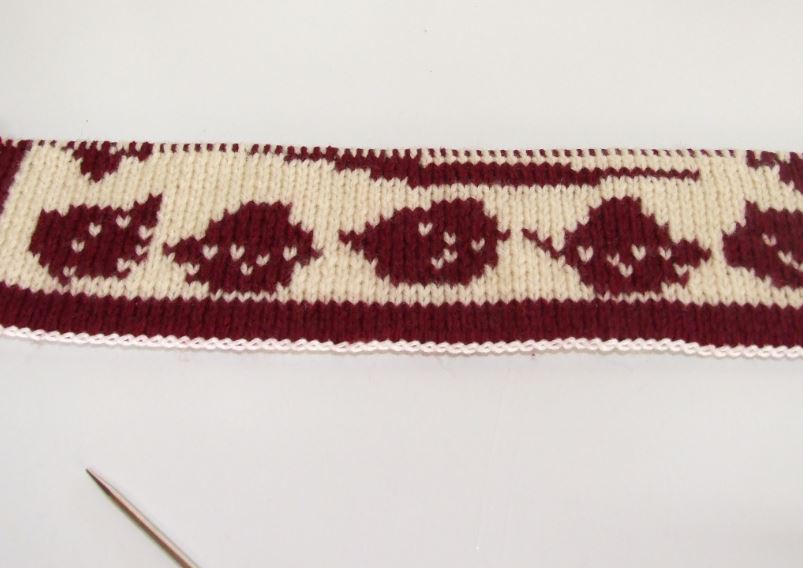
At present, I am trying out a double knit version, so as to eliminate the need for knitting the lining separate.  By separate, I don’t mean detached.  Why?  Because all additions in this pattern come off those “great” provisional chains, so I have live stitches to begin the next section.

If you have been following this website for a while, you know that I always use this method when possible, as I base my pattern engineering on the short row heel and toe idea, and working in the round when ever possible, as to avoid seams.  I used the I-cord method described on this website for the strap.  If you want to see that, just type in “I-cord” in the search box.

I will be making a final copy of this model in black Galileo sports yarn from Knitpicks.  I will be using a silver for the lining.  The model above was made from leftover sports yarn, (from different dye lots) using a #5 circle needle.   I used about 1 1/2 skeins of the main color for this mock up, but I will probably use the full 2 skeins of the black, as I will be making the strap longer( about 30 inches).

I will post the complete pattern for you to upload as soon as I finish the final copy.

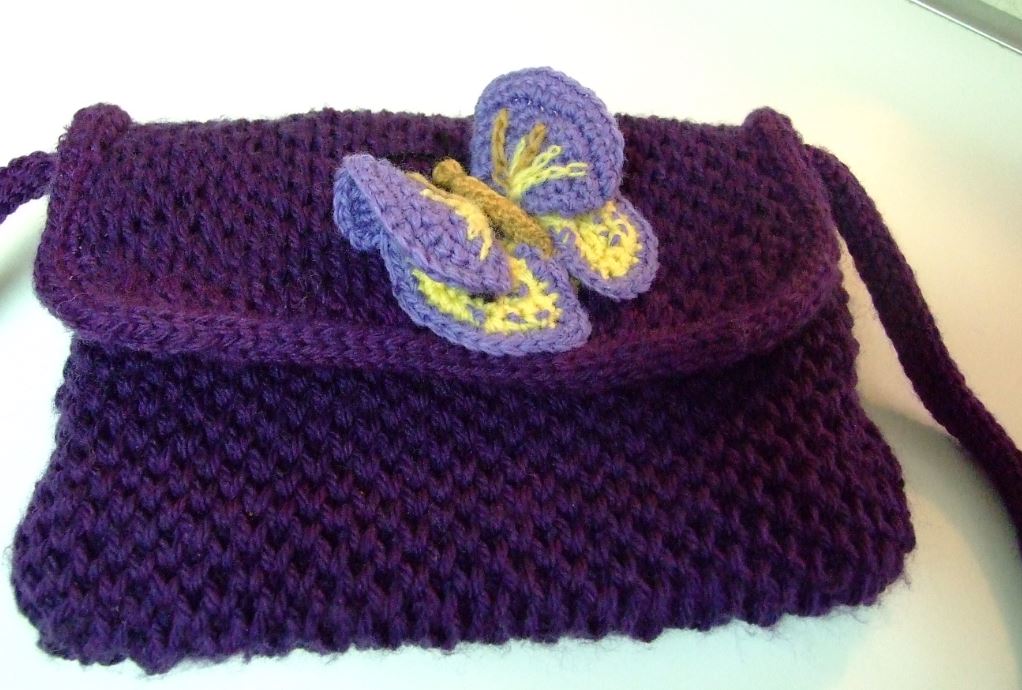
I am sending this one to my grand-daughter to play with.  I think I might even add on of my Pansies…….?  Hummmm??????  or a Butterfly………..? I think she will love it- that is if mom doesn’t snatch it first.

It has been a fun project.  I can just imagine making one of these for each one of my “evening out” outfits.

KT

Read Full Post »

« Newer Posts - Older Posts »