Feeds:
Posts
Comments

Posts Tagged ‘fiber arts’

Since I got into the “slipper mode” a few weeks ago, I have been playing around with ideas to warm my cold feet.  The howling winds outside and the snow covering the ground, are constant reminded to get busy, so I forged ahead.

Tonight I finally finished my new design, for a partially felted slipper.  Why, partially?  Its sole and sides are felted, while the upper toe and instep area is twined knitted in wool.  The ankle and upper leg are ribbed, then the leg warmer cuff is knitted with a fun fur and 4 ply wool knitted together.  It will be after the holidays before I get the pattern written up, but thought you might like to see it anyway.

felted slipper with leg warmer cuff

The leg warmer section can be as long as you like.  I’ve already decided I will make this section about 12 inches, so I can pull it up when things get really cold; otherwise it just stacks neatly on the top of the foot.

felted slipper with leg warmer cuf 2 f

As you can see in the photo, I used two colors in the felted area, while using two strands of black in the sole.

Below is a peek at the felted section before the knitted upper toe and instep area was attached.

felted slipper before upper toe attached

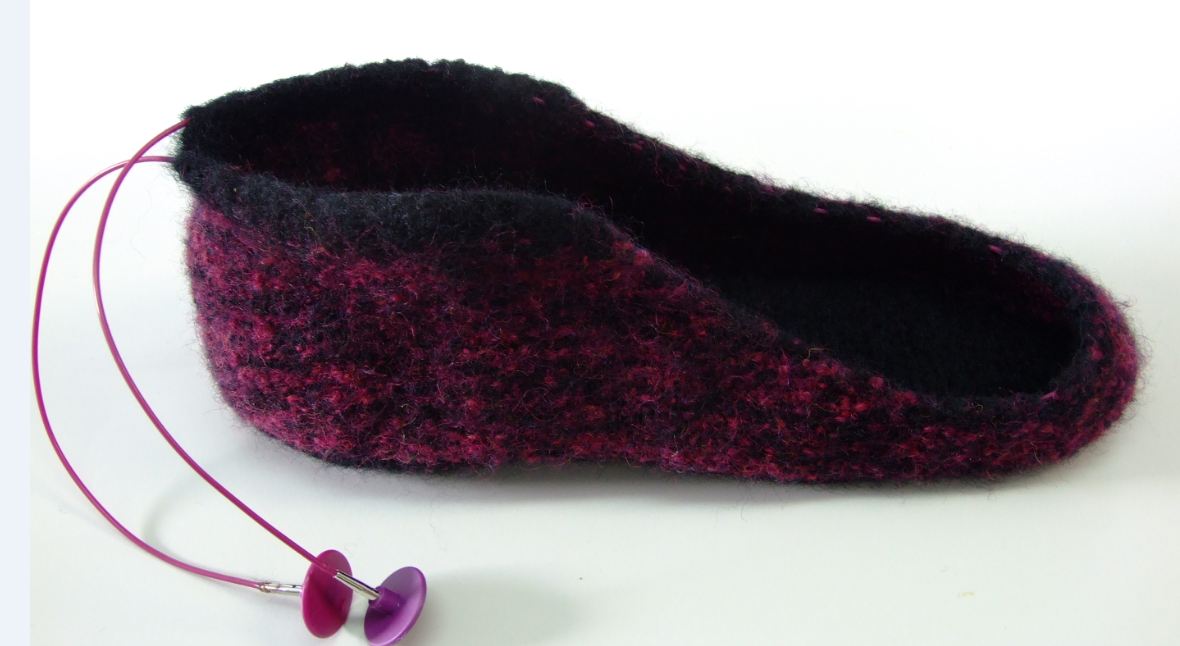
I felted this by hand, leaving the circle needle cords in the finishing stitches.

It was a fun project.

KT

Read Full Post »

This project has been particularly interesting, as I not only had fun knitting Intarsia , Armenian knitting and Fair Isle, but I also was able to combine three different types of yarns in this design.  The border was done in fingering yarn with lace weight wool and silk strands of  free floating chains riding over the top.

The chicks were especially fun to do with a combination of Aloft mohair, added to a ply of fingering yarn.  Their  3D look was accomplished by adding an additional  two strands of the black mohair to the belly and wing area.  Adding these extra strands automatically increased the gauge without changing the stitch count.  I was able to restore the  gauge around the area by filling the void with poly fill stuffing, then running a few strands of lace weight across the back, side to side, and top to bottom.   Taking up the slack with these strands, allowed me to contract the surrounding stitches back to their proper gauge.  The next move after blocking the top was covering the back with nylon net, (great stuff, by the way) and stitching around the expanded portion of the chicks,so that it would remain securely in place.

The  combination of the Mohair and the 3 D affect  made my chicks look like the little “fuzz balls” they really are.     They are the first thing people touch when they pick up the pillow and comment, ” Oh my gosh!  They look so real!”  And so they do.

The details on the legs, feet, and beak were done with duplicate stitches and crocheted chains of one and two plies of the various yarns.   The various shades on the hen are yarns that have been blended, using  of one ply of each color that have been hand spun back together.   Check out my post on blending yarns if you are interested .

So….the most clarifying  statement I can make about this pillow is that I was never bored knitting it.  It definitely was a challenge to my adventurous knitting spirit.

I also loved working with the free floating chains on the frame of the picture.  Of course as I looked at it more closely I realized this free floating chain pattern would look great on the bottom of a tunic, or the cuff area of a sleeve, or……..  Hummm????  Maybe?   …….

I have included a  tutorial describing the entire process with this  pattern.  I even included charts for practicing the process.  This tutorial is also on my “Fun Stuff”page.  It includes a sample swatch chart of the border for you to practice with.  Enjoy!

At present the pattern is available  in my Ravelry  and Etsy stores.

Again, it was an extremely fun knit.

Happy Knitting

KT

Read Full Post »

During the process of knitting up my Sebright Hen and Chicks pillow, I have come up with some things that have made the project much easier.   The first thing is my “Knitting Palette.”  It is a 30 stitch sample of the yarns, and blends of yarn that I have chosen to use in the pattern.  By first experimenting with the colors, I was able to begin knitting on the picture, confident that the colors I chose would work.   Below is a photo of the sample that I uploaded to my Serif publishing program.  Once in Serif, I was able to label the colors and save the sample for future reference.


I have boxed the various shades with colored borders and written a description on the right.  The bottom section is a mix of Mohair lace weight and fingering yarn.  This blend of the two types of yarn added a bit of reality to my little “fuzz ball” chicks.  It worked great.   I even varied the amount of strands to see what it would do.


By adding an extra strand of the Mohair lace weight I was able to create a “relief sculpture” affect to the wing and belly area.   This expanded area is retracted to its proper gauge, by creating a yarn web across the back which is stuffed with a bit pf Polyfill.

And yes,  that’s” Scratch” on the ground, created by making small bobbles of blended yarn.  I got a kick out of making those.  Sorry for the side track – now back to the Yarn Palette.

The top half is the shades of color I chose  for my Sebright hen.  I began with Suede alone, knitted 4 rows.  Next, I blended one ply of Suede with one ply of Brass Heather.  That gave me a slightly darker golden tone.  The next 4 rows were done with Brass Heather alone.   In the blue section I blended Brass Heather and Doe, but this combo didn’t lead to much of a change. (scratch that one).  The next combo gave me a darker shade- yes, Brass Heather and Bison will do it.  All this prep took time, but I didn’t need to guess how it would look .  I worked for me!  by the way, the colors mentioned above are all from Knitpicks.com.

The next aid that really helped me was my MUSIC STAND.  Yep!  There it was, sitting there next to my harp doing nothing (I play mostly from memory anyway) and the light went on in my head, “Wait, you can use that to put your chart on.”  And so I did.  Now it is not sliding off my lap so I have to chase it all over the floor.

Little things mean a lot!!!!!

Just thought I’d share.

Happy Knitting

KT


Read Full Post »

I have a friend who is wild, and I mean “wild” about her chickens.  Having decided some time ago to design her a special pillow, I finally came to the conclusion that only a “chicken” would do.  Now, she isn’t into the average chickens, she prefers the exotic, and unusual, so enter the Golden Sebright Hen and Chicks.

This new design not only gives me a chance to do the many techniques of color knitting, but also gives me an opportunity to use various kinds of yarns for special affects.  The chicks are really little fuzz balls, so Mohair will give them a more realistic look.  The spotted area you see in the design is actually going to be a blend of black Mohair and one ply of beige grey fingering yarn.  I will also be using White Mohair on the chests.

The border was another matter altogether.  I wanted a lacy grid in the design you see, but cabling the black fingering yarn over the bronze, was much to bulky looking.  What to do?  I began to think “lace.”    I pulled out my lace silk and wool cone, and went to work, using white in the background, I worked “floating” chain loops between the stitches to form the design I drew on the pattern.  Here is the result.

This gave me the affect I wanted.  So I am now waiting for the Black lace yarn to be delivered, so I can get started.  Meanwhile, I will be knitting up swatches of the various shades and combination shades that I will be using in the main design, and recording them in my color chart for later use.

If you might be interested in learning how to knit these free floating chains, take a look at the “Wandering Chains” tutorial on my “Fun Stuff” page, or you can use this Floating chains tutorial.  I will be add to the info as I work on this project and develop the pattern for sale.

Just thought I would share –

Knit-tweaker

Read Full Post »

I was so glad to get this one done so I could send it to my grandson.  He has been checking on it’s progress the last few months, so now he won’t have to wait anymore.

I had great fun knitting this one.  I even knitted some extra leaves, which I placed in the front of the duck, stuffing them a bit to give it a 3 dimensional look.

One other thing I did differently from the last pillow was to make my own pillow form.  I discovered that most of the forms  (no matter what you pay for them) are made with clumps of fiber fill, often leaving a lumpy surface.  Of course, that is unacceptable when you have spent many hours working on one of these pillow tops.  The only solution-make it yourself.

I began the process with a sheet of Poly-fill quilt batting.   I cut two 17 inch squares, then machine sewed them together on three sides, using a long stitch.   I stuffed the middle with tiny pieces of fill, poked them in place with a #1 DPN, then whipped the open edge shut.  You could even use two thickness (sheets) for each side to unsure an even smoother surface.   Anyway, it  worked great.  It will also dry much faster as there is no cloth on the inside.

I will be making all my pillow forms from now on.

Now it’s time to box it up and head to the UPS store.  My grandson will be a happy camper!

I hope to have this pillow pattern available soon.  I will be starting my J’s Designer Pillow page soon.

KT

Read Full Post »

One of the techniques I use to shape my pillow tops is to block them on the needles.   I use the cords of two 47 inch circle needles.  Needle A, goes across the top and down the left side.  Needle B holds the stitches across the bottom and up the right side.  This allows me to use the cords as blocking rods.  Below is a picture of my latest Needlepoint Knitting pillow top.  This one is for my grandson, who is a mighty hunter. 🙂

The stitches have been picked up on the edges and are set up to knit the tubing for my corded edge.  This process is completed before I wash the top.   Notice the cord loops in the corners;  needle A, in the upper left corner, and needle B in the lower right corner.  These loops free the cord, allowing me to pull the edges straight.   To secure the pillow top in place,  I use T pins.  It works great.

When dry,  I will be knitting the tubing using the same method used for working with 2 circle needles in the round.  You can find this method by typing in “socks on two circles,” or “knitting with two circle needles,” in you search engine.   There are some good videos on YouTube.

Thought you might like to see this-thought it might be helpful.

Happy knitting- KT

Read Full Post »

Unable to purchase all the necessary shades I needed to knit up the Wood Duck pillow for my grandson, I decided to make up my own by blending two single strands of colors together.   In the illustration below, the areas where I have used the blended yarns are marked with circles of various colors.

The red circle indicates the Steel grey/ Iris heather mix.


The next combination  in the green circle, is a teal/dark green mix.


The blue circle marks the side of the body.  In this section I chose to blend the Suede color with gold.  This combination allowed me to transition to the single gold color without a definite line.

All this is to say that you don’t have to settle for the color combinations that are out there.  You can blend your own.

HOW ?

1.  Select you colors.  Peel off the amount you normally use in your colorwork ( I use about an arm’s length).

2  Separate the plies.

3.  Tie one end of the two strands together.

4.  Lay the joined end of the two strands in the palm of your left hand.

5.  Lick or moisten the palm of your right hand and rub the two strands together vigorously for about 30 seconds-

inotherwords, “spit splice” the strands together.

6. Wet your right palm again, now push down on the combined strand and roll it away from you about 5-6 time.  This sets the twist.

7.  Move the blended strand to the left, so you can work the same process in the next section of yarn to your right.  Be sure to repeat the same number of rolls when setting the twist.  Continue this process to the end of the strand.

Your finished strand should look something like this-

The above strand is a combination of “Pumice Heather ” and “Iris Heather.”

*  If you find an area that didn’t get twisted enough, just wet you palm and work a few more rolls at that point.

Next time you can’t find the color you need, you might try this out.  It’s fun to see what color combos you can come up with.  When I need larger amounts, I use a drop spindle to re-spin the two strands together.

Have fun- KT

Read Full Post »

It definitely is Spring around here, as the wild  flowers are blooming and the mountains are turning green.  Add this to the birds singing and the butterflies checking out the blooms and next thing you know I found myself drawing up a new pillow design of daisies and butterflies.

As before, this chart is gauged for 8 stitches and 11 rows, knitted with fingering yarn.  I will be using Knitpicks Palette yarn for this design.  The chart for the detailed crocheted lines and specialty stitches are included in the download.  The knitted cording instructions are in the PDF file listed below.

Of course, you can use the center motif on other projects.  Here is the pattern – daisies and butterfly pillow

For knitted cording instructions, Knitted Cording Instructions   This file includes instructions for joining knitted back.

Give it a try –

KT

Read Full Post »

Yesterday, I received my order from Knitpicks.   The box contained all the yarns I had recently ordered for the next two pillow tops I have planned.


As you can imagine from my previous posts on ” Needle Point  Knitting,”  I have drawers of Palette colors at my disposal.   So here I sit with still more to stuff in the corners.   But…. this time I am going to be smarter than before.  I have decided to catalog all my colors.  Why?  Using Pattern Maker to create my pillow top charts, requires that I choose  DMC colors for my palette; therefore, I need to be able to cross reference the colors available to me in the selection of Knitpicks “Palette” fingering yarns.    With that in mind, I took the time to make my life easier by taking care of the issue TODAY.

To get started, I picked up a couple of pieces of card stock, grab the scissors, and some school glue.  Next, I pasted some index cards on the surface, one for each category of the main colors, such as browns, reds, greens, etc.

As you can see from the photo, I  wrote the name of the color on the left, and pasted a double strand of yarn to the right of it.  The next step was matching it to the DMC chart, and writing down the number of the corresponding color.

I will tell you that you won’t be able to match them all, but you will be able to match them close enough that when you select the colors to use in PM, what you see will be very close to what you get.

I know this takes a bit of time, but it is well worth it.


Happy Knitting – KT

Read Full Post »

I can see from the response to my last post, that I need to write up separate instructions for this process.  This knitted cording can be done on any pillow you are knitting.  Even though I have assembled it with a cloth back, you can make a tubing for one with both sides knitted by incorporating the pick up stitches from the knitted back with the purl bars picked up in closing the tubing as instructed in the tutorial.

However, another option uses the double knitting technique, and a Kitchener stitch closure.  I will work out a tutorial for this soon, as I have a heart shaped pillow planned and this one will require a knitted back.

Knitted Cording Instructions


The next addition to the “Wild Life Series” is a Wood duck.  Vibrantly colored, with defined color changes, it is one of my favorite patterns.  I will be using different stitches to add texture and detail to the finished piece.  My yarn is ordered and I am anxiously waiting it’s arrival.

Hummm…..??????  I wonder what color border I should put on this one?

 Happy Knitting!

KT

Read Full Post »

« Newer Posts - Older Posts »