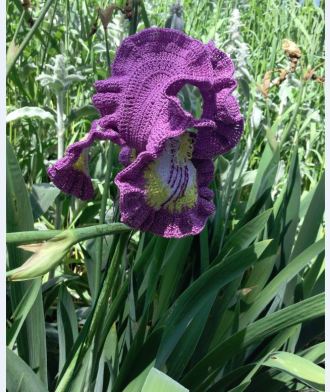
Above is the top and bottom surface of a real Morpho butterfly

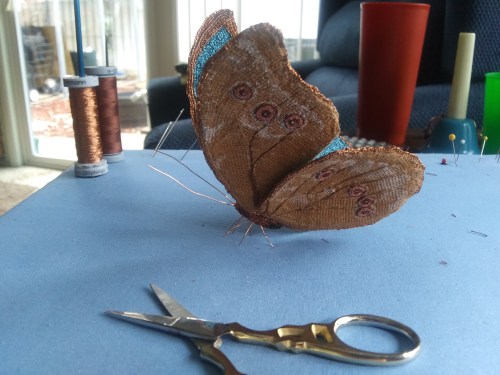
This is the top surface of a crocheted Morpho using 2 strands of Gutermann metallic sewing thread. In the proper light it shines just like the real one. You will notice that there are NO holes. Raised slip stitches create the vein definitions. The top and bottom wings are wired on the upper edge, and the bottom wings on the inside edge.
This is not a project for the impatient, but for those of you who are into detail work it is quite rewarding. I have had a request for a pattern for my butterflies, but honestly there is no way I can do that, as each one is totally different. That said, I am going to begin a series of posts (one bite at a time)on how I go about the process, and will give you the steps you need to take in order to begin your own butterfly journey.
To Begin-
SETUP STATION
I built myself a setup station which enables me to have everything at hand. The platform is made of 2-3 inch form, 12 by 12. It is covered with a cotton fabric, and pinned in place.

You will note that I have pins in the upper right corner, threads at the left and my template in the middle. These pins are used to check the progress of each vein, as I pin them in their place after each few stitches.
At the present the thread you see is sewing thread from Germany. The template is for the bottom side of the Morpho, (Yes, this butterfly has completely different design on the bottom side). What can I say, I am a gluten for punishment. 🙂
Back to the platform. I used double pointed knitting needles for thread holders. Once I decided where I wanted them, I snipped through the fabric and pushed them in. * If you want to have a more firm bottom you can add a piece of heavy cardboard to the bottom of the foam before covering.
Supplies
I begin with my head piece. It has a light and magnification lense that helps me see the small threads . As for thread and hooks, all my butterflies are made with crochet threads from size 40 or 80, and metallic machine embroidery threads( Gutermann seems to hold up well for me). I usually use a size .06 or .09 hook depending on the thread size. I use size 36 wire in the upper and lower wings.
Basic Stitch
I had to come up with a stitch that allowed me to have a flat solid surface for each vein of the wing. Working back an forth with the normal crochet stitch did not do it for me, so I tried a few things and came up with a stitch that gave me a more woven design. I also needed a flat firm surface on which I could paint, or embroidery the tiny designs required to make them look real. As you are aware, threads have their defined edges, so blending colors is difficult-solution paint (acrylic, and fingernail polish).

The Basketweave Stitch
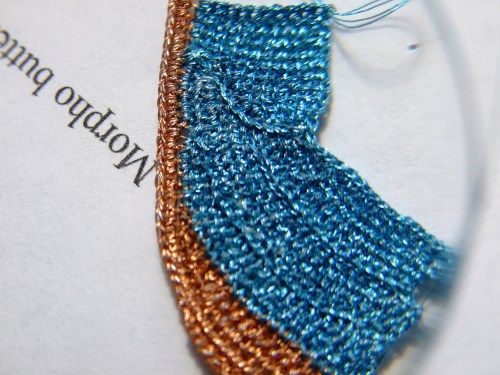
In the photo above you can see the vertical lines that make up the “weft” portion of the weave. In the photo below I have used a red thread to make these lines stand out.

This stitch or process is accomplished by picking up the number of loops required through the previous loops around the post of the previous stitch. In the case of this sample, I have picked up the 2 loops required for my treble crochet through the 2 loops made around the previous post of the treble crochet.

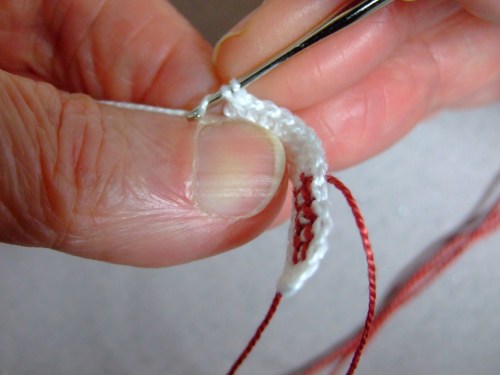
The second loop is pick up the same way. You work the remainder of the stitch normally, making sure to make the first part of the stitch firm at the base. This stitch is only limited by the length of the throat of your crochet hook. I have had as high as 14 loops on my hook, using sewing thread and a .06 crochet hook.
Give it a try. Do some crochet swatching.
with size 20 crochet thread and 1.50 hook, chain up 20 stitches and work one row of sc. Chain 1, and reverse slip stitch through both legs of each stitch to the beginning( this keeps you working on the right side of the fabric). Ch 4, pick up 2 loops in chain, work treble crochet; next, pick up 2 loops of through previous stitch(“wefts”) complete stitch as before. Proceed down the row, crocheting in the back loops(2) of the slipped st. * Be sure to allow your loops to ride on the hook smoothly, do not pull them too tight.
Next, ch 5, pick up 3 loops in chain, work dtr, across as before. Repeat slip stitch return. Chain 6, pick up 4 loops, and proceed as before.

Working in the back loops of the slipped st row, repeat this process adding on more chain and one more loop at the start of each row until you have as many loops(wefts) on your hook as you can work comfortably.

I am working on a tutorial for this stitch and will post it soon. It will include instructions on how to make various shaped beginnings and endings, How to increase and decrease, and how to connect the various parts of veins to one another.
My entire Morpho was done with this stitch. It worked well.
Here endeth the lesson for today!
KT
Read Full Post »